Routes contain references to transformers, processes,
and outlets. A route describes the path that a document takes during
its passage through the system, after the inlet converts the input
message to a document that can be processed. Multiple routes can
be defined for the same channel if required, but only one route
is executed. The executed route is the first route in the processing
order that meets the condition criteria for the document or is a
default route if no condition is met.
Transformers contain a transform component such as information
to a common format suitable for general business processing. For
example, similar messages from two trading partners might differ
slightly in format; a common format is often desirable for business processing.
Transforms are constructed using iWay Transformer. For more information,
see the iWay Transformer User’s Guide.
Processes perform the actual business operations on the document.
A business process is composed of one or more services, with appropriate
switching, testing, iteration, and error handling. Processes can
call on other processes and web services, and in turn can be packaged
as web services for external consumption. Business processes are constructed
using iWay Designer. For more information, see the iWay
Designer User’s Guide.
Outlets pass the processed document to one or more designated
recipients. They convert the document to a transport format and
then emit the message.
x
Procedure: How to Define a Route
To
define a route using the iWay Service Manager Administration Console:
-
In the
left console pane of the Registry menu, select Routes.
The Routes pane opens.
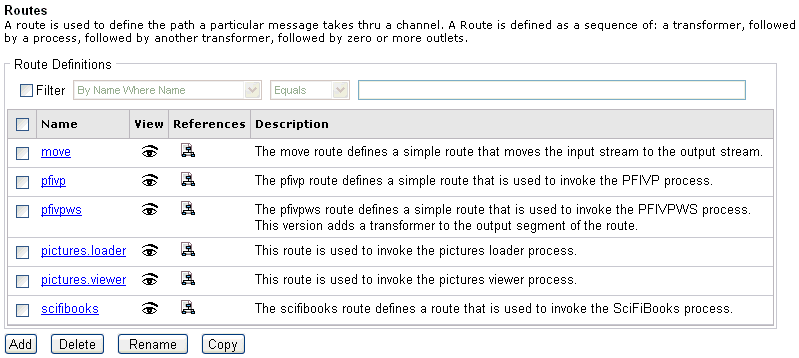
The table that is
provided lists each route that is defined with a brief description. If
you click the document schematic icon in the References column for
a specific route, you will see which components are referencing
that route. (If you click the eye icon in the View column for a
specific route, and then the process icon between the two arrows, you
will see a visual depiction of that route.)
-
Click Add.
The New Route Definition pane opens.

-
Enter
a name, for example, SampleRoute, and description for the route.
-
Click Finish.
The Construct Route pane opens.

The table that is
provided is used to list the components that are currently registered
with the route.
-
Click Add.
The Select component type pane opens.
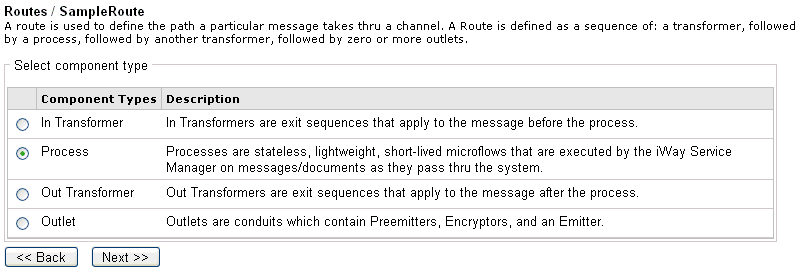
The
table that is provided lists the component types you can select
and register with the route you are defining.
-
In Transformer -
Exit sequences that apply to a message before processing occurs.
-
Process -
Stateless, lightweight, and short-lived microflows that are executed
by iWay Service Manager on messages and documents as they pass through
the system. The simplest process contains a move service, which
is first placed into a flow then added to a process.
-
Out Transformer -
Exit sequences that apply to the message after processing occurs.
-
Outlet -
Conduits that consist of Preemitters, Encryptors, and Emitters.
Note: Each route that is being defined is required
to have a registered process. The remaining components are optional
during route configuration. For more information on creating a component,
see Configuring iWay Registry Components.
-
Select Process from
the list of component types and click Next.
The Select a process definition pane opens.
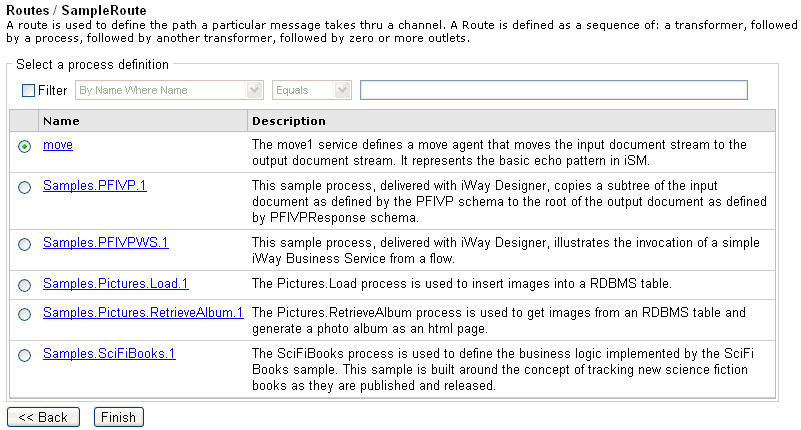
The
table that is provided lists existing process flows you can select
for the route you are defining.
-
Select move and
click Finish.
You are returned to the Construct Route pane, which now
includes the process (move) you registered with your route (SampleRoute).

You can now add additional
components, such as a transformer or an outlet.
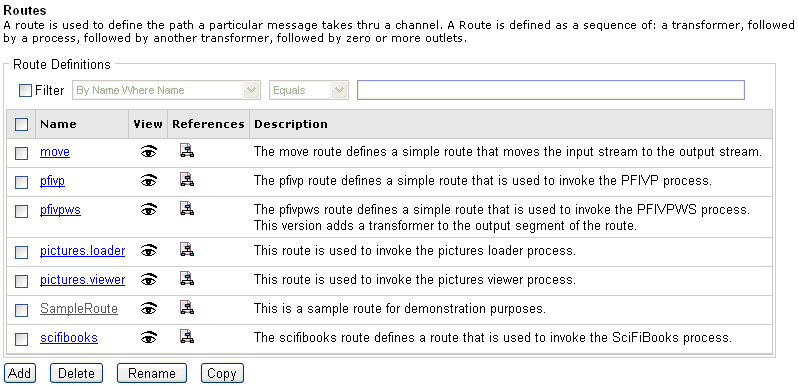
If you return
to the main Routes pane, you will notice that the route you just
defined (SampleRoute) has been added to the list, as shown in the
following image.
x
Procedure: How to Modify a Route
You
can modify a route by changing one of the components already defined
for the route or by adding new components.
Note: If
you change one of the components assigned to a route, such as a process,
the component will be changed in the registry, not only in the particular
route you are modifying.
To modify a route:

-
Click
the name of the route you wish to modify in the main Routes pane,
for example, SampleRoute.
The Construct Route pane opens.

The table that is
provided shows the component that has been registered for the route
you are modifying. In this example, the move process is used.
-
Modify
the route as required:
The table that is provided lists components that are currently
assigned to the selected process.
- To change one
of the components already defined, such as a process, in this case
the move process, click the name of the component.
The Construct
Process pane for the move process opens.

- To add a new
component, such as an In Transformer, an Out Transformer, or an
Outlet, select the component type and click Next.
For
more information on transforms, see Configuring iWay Registry Components.
-
Click
the move1 service.
The Component Properties pane opens.

-
Make
your changes to the service properties as required and click Update or
select the component you wish to add and click Finish.
The route is now modified.
x
Procedure: How to Delete a Route
To
delete a route:

-
Click
the check box next to the route you wish to delete, for example,
SampleRoute.
-
Click Delete.
A confirmation dialog box opens, prompting you to confirm
the deletion of the route.
-
Click OK.
The route is deleted from the system.
Tip: To
delete more than one route at once, you can select multiple check boxes
in the Routes pane and click Delete.
x
Procedure: How to Rename a Route
To
rename an route:

-
Click
the check box next to the route you wish to rename, for example,
SampleRoute.
-
Click Rename.
The Rename pane opens.

-
Type
a name, for example, TestRoute, in the New Name field and click Finish.
You are returned to the main Routes pane.

The
new name for the route you provided is shown.
x
Procedure: How to Copy a Route
To
copy a route:

-
Click
the check box next to the route you wish to copy, for example, SampleRoute.
-
Click Copy.
A copy of the route is made, as shown in the following
image.

Making copies of a
route is useful for versioning and testing purposes.
Tip: To
copy more than one route at once, you can select multiple check boxes
in the Routes pane and click Copy.
x
iWay Service Manager provides mechanisms to support
routing strategies. This section describes how you can use iSM to
execute business logic and route documents to a particular location.
The following topics are provided:
- Modifying the
processing order when multiple routes are used in a channel.
- Setting default
routes.
- Adding conditions
to routes.
x
Procedure: How to Modify the Route Processing Order
The
route processing order depends on how the routes are configured
after they are added to a channel. The routing order can be modified
by reordering the position of a route on the list. During runtime,
only the first route that meets the condition or is a default route
is executed. The ordering of the routes implies that the conditions
of the routes will be checked based on the order. In this case,
the first instance of the route to meet the condition will be executed
or the default route will be executed.
-
Open
the channel you want to edit.
-
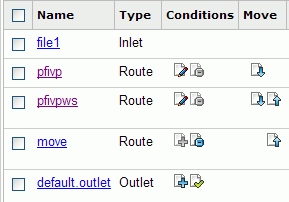
In the
move channel, click either the up or down icon to modify the order of
routes.
The following image shows the order of routes before the
modification.
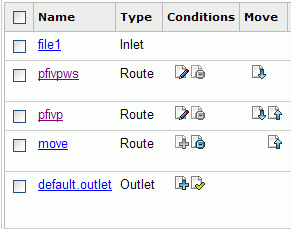
The
following image shows the order of routes after the pfivpws route
was moved up.
-
You
can continue to edit the channel if necessary, or click Build to
build the modified channel.
x
Procedure: How to Set Default Routes
As
a best practice, set one of the routes as a default to ensure the
document is processed if none of the specified conditions are met.
If no default route is set, then a warning message is displayed
when you build the channel and the document is not be processed
at run time. If conditions are assigned to the route(s) on a channel
and if a document does not meet the assigned conditions, then the
document is processed by the default route.
The placement
of the default route matters if there are no conditions on the routes assigned
to a channel.
-
Open
the channel you want to edit.
-
Click
the set default icon in the Conditions column
in the route that you want to designate as the default.
The following image shows the set default icon.

The set default icon
on the route you modified now appears as active.
x
As a document moves through a channel, you can apply
conditions to the routes assigned to the channel to direct the flow
of the document dynamically based on the document's contents. The
particular route that the document takes is therefore selected based
on whether the document matches the conditions. If none of the conditions
on the route(s) is met, the document will be handled by the default
route. If no default route is set, the message will not be handled.
You can also control the routing of a document by specifying
whether a channel allows fixed or dynamic routing. If the routing
on a channel is set to fixed, a selected route in the channel remains
in force for the duration of the messaging process. Dynamic routing,
which is the default when a channel is created, allows the channel
to evaluate the message at each stage in the document processing
to determine which route to use. For more information on fixed and
dynamic routing, see Specifying Fixed or Dynamic Routing.
The conditional routing and test feature supports complex expressions
and a wide range of tests that can be performed. It compiles a complex
expression the first time that it is encountered and uses the compilation
in subsequent testing. This feature results in faster processing.
A requirement of conditional routing is that the function return
a value of true or false, as do the COND(), ALL(), and ANY() functions
as well as the _IS and _HAS functions.
You can use other functions that return a value and test their
result in the COND(), ALL(), and ANY() function. Examples include
the _LENGTH() and _SUBSTR() functions.
For more information on using functions, see the iWay Service
Manager Component and Functional Language Reference Guide.
x
Procedure: How to Add or Edit Conditions on Routes
You
add conditions to routes after the route has been added to a channel.
In this way, you can reuse routes that have already been defined
and customize them to perform the document processing required by
each channel.
-
Open
the channel you want to modify.
-
In the
Conditions column for the route you want to modify, click the icon in
the left of the column, either the icon with the plus sign or with
the pencil, depending on whether conditions already exist for the
route.
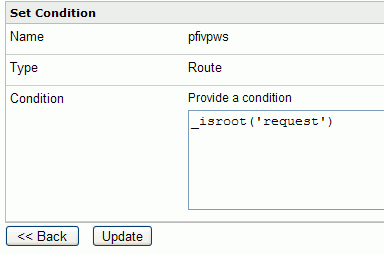
The Set Condition pane appears, as shown in the following
image.
If no condition is
set, iWay Service Manager first checks the route tag in the document
to see if it matches the route name.
-
Specify
the condition and click Update.
The route is updated with the condition.
-
Click
Back to return to the channel pane.


