In this section: |
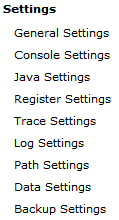
In the left console pane of the Server menu, the Settings group contains links to the following iSM settings you can configure:
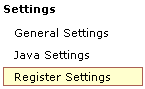
The following image shows the available links that are available under the Settings group in the iWay Service Manager Administration Console.
The following sections describes how to configure each of the settings that are available.
Using the iWay Service Manager Administration Console, you can configure general settings that are used by the base configuration of the server.
To configure general settings:
The General Settings pane opens, as shown in the following image.
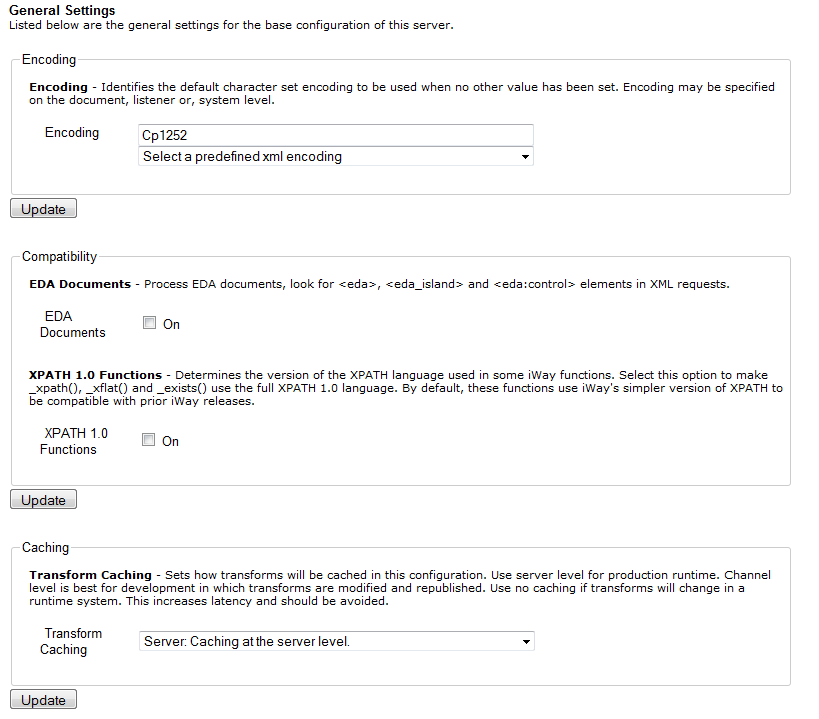
The following table lists and describes the available general settings.
|
Property |
Type/Value |
Description |
|---|---|---|
|
Encoding |
String |
Identifies the default character encoding set to use (if not specified in the document or in the listener configuration). Defaults to your local system encoding. You may overwrite the default value with a value from the drop-down list. The values from the drop-down list are:
|
|
Compatibility |
Check box |
Select from the following compatibility options:
|
|
Caching |
String |
Determines how transforms will be cached in the current iSM configuration. Select one of the following options from the drop-down list:
|
|
Configuration Backups |
Integer |
Number of automatic backups of the configuration (for example, base.xml) to maintain. 0 equals none. If you supply a value greater than 0, the configuration is backed up every time the server starts. It is recommended that you enable this setting. |
|
Configuration Backup Location |
Directory |
The directory where the configuration backups are saved. |
|
Dead Letter |
Directory |
Default directory where responses that cannot be delivered are held when the reply-to value cannot be identified. If the directory does not exist, select the check box to create the named directory. |
|
Retry Interval |
Duration: xxhxxmxxs |
Interval (in seconds) after which the listener can be retried if it fails for external causes. The default value is 120. Note: The Retry Interval is a global setting that applies to all listeners. |
|
Kill Interval |
Duration: xxhxxmxxs |
Interval at which to check for runaway requests that exceed their maximum life. Default is 60 (seconds), for example, 1h2m3s=1 hour, 2 minutes, and 3 seconds. Note: Each listener has an Execution Time Limit property that determines the maximum life of each request. |
iWay Service Manager (iSM) is configured and monitored using the iWay Service Manager Administration Console, which is a web-based console. The console itself can be configured using the Console Settings pane.
The available settings apply to the master console and are inherited when the console is redirected through the master console configuration (usually base) to other configurations including iWay Integration Applications (iIAs). Only the master configuration supports a console.
The following image shows the Console Settings pane in the iWay Service Manager Administration Console.
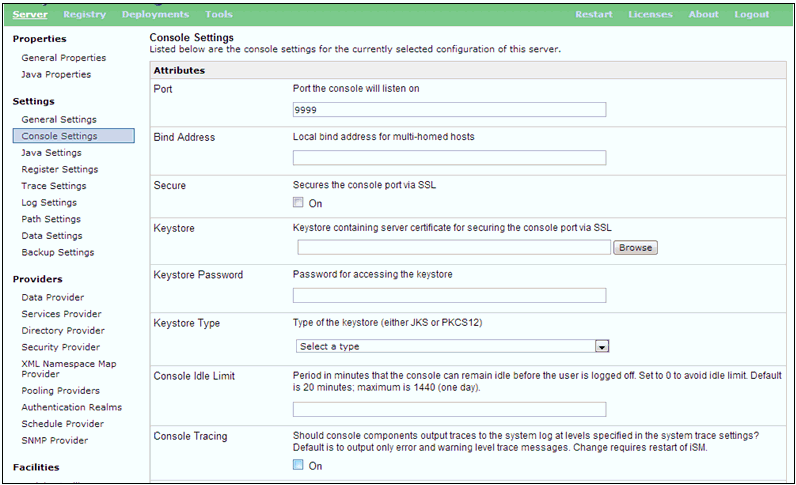
The following table lists and describes the parameters that are available in the Console Settings pane:
|
Parameter |
Description |
|---|---|
|
Port |
The port used to reach the console. The default port is 9999, which is set during the iSM installation. |
|
Bind Address |
If the server is multi-homed (connected to more than a single network interface), then this is the address of the interface to be used to reach the console. |
|
Secure |
Determines whether to secure the console port using SSL. This option is not enabled by default. |
|
Keystore |
If the Secure option is enabled, then this is the path to the keystore holding the private key of the server. |
|
Keystore Password |
The password to the keystore. |
|
Keystore Type |
The type of keystore being used (JKS or PKCS12). |
|
Console Idle Limit |
Approximate time (within 10%) in minutes before an idle console will be logged out by the server. |
|
Console Tracing |
Determines whether the iSM Administration Console participates in the standard tracing for the server. If set to On, then the console does participate. However, console tracing can be voluminous, and can therefore interfere with trace log analysis. The Console Tracing option is set to Off by default, meaning that the console only traces error and warning messages. You can set an individual trace level on the console using the Set command. Note: The Console Tracing option is only available as of iSM Version 6.1.7 and higher. |
As of iSM Version 6.1.5, console protection at the session level is available. Facilities not available to a specific user are disabled, and appear on the iSM Administration Console in the disabled state. Users are provided with the following attributes:
The console itself requires that the user log on. While it is possible for a single user to be logged on in two or more browser tabs, this is considered a single session by iSM. The user is expected to adhere to good console practices, such as logging off when the console is not in use. A logout link is available on the upper-right corner of the console.
The system administrator can set an idle time (default is 20 minutes) that will be tolerated by the server. If the user does not interact in the session with the server in this period, the user is logged off and must reenter credentials when the console is next used. This option can be set in the Console Settings area of the iSM Administration Console, as shown in the following image.

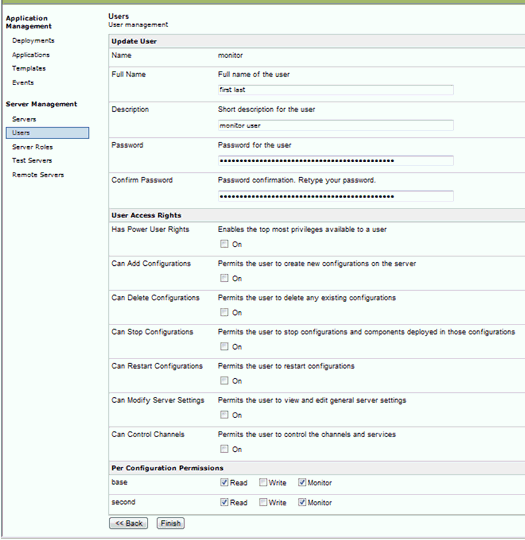
In the following example, a user has been created with only monitor rights by not providing any selectable privileges. In this case, when the user logs in to the iSM Administration Console, the user is be able to monitor and view information, but will not be able to modify any iSM settings.
The following image shows the User Management pane in the iSM Administration Console.
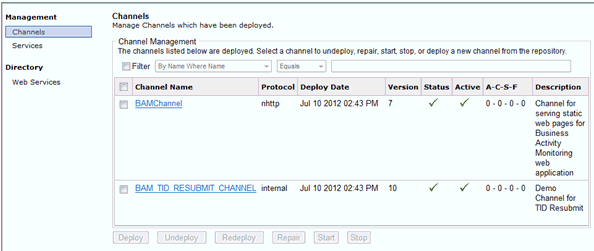
The following image shows the Channel Management pane in the iSM Administration Console for a user that has read-only privileges set. Notice the disabled buttons at the bottom of the screen.
The Java Settings pane in the iWay Service Manager Administration Console enables you to specify Java Virtual Machine (JVM) options and Java system properties. It also enables you to register Java classes by adding .JAR files to the class path.
The Java Virtual Machine Settings section enables you to specify the options used for starting the JVM. For example, you can set memory allocation options.
Setting JVM options can improve the performance of Service Manager or correct problems. The most common setting adjustments are for the size of the Java heap and stack, which determine memory availability for Java programs and the JVM. If sufficient memory is not available, errors can occur. The heap size affects performance, as it determines how often garbage collection occurs.
If you encounter performance problems or receive “out of memory” exceptions, you can adjust these sizes. The following are the JVM memory settings most commonly adjusted:
Sets the Java thread stack size.
Sets the maximum Java heap size.
Sets the initial Java heap size.
The size is usually set in megabytes, for example:
-Xmx512M
Optimum sizes vary, depending on the total memory available, the requirements of your application, the number of other processes that require memory, the type of JVM, and other considerations.
The location for setting these and other JVM options depends on the operating system. You must edit the UNIX startservice.sh script or the iway61sm.sh script to include JVM options on that platform.
To specify JVM options on Windows:
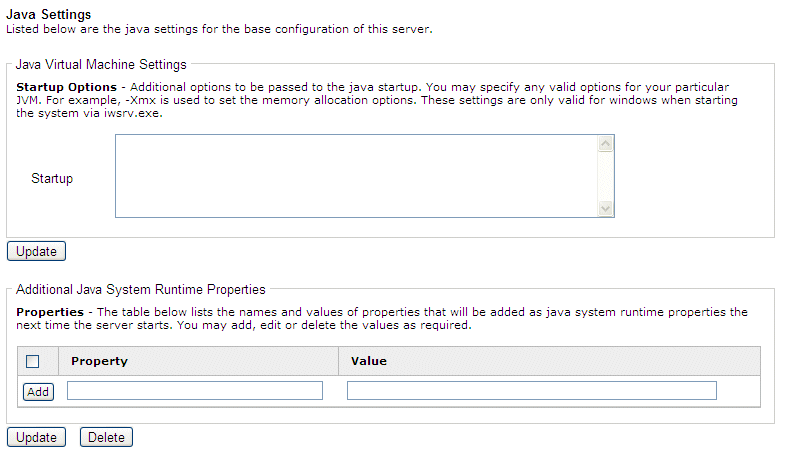
The Java Settings pane opens, as shown in the following image, displaying two sections: Java Virtual Machine Settings and Additional Java System Runtime Properties.
-Xmx512M
To specify JVM options on a non-Windows platform when running Service Manager as a service (daemon):
su $IWAYUSER -c "java -Xmx512M
-Xss256M $REMDBG -cp $CLASSPATH -DIWAY61=$IWAY61sm
-Diwaysoftware.af.idocument=com.ibi.edaqm.XDDocument
com.ibi.service.edaqm.XDDocument -$IWAYCONFIG >> $IWAY61sm/bin/service.log &"
To specify JVM options on a non-Windows platform when running iWay Service Manager manually:
java -Xmx512M -Xss256M $REMDBG -cp
$CLASSPATH -DIWAY61=$IWAY61sm edaqm -config $SCRIPT $2 $3 $4 $5 $6
-Diwaysoftware.af.idocument=com.ibi.edaqm.XDDocument
The Additional Java System Runtime Properties section enables you to add, edit, or delete Java system properties.
In the Additional Java System Runtime Properties section:
A special register is a named variable that referenced a value which is carried throughout the system. Once defined, this variable is available to all components of the system.
You can examine special registers as part of the Service Manager conditional routing facility to control a message flow.
Note: Special registers operate on a global (system-wide) level. As a result, you must restart iWay Service Manager for any changes to be applied.
For more information on using a special register to supply configuration properties, see Configuring Basic Properties.
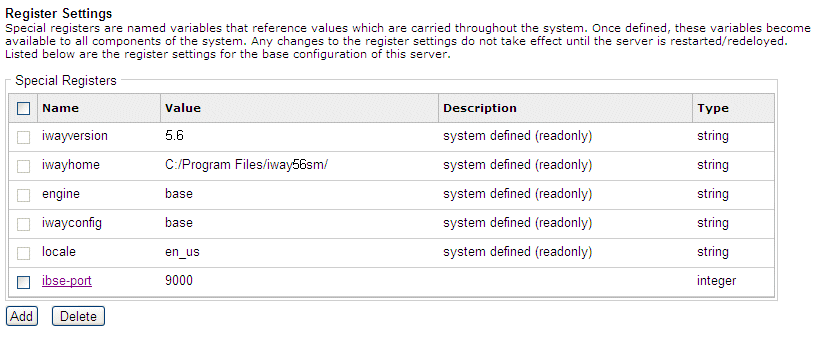
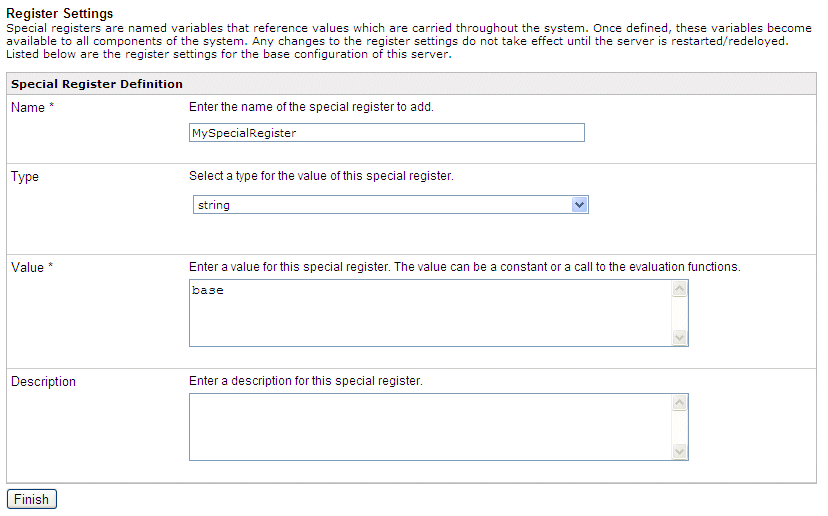
To define a special register:
The Special Registers pane opens, listing the register settings for the base server, as shown in the following image.
As shown in the following image, the completed Special Register Definition pane shows the Name, Type and Value fields completed.
Note: You must restart the server for the values to take effect.
You are returned to the first Special Registers pane which displayed the newly defined special register. If required, you can now associate the defined special register with a channel. For more information, see Adding Register Sets.
Trace settings allow you to control the amount of detail that is produced by the diagnostic components embedded within iWay Service Manager. Traces produced during run time are either displayed or logged based on settings in the run time environment. For more information on configuring trace settings, see Diagnostics, Tracing, and Logging.
Log settings are used to record the diagnostic information that is generated by the run time components of iWay Service Manager. For more information on configuring log settings, see Diagnostics, Tracing, and Logging.
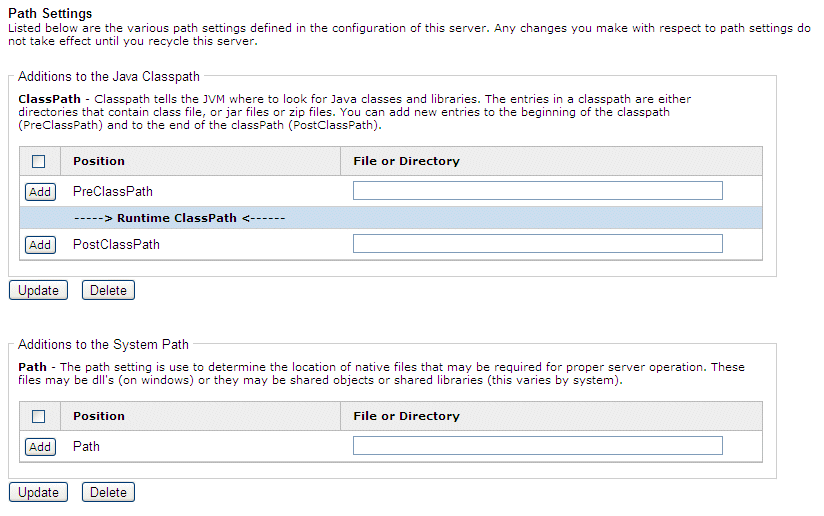
The Path Settings pane contains the various path settings defined in the configuration of iWay Service Manager.
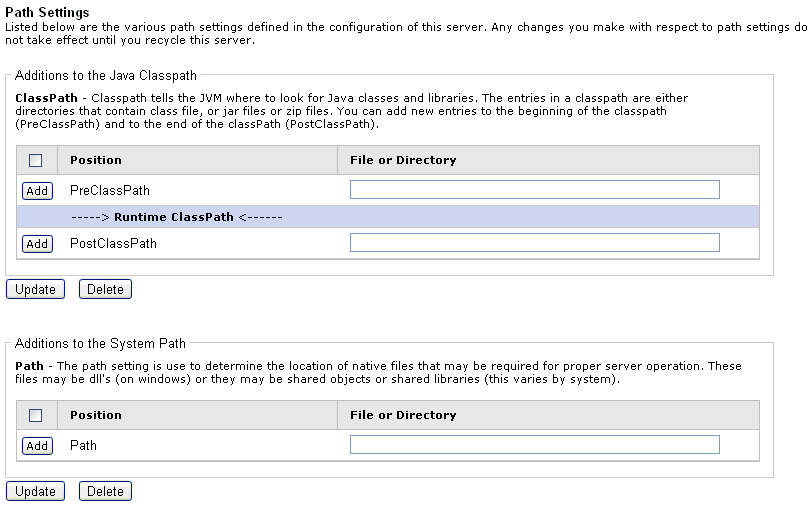
Adding entries to the Java classpath tells the JVM where to look for Java classes and libraries. The entries in a classpath are either directories that contain class files, .jar files, or .zip files. You can add new entries to the beginning of the classpath (PreClassPath) and to the end of the classPath (PostClassPath).
Adding entries to the system path is used to determine the location of native files that may be required for proper server operation. These files can include Dynamic Link Libraries (.dll) on Windows or they may be shared objects or shared libraries, which vary by system.
Important: Any changes that are made with respect to path settings do not take effect until you restart iWay Service Manager.
On Windows, the Path Settings pane enables you to include JAVA class and JAR files in the class path. Use this function to add third-party drivers, such as those for IBM WebSphere MQ, Oracle AQ, and JDBC. You also can specify additional library directories that may be required when the third-party Java classes require dynamic link libraries or shared objects (depending on the platform in use). WebSphere MQ, for example, requires this type of setting.
Note: For the change in these values to take effect, you must completely stop Service Manager and then start it again. The Restart option on the top navigation pane of the console is not sufficient for the change to take effect.
The location for registering libraries depends on the operating system. You must edit the UNIX startservice.sh or iway61sm.sh script to include additional Java libraries on that platform.
The following procedure describes how to add third-party Java libraries on Windows, using IBM WebSphere MQ as an example. First, the third-party JAVA files (JAR, CLASS, or ZIP) must be installed.
To add a Java library:
The Path Settings pane opens, as shown in the following image. You can add jar files or dll files using this pane.
or
To add the entry to the end of the class path, type the directory path and/or file name in the PostClassPath field.
or
To add a dll to the system path, type the directory path to the dll file in the Path field.
To register libraries or other files on UNIX, z/OS, and iSeries, you edit the script used to start iWay Service Manager and add files to the CLASSPATH variable. Ensure you add the full path including the file name.
If you run iWay Service Manager as a service (daemon), edit iWay61/bin/startservice.sh.
If you run Service Manager as a non-service, edit iWay61/iway61.sh.
The following relevant lines are the same in both startservice.sh and iway61.sh.
CLASSPATH='echo $IWAY61/lib/*.jar | tr ' ' ':'if [ -f
   $IWAY61sm/etc/manager/extensions/*.jar ]
then
    CLASSPATH=$CLASSPATH:'
echo $IWAY61/etc/manager/extensions/*.jar | tr ' ' ':''
fi
echo CLASSPATH set to: $CLASSPATH
To load files before iWay files, add the files you are registering after CLASSPATH= and place a colon after each file as in the following:
CLASSPATH=/home/myjars/broker.jar:/home/myjars/jsse.jar:'echo $IWAY61/lib/*.jar | tr ' ' ':''To load files after iWay files, add a colon at the end of the line, followed by the path to the files you wish to register, separated by colons.
CLASSPATH='echo $IWAY61/lib/*.jar | tr ' ' ':'':/home/myjars/broker.jar:/home/myjars/jsse.jarNote: Ensure you add the full path to the files, including the file names. Adding the directory containing the files is not sufficient.
JLINK is a technology that can be used to access information hosted by iWay, WebFOCUS, and EDA data servers. The Data Settings pane contains the general settings for the JLINK in the base configuration of this server.
Note: The Data Settings pane is retained for legacy users. It is recommended that all new configurations to data servers should be made through the Data Provider facility in the iWay Service Manager Administration Console. For more information on configuring data providers, see Data Provider.
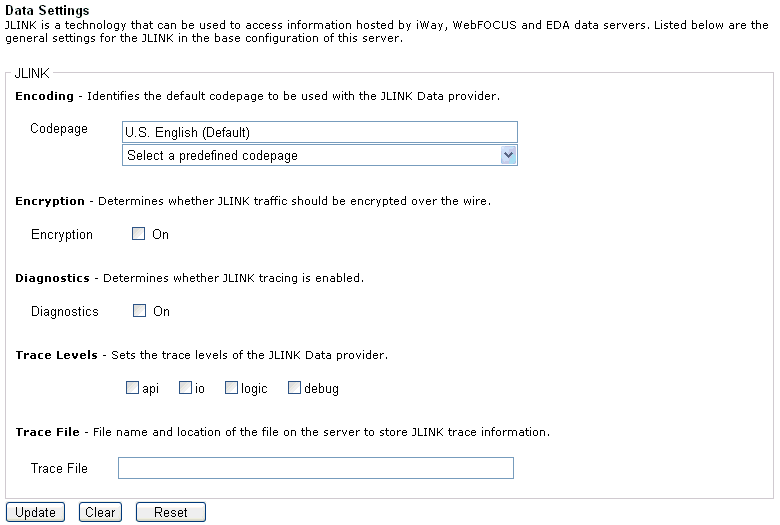
For more information on configuring the JLINK properties, see Diagnostics, Tracing, and Logging.
iWay Service Manager (iSM) can be deployed to automatically fail over to another waiting machine usually referred to as a hot backup host. Simple fail over relies on native functionality in iWay to emit and respond to "heartbeat" messages, which signify normal operation of the primary server. More sophisticated backup can be configured via the Hot Backup extension on the backup server. In the Backup Settings pane of the iWay Service Manager Administration Console, provide a hostname and port number in the Location of Backup field that corresponds to the iWay Service Manager that is monitoring this instance of iSM.
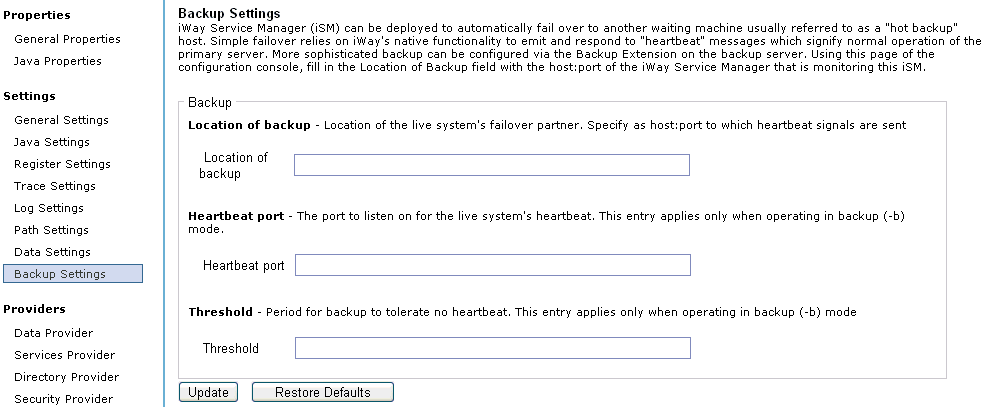
For more information about configuring the Hot Backup extension, see the iWay Service Manager Extensions User's Guide.
| iWay Software |