Understanding iWay Business Services
iWay Explorer provides developers with a simple, consistent
mechanism for extending the capabilities of the adapter. The iWay
Business Services Provider (iBSP) exposes functionality as web services.
It serves as a gateway to heterogeneous back-end applications and
databases.
A web service is a self-contained, modularized function that
can be published and accessed across a network using open standards.
It is the implementation of an interface by a component and is an
executable entity. For the caller or sender, a web service can be considered
as a "black box" that may require input and delivers a result. A
web service integrates within an enterprise as well as across enterprises
on any communication technology stack, whether asynchronous or synchronous,
in any format.
Note: In a J2EE Connector Architecture (JCA) implementation
of iWay adapters, web services are not available. When the adapters
are deployed to use the iWay Connector for JCA, the Common Client
Interface provides integration services using the iWay adapters.
For more information, see the iWay Installation and Configuration documentation.
x
After you connect to your application system and create
an XML schema for a transaction, you can create a web service. The
following procedure describes how to create a web service using
iWay Explorer.
x
Procedure: How to Create a Web Service
To create
a web service:
-
Click
the Iway Adapters tab.
The iWay Adapters window opens.
-
In the left pane, expand the CICS node.
-
Connect to a CICS target, for example, CICS_Connection.
-
Expand the node to which you connected.
The Transaction node appears under the connected node.
-
Click Transactions and
then select the transaction for which you want to create a web service.
-
In the
right pane, move your cursor over Operations and
select Create iWay Business Services.
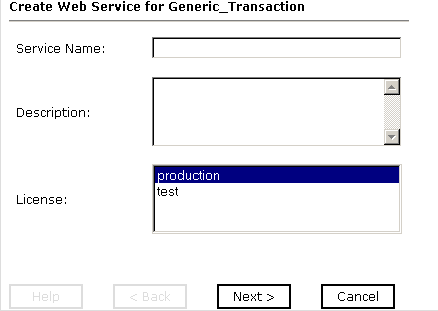
The Create Web Service pane opens on the right, where you
enter information that is specific to the web service you are defining,
as shown in the following image.
-
In the Service Name field, type a descriptive name for the
web service.
-
In the Description field, type a brief description for the
web service (optional).
-
In the License field, select one or more license codes to assign to
the web service. To select more than one, hold down the Ctrl key
and click the licenses.
-
Click Next.
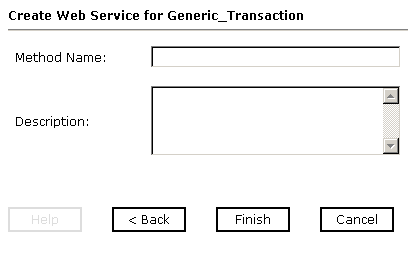
Another pane with the Method Name and Description fields
opens, where you enter information that is specific to the method
you are defining, as shown in the following image.
-
In the Method Name field, type a descriptive name for the method.
-
In the Description field, type a brief description for the method.
-
Click Finish.
The iWay
Business Services Provider tab opens. The web service is created and
published to the iWay Business Services Provider. iWay Explorer
displays the newly created web service under the iWay Business Services folder.
x
After you create a business service, you can test it
to ensure that it functions properly. iWay provides a test tool
for testing the business service.
x
Procedure: How to Test the Web Service
To test
the web service:
-
If you
are not on the iWay Business Services tab of iWay Explorer, click
the tab to access business services.
-
If it is not expanded, expand the list of business services
under iWay Business Services.
-
Expand the Services node.
-
Select
the name of the business service you want to test.
The business service name appears as a link in the right
pane.
-
In the
right pane, click the named business services link.
The test option appears in the right pane.
-
In the
input xml field, either type a sample XML document that queries the
service, or browse to the location of an XML instance and click Upload.
The following is an example of an XML document that queries
the service.
<?xml version="1.0" encoding="UTF-8" ?>
<CICS>
 <Transaction location="/CICS/Transaction/IWAYSAMP">
  <CommArea>
   <COMMAND>SHORT</COMMAND>
  </CommArea>
 </Transaction>
</CICS>
<?xml version="1.0" encoding="UTF-8" ?>
<CICS>
 <Transaction location="/CICS/Transaction/IWAYSAMP">
  <CommArea>
   <COMMAND>LONG</COMMAND>
  </CommArea>
 </Transaction>
</CICS>
-
Click Invoke.
The result
appears in the right pane.
x
Generating WSDL From a Web Service
The Web Service Description Language (WSDL) file is
an XML file that describes the web service documents and provides
access to the service, such as iWay run-time environment.
x
Procedure: How to Generate WSDL From a Web Service
To generate
WSDL from a web service:
-
If you
are not already on the iWay Business Services tab, click the tab
to access business services.
-
In the
left pane, expand the list of services to display the iWay Business Services
for which you want to generate WSDL.
-
Select
the business service.
The link for the service appears in the right pane.
-
Right-click the Service Description link
and choose Save Target As.
-
Choose a location for the file and specify .wsdl for
the extension.
Note: The file extension must be .wsdl.
-
Click Save.
Example: Viewing WSDL Generated from a Web Service
After
generating a WSDL file from the IWAYSRV0.ibs serialized object,
the IWAYSRV0. wsdl file looks similar to the following image.

x
If you test or execute a web service using a third party
XML editor, for example XMLSPY, the Username and Password values
that you specify in the SOAP header must be valid and are used to
connect to CICS. The user name and password values that you provided
for CICS during target creation using iWay Explorer are overwritten
for this web service request. The following is a sample SOAP header
that is included in the WSDL file for a web service:
<SOAP-ENV:Header>
    <m:ibsinfo xmlns:m="urn:schemas-iwaysoftware-com:iwse">
        <m:service>String</m:service>
        <m:method>String</m:method>
        <m:license>String</m:license>
        <m:disposition>String</m:disposition>
        <m:Username>String</m:Username>
        <m:Password>String</m:Password>
        <m:language>String</m:language>
    </m:ibsinfo>
</SOAP-ENV:Header>
Note: You can remove the following tags from the SOAP
header, as they are not required.
<m:disposition>String</m:disposition>
<m:language>String</m:language>