Access the Emulator tool from either the main menu (Tools, then Emulator) or from the Emulator tool icon. The Terminal Emulator dialog box opens with the Connection tab displayed, as shown in the following image. In this window, you set the parameters that allow you to connect to the system you want to emulate, and select the Telnet Designer mode in which you will work.
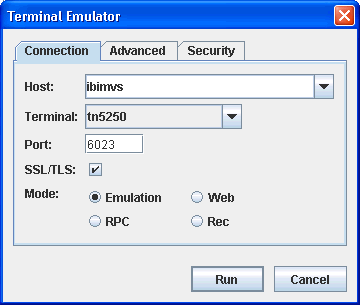
The following table lists and describes the parameters available in the Terminal Emulator Connection tab.
|
Parameter |
Description |
|---|---|
|
Host |
DNS name or IP address of the system you will connect to for the emulation session. |
|
Terminal |
Type of terminal you will use for the emulation. The available selections are tn3270 and tn5250. |
|
SSL/TLS |
This option allows you to enable a Secure Sockets Layer (SSL)/Transport Layer Security (TLS) security connection. |
|
Port |
Port number of the connection. |
|
Mode |
Emulation mode that Telnet Designer will use for the session. The modes are Emulation, RPC (Remote Procedure Call), Web, and Rec (Recorder). |
Click Run to connect to the designated system. Click Cancel to exit the Terminal Emulator dialog box.
The Advanced tab of the Terminal Emulator dialog box is shown in the following image. The Advanced tab provides additional settings to further define the connection.
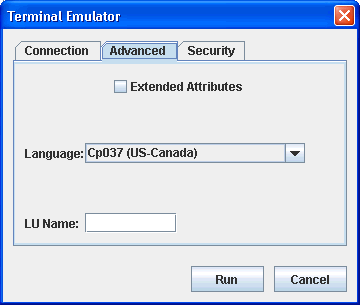
The following table lists and describes the parameters available in the Terminal Emulator Advanced tab.
|
Parameter |
Description |
|---|---|
|
Extended Attributes |
Allows the session to send extended attributes from the back-end application. These attributes are returned to the application without modification. The following attributes are allowed: background color, character set, field outlining, field validation, and foreground color. Note: If you select a code page in the Language parameter that supports double byte character set (DBCS) code pages, the extended attributes parameter is the default. |
|
Language |
The code page for the language used by the host system. |
|
LU Name |
Allows 3270 application users to specify a particular terminal name (LU) or Pool name (LU pool) to use in its connection with the mainframe. As a result, the mainframe can then dedicate specific connections and privileges to specific telnet ports. |
Click Run to connect to the designated system. Click Cancel to exit the Terminal Emulator dialog box.
The Security tab of the Terminal Emulator dialog box is shown in the following image. When the SSL/TLS check box is selected in the Connection tab, the Security tab provides additional security settings that must be defined.
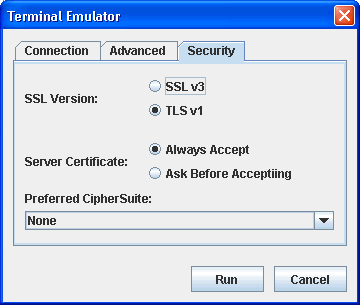
The following table lists and describes the parameters available in the Terminal Emulator Security tab.
|
Parameter |
Description |
|---|---|
|
SSL Version |
Select one of the Secure Sockets Layer (SSL) and Transport Layer Security (TLS) protocol versions to use for the connection:
By default, TLS v1 is selected. |
|
Server Certificate |
Select one of the following server certificate options:
By default, Always Accept is selected. |
|
Preferred CipherSuite |
Select an available CipherSuite to use for the connection from the drop-down list. By default, None is selected. |
The implementation of the SSL/TLS security connection relies on the implemenation of Oracle Java Secure Socket Extension (JSSE). JSSE is included as a standard component of JRE Version 1.4 and higher. SSL Version 3.0 and TLS Version 1.0 are currently supported by iWay Emulation Adapter (3270/5250).
iWay Emulation Adapter (3270/5250) uses its own trust store file to store server certificates. The file is called iway_telnet_jssecacerts and will be created in the following directory:
<JRE-home>\lib\securityIf the Always Accept value is selected in the Security tab of the Telnet Designer for the Server Certificate parameter or ACCEPTCERTIFICATE='1' is included in the RPC scripts, then an unrecognized server certificate will be stored in the trust store file. If the Ask Before Accepting value is selected in the Security tab of the Telnet Designer for the Server Certificate parameter or ACCEPTCERTIFICATE='2' is included in the RPC scripts, then a dialog window with the certificate information is displayed and you must decide whether or not to accept the server certificate.
You can also select a cipher suite to use for encryption and integrity check purposes. However, it is possible that a server may not support the preferred cipher suite and a connection will not be established as a result. If no preferred cipher suite is selected, the Telnet client will negotiate with the server based on a set of cipher suites and use one that both parties can support.
The Record mode of the Telnet Designer still records unencrypted data. As a result, you can not use SSL/TLS to connect to a player server, even if the recorded dump is recorded from a SSL/TLS session.
