-
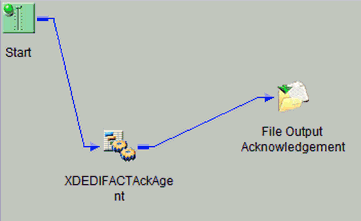
Drag and drop the Service object from the toolbar to the workspace.
The New Service Object dialog box opens.
-
In the Name field, type XDEDIFACTAckAgent, and
a brief description (optional) in the Description field.
-
Click Next.
The Service Type dialog box opens.
-
Select Class Name and enter com.ibi.agents.XDEDIFACTAckAgent.
-
Click Next.
The Define Service dialog box opens.
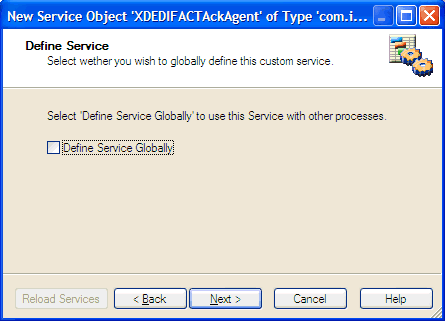
-
Click Next.
The Properties dialog box opens.
-
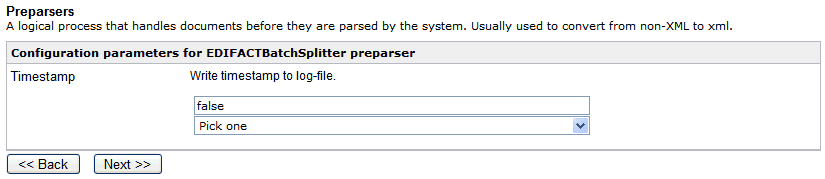
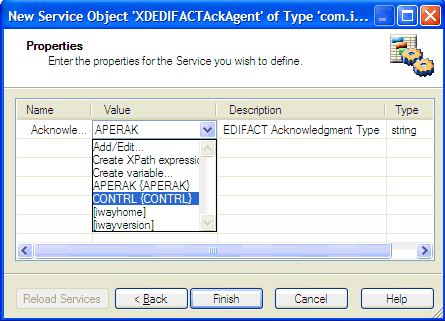
For the Acknowledgment type parameter, select CONTRL from
the drop-down list.
-
Click Finish.
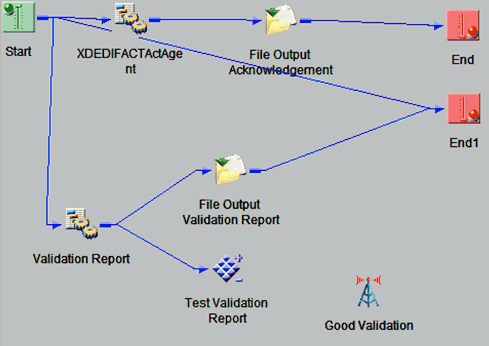
The new Service object (XDEDIFACTAckAgent) appears in the workspace.
-
Select the Start object, right-click
the XDEDIFACTAckAgent object, and select Relation from
the context menu.
The Line Configuration dialog box opens.
-
From the Event drop-down list, select OnCompletion and
click OK.
This option indicates that there are no conditions that
affect the path, and that the path between the two objects will
always be followed.
A line appears between the objects to
indicate that a relationship has been established.
-
Drag and drop the File object from the toolbar to the workspace.
The New File Object dialog box opens.
-
In the Name field, type File Output Acknowledgement,
and a brief description (optional) in the Description field.
-
Click Next.
The Define File Type dialog box opens.
-
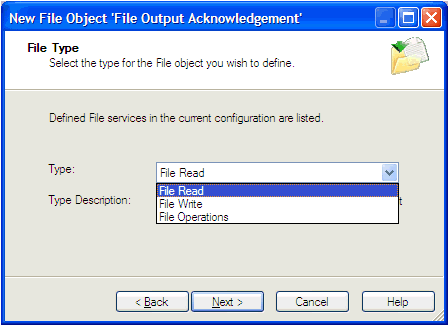
Select File Write from the Type drop-down
list and click Next.
The Properties dialog box opens.
-
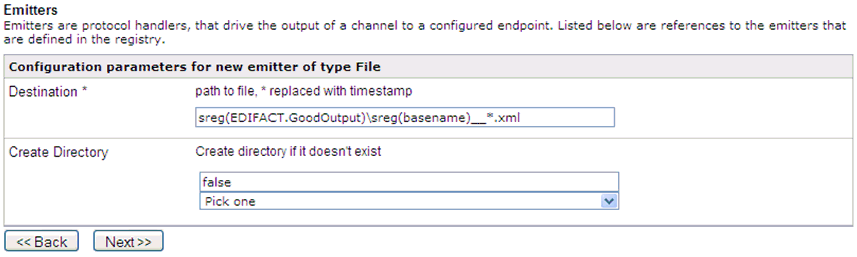
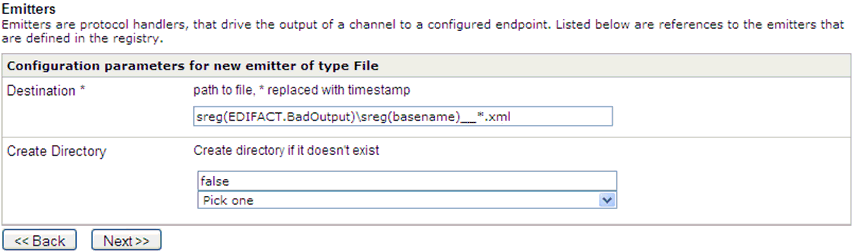
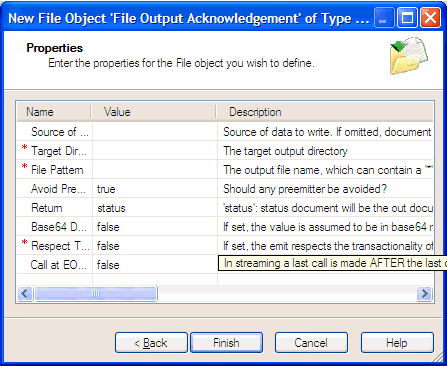
For the Target Directory parameter, enter the following location
where the data will be written:
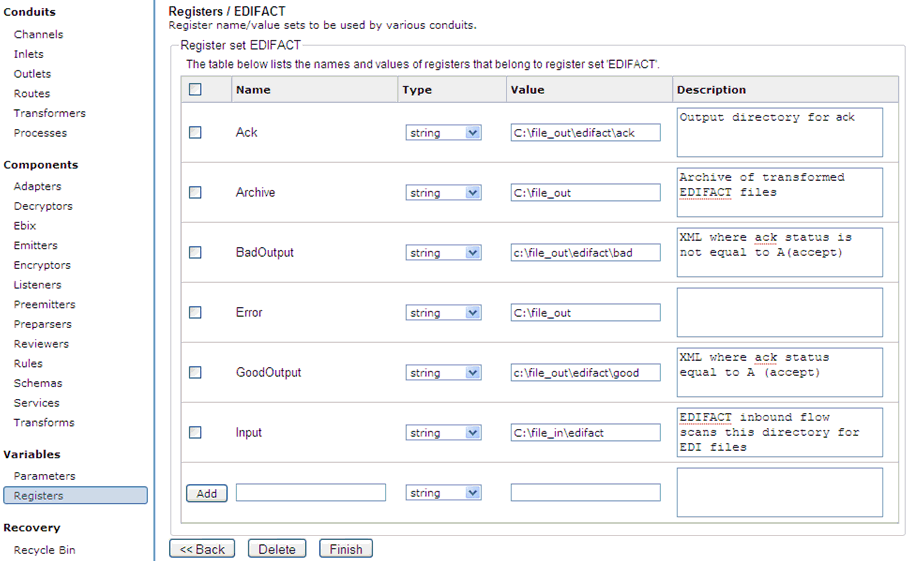
Sreg(EDIFACT.Ack)
-
For the File pattern parameter, enter the following:
Sreg(basename)__*.edifact
-
For the Respect Transactionality parameter, select true from
the drop-down list.
-
Click Finish.
The new File object, File Output Acknowledgement,
is added to the workspace area.
-
Select the XDEDIFACTAckAgent object,
right-click the File Output Acknowledgement object,
and select Relation from the context menu.
The Line Configuration dialog box opens.
-
From the Event drop-down list, select OnCompletion and
click OK.
A line appears between the objects to indicate that a relationship
has been established.
-
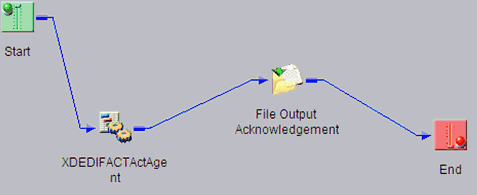
Drag and drop the End object from the toolbar to the workspace.
The End Name and Description dialog box opens.
-
In the Name field, type End, and a brief description
(optional) in the Description field.
-
Click Next.
The End Name Schema dialog box opens.
-
Since no schemas are used in this processing path (that is,
the process flow will not be exposed as a web service), from the
Schema drop-down list, select None.
-
Click Next.
The Properties dialog box opens.
-
Click Finish to accept the default values
and close the dialog box.
The new End object appears in the workspace.
-
Select the File Output Acknowledgement object,
right-click the End object, and select Relation from
the context menu.
The Line Configuration dialog box opens.
-
From the Event drop-down list, select OnCompletion and
click OK.
A line appears between the objects to indicate that a relationship
has been established.
-
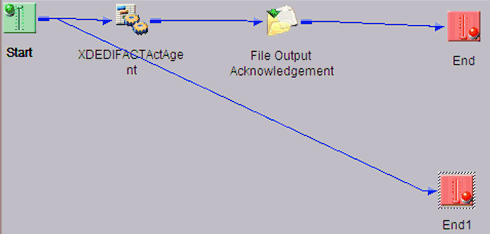
Drag and drop the End object from the toolbar to the workspace.
The End Name and Description dialog box opens.
-
In the Name field, type End1, and a
brief description (optional) in the Description field.
-
Click Next.
The End Name Schema dialog box opens.
-
Since no schemas are used in this processing path (that is,
the process flow will not be exposed as a web service), from the
Schema drop-down list, select None.
-
Click Next.
The Properties dialog box opens.
-
Click Finish to accept the default values
and close the dialog box.
The new End1 object appears in the workspace.
-
Select the Start object, right-click
the End1 object, and select Relation from the
context menu.
The Line Configuration dialog box opens.
-
From the Event drop-down list, select OnCompletion and
click OK.
A line appears between the objects to indicate that a relationship
has been established.
-
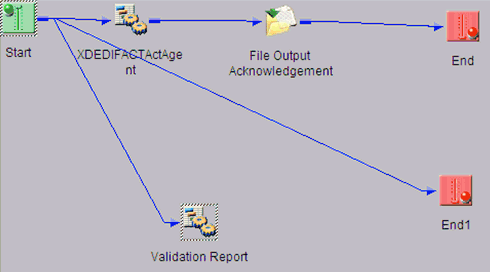
Drag and drop the Service object from the toolbar to the workspace.
The New Service Object dialog box opens.
-
In the Name field, type Validation Report,
and a brief description (optional) in the Description field.
-
Click Next.
The Service Type dialog box opens.
-
Select Class Name and enter com.ibi.agents.XDEDIFACTValidationReportAgent.
-
Click Next.
The Define Service dialog box opens.
-
Click Next.
The Validation Report object appears in the workspace.
-
Select the Start object, right-click
the Validation Report object, and select Relation from
the context menu.
The Line Configuration dialog box opens.
-
From the Event drop-down list, select OnCompletion and
click OK.
A line appears between the objects to indicate that a relationship
has been established.
-
Drag and drop the File object from the toolbar to the workspace.
The New File Object dialog box opens.
-
In the Name field, type File Output Validation Report,
and a brief description (optional) in the Description field.
-
Click Next.
The Define File Type dialog box opens.
-
Select File Write from the Type drop-down
list and click Next.
The Properties dialog box opens.
-
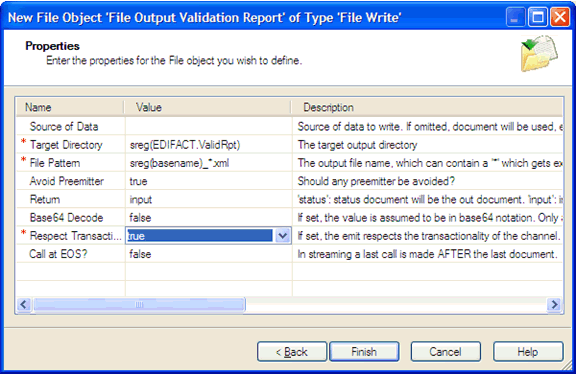
For the Target Directory parameter, enter the following location
where the data will be written:
sreg(EDIFACT.ValidRpt)
-
For the File pattern parameter, enter the following:
sreg(basename)_*.xml
-
For the Respect Transactionality parameter, select true from
the drop-down list.
-
Click Finish.
The new File object, File Output Validation Report,
is added to the workspace area.
-
Select the Validation Report object,
right-click the File Output Validation Report object,
and select Relation from the context menu.
The Line Configuration dialog box opens.
-
From the Event drop-down list, select OnCompletion and
click OK.
A line appears between the objects to indicate that a relationship
has been established.
-
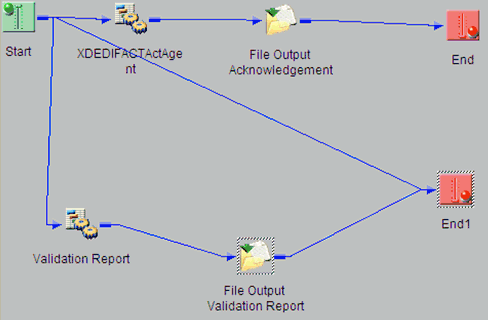
Select the File Output Validation Report object, right-click
the End1 object, and select Relation from
the context menu.
The Line Configuration dialog box opens.
-
From the Event drop-down list, select OnCompletion and
click OK.
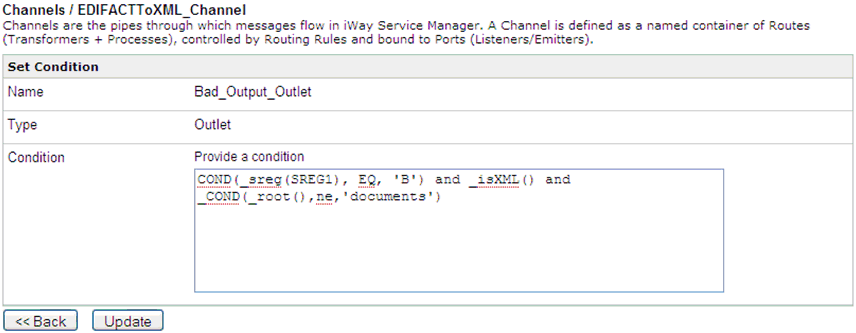
Note: If you do not want to create APERAK or CONTROL,
but need to monitor accept or reject rules validation status, a
validation report can be substituted for the acknowledgement agent
to update the SREG.
A line appears between the objects to
indicate that a relationship has been established.
-
Drag and drop the Decision Test object from the toolbar to
the workspace.
The New Test Object dialog box opens.
-
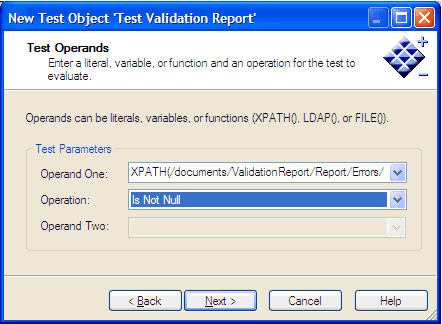
In the Name field, type Test Validation Report, and
a brief description (optional) in the Description field.
-
Click Next.
The Test Operands dialog box opens.
-
In the Operand One field, enter the following:
XPATH(/documents/ValidationReport/Report/Errors/error)
-
From the Operation drop-down list, select Is Not Null.
-
Click Next.
The Value Occurrences dialog box opens.
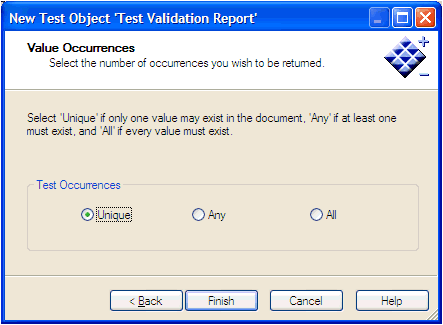
-
Ensure that Unique is selected from
the available options.
-
Click Finish.
The new Decision Test object appears in the workspace.
-
Select the Validation Report object,
right-click the Test Validation Report object,
and select Relation from the context menu.
The Line Configuration dialog box opens.
-
From the Event drop-down list, select OnCompletion and
click OK.
A line appears between the objects to indicate that a relationship
has been established.
-
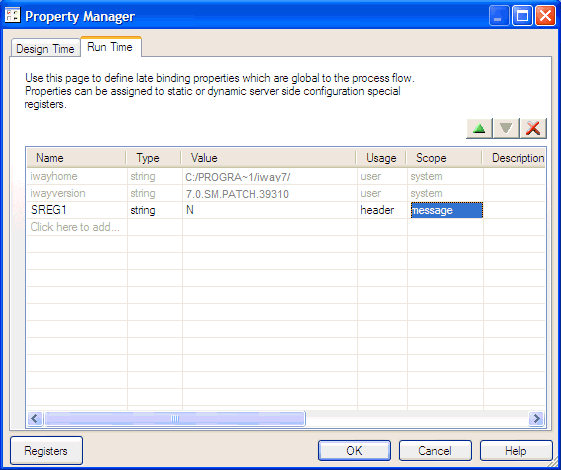
From the Tools menu, select Property Manager.
The Property Manager dialog box opens.

-
Click the Run Time tab.
-
In the Name column, click on an empty row.
SREG1 appears in the Name column.
-
In the Value column, enter the value N.
-
In the Usage column, select Header from
the drop-down list.
-
In the Scope column, select Message from
the drop-down list.
-
Click OK.
-
Drag and drop the Set object from the toolbar to the workspace.
The Set Name and Description dialog box opens.
-
In the Name field, type Good Validation,
and a brief description (optional) in the Description field.
-
Click Next.
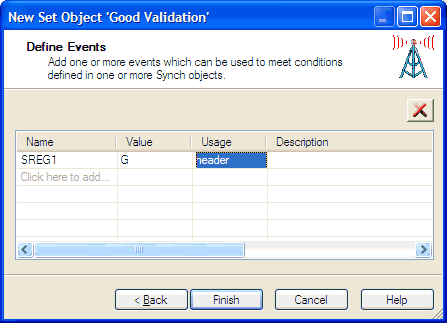
The Define Events dialog box opens.
-
Click the first row in the Name column and enter SREG1.
-
In the first row of the Value column, type G.
-
Select header from the drop-down list
in the Usage column.
-
Click Finish.
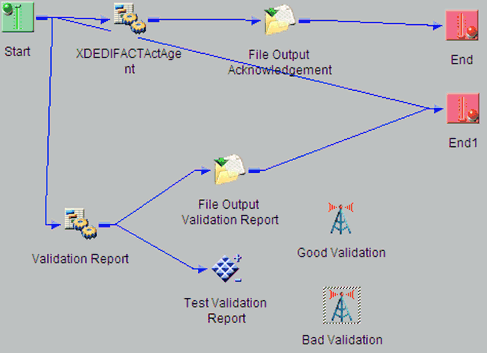
The new Set object (Good Validation) appears in the workspace.
-
Drag and drop the Set object from the toolbar to the workspace.
The Set Name and Description dialog box opens.
-
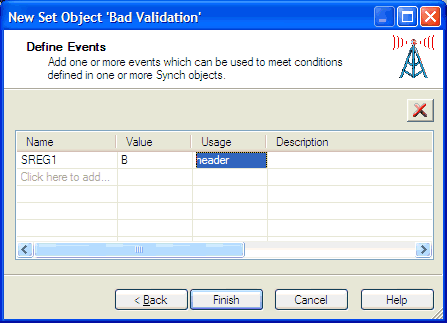
In the Name field, type Bad Validation,
and a brief description (optional) in the Description field.
-
Click Next.
The Define Events dialog box opens.
-
Click the first row in the Name column and enter SREG1.
-
In the first row of the Value column, type B.
-
Select header from the drop-down list
in the Usage column.
-
Click Finish.
The new Set object (Bad Validation) appears in the workspace.
-
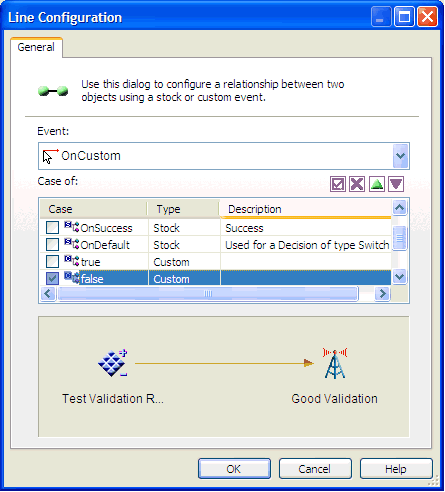
Select the Test Validation Report object,
right-click the Good Validation Set object,
and select Relation from the context menu.
The Line Configuration dialog box opens.
-
From the Event drop-down list, select OnCustom.
-
In the Case of section, select false.
-
Click OK.
A line appears between the objects to indicate that a relationship
has been established.
-
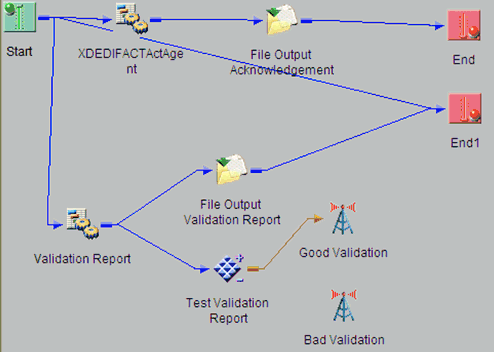
Select the Test Validation Report object,
right-click the Bad Validation object, and
select Relation from the context menu.
The Line Configuration dialog box opens.
-
From the Event drop-down list, select OnCustom.
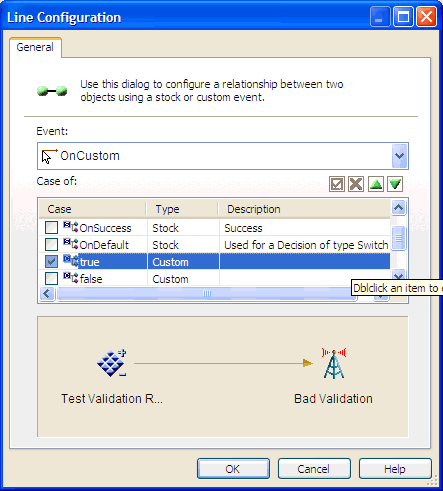
-
In the Case of section, select true.
-
Click OK.
A line appears between the objects to indicate that a relationship
has been established.
-
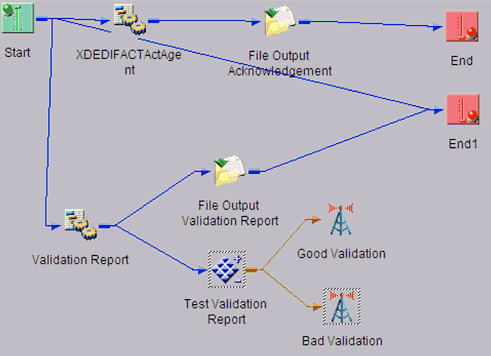
Select the Good Validation set object,
right click the End1 object, and select Build Relation from
the context menu.
The Line Configuration dialog box opens.
-
From the Event drop-down list, select OnCompletion and
click OK.
A line appears between the objects to indicate that
a relationship has been established.
-
Select the Bad Validation set object,
right click the End1 object, and select Build Relation from
the context menu.
The Line Configuration dialog box opens.
-
From the Event drop-down list, select OnCompletion and
click OK.
A line appears between the objects to indicate that
a relationship has been established.
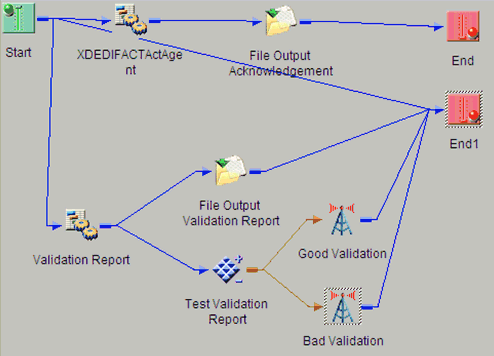
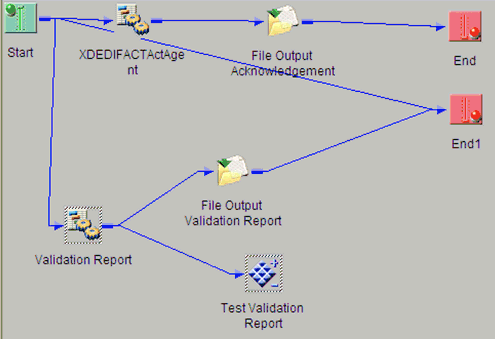
The
process flow is now complete.
-
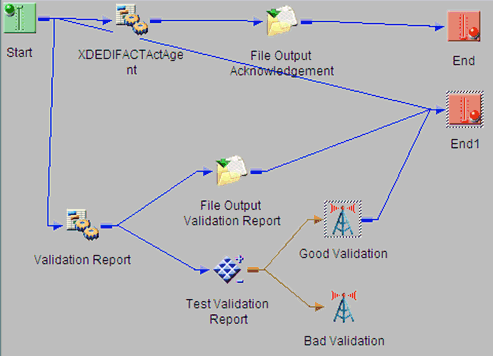
To save the process flow, right-click the EDIFACTtoXML node
in the left pane and select Save from the
context menu.
Now you need to validate the process flow and publish it
to the Registry of the iWay Service Manager Administration Console
for use in the route of a channel for outbound processing.
Validating
a process flow ensures that its structure is correct. Publishing
a process flow makes it available in the Registry for use in a channel
configuration. For instructions on validating and publishing the
process flow, see the iWay Designer User's Guide.
-
Close iWay Designer.
Your next step is to add a new route to the Registry using
the iWay Service Manager Administration Console and associate the
process flow with it.