Each pack (box, for example) has a bar code label with a serial number. This segment represents that pack and contains that serial number. For common carriers, the shipper and recipient mutually agree on the format and content of the labels. If the package is being transported by a "small package" carrier like Federal Express or UPS, the labels are formatted to the specifications of the freight company. UPS and Federal Express allow shippers to create labels over the web, and often provide hardware and software to allow the shipper to create the labels and accompanying manifests at the location of the shipper. We previously discussed the looping format of the advanced ship notice for common carrier shipments. A small package ASN may have only one pack (and possibly no items) per ship level, and may contain multiple ship levels in a document. The common carrier ASN usually contains the 20 character readable bar code from the label with a GM qualifier. The small package ASN contains the package tracking number with a SM qualifier.
-
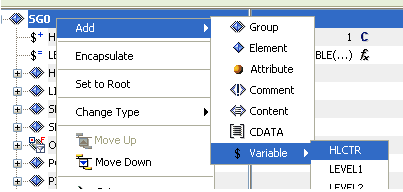
Right-click the SG0 tag,
which is located under inv_pack, select Add,
move your pointer over Variable, and then
select HLCTR.
- Use the position icons (Move Up and Move Down) on the toolbar (or right-click and select from the control menu) to position the HLCTR variable below the SG0 tag.
-
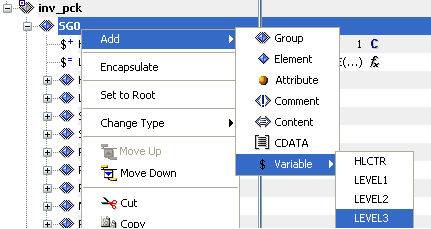
Right-click the SG0 tag, which
is located under inv_pack, select Add, move
your pointer over Variable, and then select LEVEL3.
-
Right-click the LEVEL3 variable
tag in the Output pane and select Properties from
the context menu.
The Output Node Properties - LEVEL3 dialog box opens.
- Select SET from the Action drop-down list and then click OK.
-
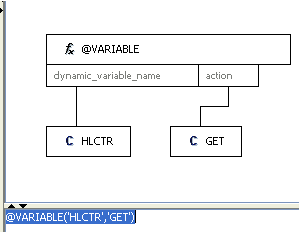
Configure the mapping values for the LEVEL3 variable
as indicated by the following table:
Element
Value
LEVEL3
@VARIABLE('HLCTR','GET')
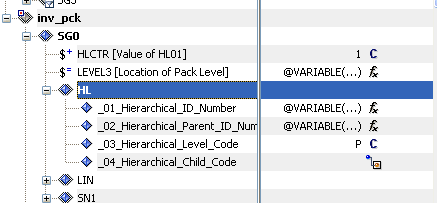
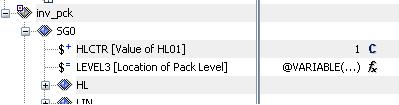
Your screen should now resemble the following image:
-
Use the position icons (Move Up and Move Down) on the
tool bar (or right-click and select from the control menu) to position
the LEVEL3 variable below the HLCTR variable tag.
Your screen should now resemble the following image:
-
Configure the mapping values for the HL elements as indicated
by the following table:
Element
Value
HL01
@VARIABLE('HLCTR','GET'
HL02
@VARIABLE('LEVEL1','GET')
HL03
P
-
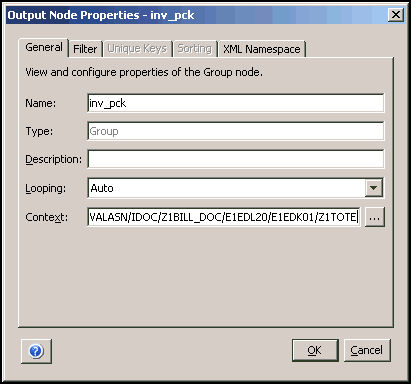
Set the context to the following:
ZWALASN/IDOC/Z1BILL_DOC/E1EDL20/E1EDK01/Z1TOTE
-
Set the filter condition to the following:
@LEN(ZWALASN/IDOC/Z1BILL_DOC/E1EDL20/E1EDK01/Z1TOTE/TOTE_NUMBER) > '0'
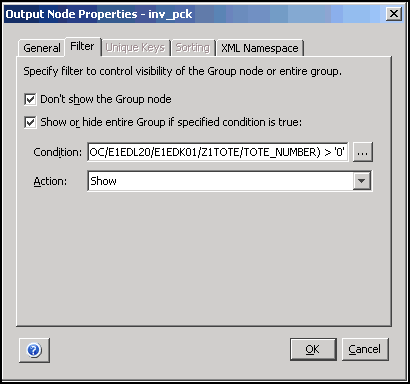
Your screen should now resemble the following image: