The iWay Application Adapter for PeopleSoft includes
two custom Component Interfaces. iWay Explorer uses these Component
Interfaces to create schemas for events and services.
To configure Component Interfaces for use by the iWay Application
Adapter for PeopleSoft:
x
Importing and Building the Component Interfaces
The Component Interfaces supplied with the iWay Application
Adapter for PeopleSoft are delivered through a PeopleSoft project.
- For Release
8.4, the project is the IWY_CI_84 project, packaged in iwpsci84.zip.
- For Release
8.1, the project is the IWY_CI_81 project, packaged in iwpsci81.zip.
These files are installed with iWay 6.1 SM.
On Windows, their default location is:
C:\Program Files\iWay61\etc\setup\peoplesoft
On non-Windows systems, use the corresponding location. If this
location does not exist, contact iWay Software for copies of the
relevant files.
x
Procedure: How to Import and Build the Component Interfaces
To import
the IWY_CI_81 or IWY_CI_84 project to PeopleSoft 8:
-
Unzip iwpsci81.zip or iwpsci84.zip to
a directory of your choice.
The unzip process creates its own subdirectory. For example,
if you extract the file to c:\temp, it creates c:\temp\IWY_CI_81
or c:\temp\IWY_CI_84.
-
Launch
the PeopleSoft Application Designer in two-tier mode.
-
To open
the Copy From File Select Project dialog box:
In PeopleSoft 8.4, select Copy Project from
the Tools menu and then, select From File.
In
PeopleSoft 8.1, select Copy Project from File from
the File menu.
The Copy Project From File dialog box opens.
-
Navigate
to the original directory to which you unzipped the file.
-
To open
the Copy From File dialog box, click Open (in
8.4) or Copy (in 8.1).
Note: Although the following images illustrate PeopleSoft
release 8.4, the corresponding instructions are accurate for releases
8.1 and 8.4.
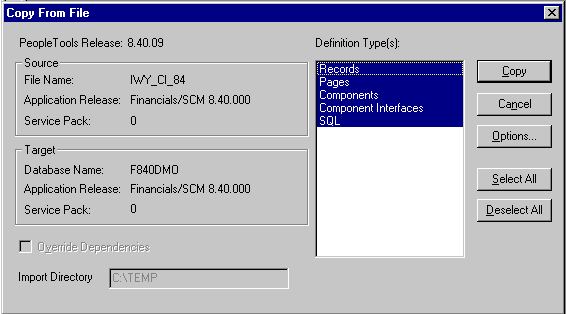
The following image shows the PeopleSoft Application
Designer Copy From File dialog box. It includes PeopleTools release
and target information on the left, a Definition Type(s) pane, and
five buttons, Copy, Cancel, Options, Select All, and Deselect All.
-
Highlight
all the objects that appear under Definition Types and click Copy.
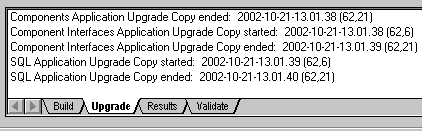
The following image shows a message generated by iWay Designer
that indicates successful completion of the copying.
-
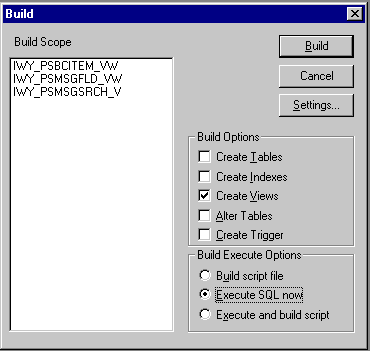
To build
the views in the project, from the Build menu, select Project.
The following image shows the Build dialog box. It contains
a Build Scope pane, a Build Options pane, and a Build Execute Options
pane. It also contains Build, Cancel, and Settings buttons.
-
From Build Options, select the Create Views check
box.
-
In the Build Execute Options pane, select the customary option for
your site. (For example, in the previous image, the Execute SQL
now option is selected.)
-
Click Build.
The following image shows the Application Designer Build
Progress status pane. It contains a summary of the process completed
and a progress bar. Only the Close button is active.
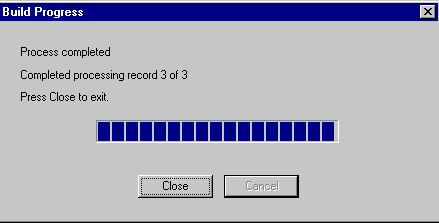
Note: There
are no errors or warnings.
-
To ensure that the records were created correctly, use your
native SQL Tool to view the records from the generated view.
-
If the records were not correctly generated, click Close.
-
Double-click
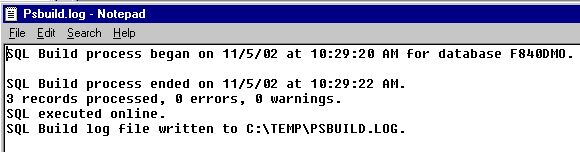
the SQL Build log statement.
The following image shows the PsBuild log file, which contains
information about the SQL build process.
-
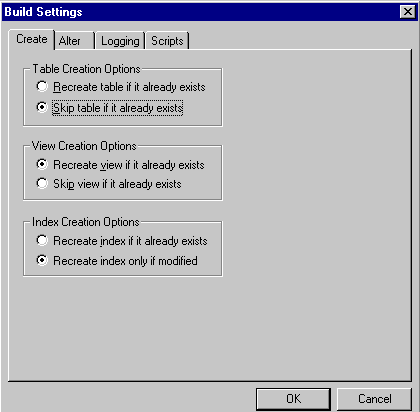
If you
encounter problems, check the Build settings options by choosing Build and
then, Settings.
The following image shows the Build Settings dialog box.
It includes four tabs: Create (active), Alter, Logging, and Scripts.
The Create tab includes three panes: Table Creation Options, View
Creation Options, and Index Creation Options. Each pane includes
two options. One is to recreate the table, view, or index if it
already exists. The other is to skip the table or view if it already
exists or to recreate the index only if modified. The dialog box
also includes OK and Cancel buttons.
Depending on the application
server database for PeopleSoft 8, a database may require
the Tablespace name. For more information regarding this function,
consult your PeopleSoft 8 database administrator.
You have
finished importing and building the Component Interfaces. To configure
security for Component Interfaces, see Configuring Component Interface Security.
x
Configuring Component Interface Security
iWay Explorer requires the custom Component Interfaces
that you imported and built in the previous procedure, How to Import and Build the Component Interfaces, so you must ensure that all iWay Explorer
users have access to these Component Interfaces. As with all PeopleSoft
objects, security is assigned at the Permission List level. Review
your site security requirements to determine the users who will
work with iWay Explorer and then, set Component Interface security
for each distinct Permission List belonging to those users.
Note: These Component Interfaces are required for creating
schemas and iWay Business Services, and they are required at run
time for using the Find method. They have only Get and Find access
and cannot be used to update your PeopleSoft database; this minimizes
possible security exposures.
In PeopleSoft release 8.1, you may set security in 2-, 3-, or
4-tier mode; in release 8.4 and higher, you may set security in
4-tier mode only.
The following procedure describes how to configure security for
all supported releases of PeopleSoft in all supported modes. The
images in the procedure reflect PeopleSoft release 8.4 in 4-tier
mode.
x
Procedure: How to Configure Component Interface Security
To configure
security for each adapter Component Interface:
-
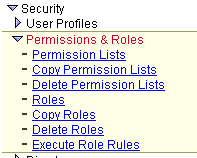
From the PeopleSoft user interface menu, choose PeopleTools, Security, User
Profiles, Permissions & Roles, and
then Permission Lists.
The following image shows the expanded Security menu, which
displays a list of options under Permissions & Roles.
-
Click Permission
Lists.
The following image shows the Permission Lists pane. It
contains two tabs, Find an Existing Value (active) and Add a New
Value, a Search by drop-down list, an input field called "begins
with," a Search button, an Advanced Search hyperlink, and a Search Results
section.

-
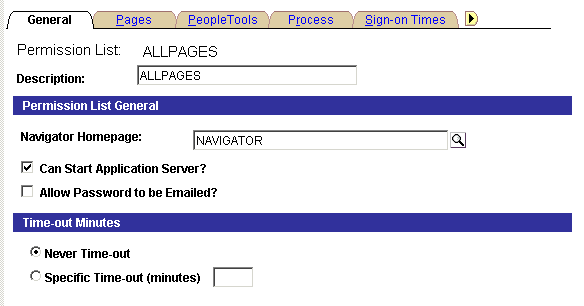
Click Search and
select the relevant Permission List.
The following image shows that the Permission List appears
on the General tab which is active. The other tabs are Pages, PeopleTools,
Process, and Sign-on Times.
-
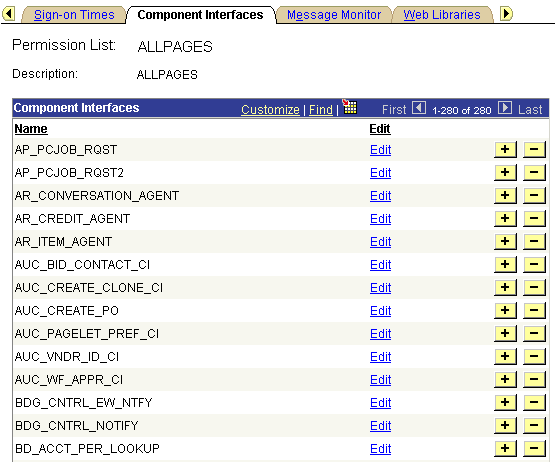
To display
the Component Interfaces tab, click the arrow to the right of the
Sign-on Times tab.
The following image shows the Component Interfaces tab
with a list of interfaces. In addition to the Sign-on Times tab,
the Message Monitor and Web Libraries tabs appear but are inactive.
-
To add a new row to the Component Interfaces list, select the
plus sign (+).
-
Type or select the IWY_CI_ATTRIBUTES Component
Interface.
-
Click Edit.
The Component Interface Permissions pane for the IWY_CI_ATTRIBUTES component
interface opens. It includes a column for Methods and drop-down
lists for the Method Access including ones corresponding to Get
and Find.
-
To set the Get and Find methods to Full Access, click Full
Access (All).
-
Click OK.
-
Repeat
the process for the IWY_CI_MESSAGES Component Interface.
-
Scroll
to the bottom of the Component Interfaces pane and click Save.
You have
finished configuring security for the Component Interfaces delivered with
the iWay Application Adapter for PeopleSoft. To test these Component
Interfaces, see Testing the Component Interfaces.
x
Testing the Component Interfaces
You must test each of the PeopleSoft Component Interfaces
before using them with the adapter.
x
Procedure: How to Test the Component Interfaces
To test
the Component Interfaces:
-
In PeopleSoft Application Designer, open the IWY_CI_ATTRIBUTES Component
Interface.
-
Choose Tools and
then, Test Component Interface.
The following image shows the Component Interface Tester
dialog box. It contains three panes: 'Get' keys, 'Create' keys (inactive),
and 'Find' keys all for Component Interface. It includes three check
boxes: Interactive Mode, Get History (selected), and Edit History
Items. It also includes four buttons: Get Existing (active), Create
New (inactive), Find button, and Cancel.
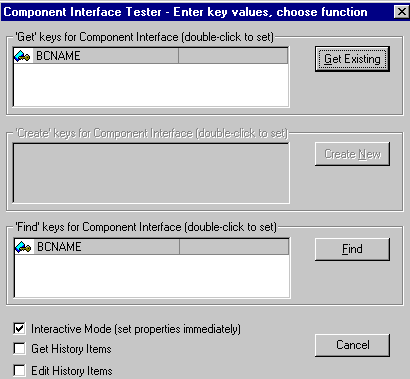
Note: The Create
New button is inactive because the Add method is not applicable
to this Component Interface.
-
Click
the Find button.
Entries for the underlying component appear. A message
may appear stating that display is limited to a certain number of
entries. This is not a significant limitation.
The following
image shows the Component Interface Tester - Find Results dialog box.
It contains a Find Results field and Get Selected and Cancel buttons.

-
Highlight
one of the lines with its corresponding key in the Find Results window
and click the Get Selected button.
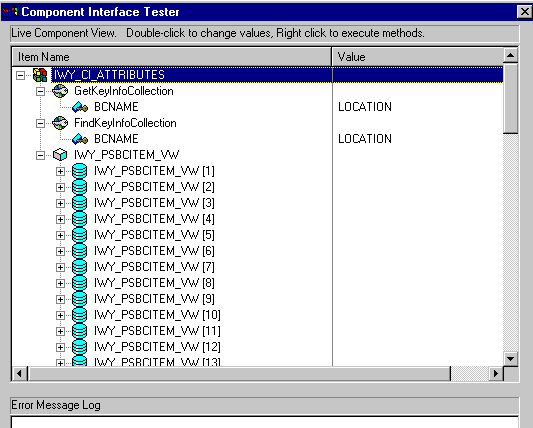
The relevant data for the selected key appears as shown
in the following image of the Component Interface Tester. The Tester
includes an Item Name pane and a Value pane. The image shows the
values for the keys, GetKeyInfoCollection and FindKeyInfoCollection,
and the list of IWY_PSBCITEM_VW databases. It also contains an Error
Message Log pane.
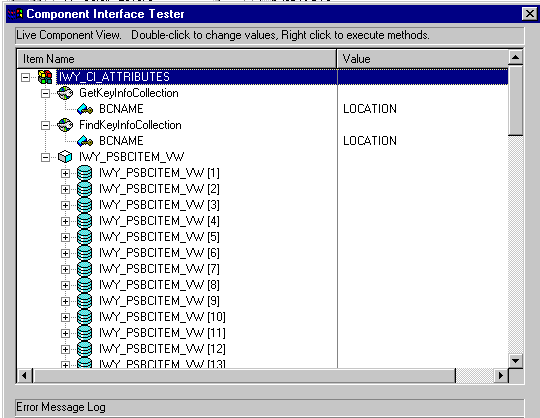
When this window appears,
the Component Interface was successfully tested for the Find method.
-
In the
Component Interface Tester dialog box, click the Get button.
For the Get method, an existing key must be entered.
The
following image shows the Component Interface Tester dialog box.
It contains three panes: 'Get' keys, 'Create' keys (inactive), and
'Find' keys, all for Component Interface. It also includes three
check boxes: Interactive Mode, Get History (selected), and Edit
History Items. It includes four buttons: Get Existing (active),
Create New button (inactive), Find button, and Cancel.
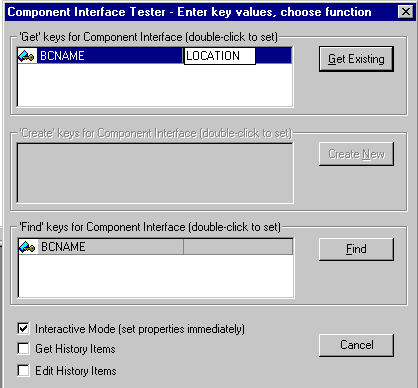
The exposed properties
for the key that is entered are returned.
The following image
shows the Component Interface Tester dialog box. It includes an
Item Name pane and a Value pane as well as an Error Message Log
pane.
If the previous window
opens, the Component Interface has been successfully tested for
the Get method.
-
Repeat
the previous steps for the IWY_CI_MESSAGES Component Interface.
You have
finished testing the Component Interfaces.