Creating a Channel

In this section:

How to:

A channel binds a port to a listener managed by iWay Application Adapter for mySAP ERP (SAP JCo 3.x). A defined port must be associated with a channel in order for you to listen for events that take place in SAP ERP.

The procedures in this topic describe how to create, edit, or delete a channel using the Events node in iWay Explorer.


Top of page

x
Procedure: How to Create a Channel
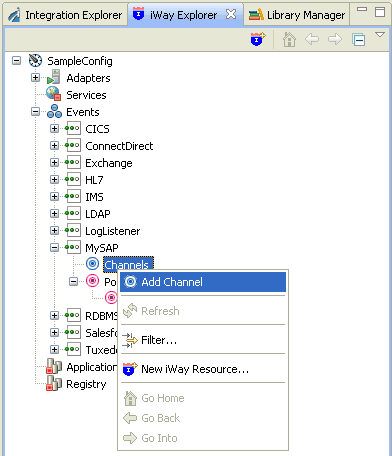
  1. Connect to the Events node in iWay Explorer and expand the MySAP node.

  2. Right-click the Channels node, and click Add Channel from the menu.

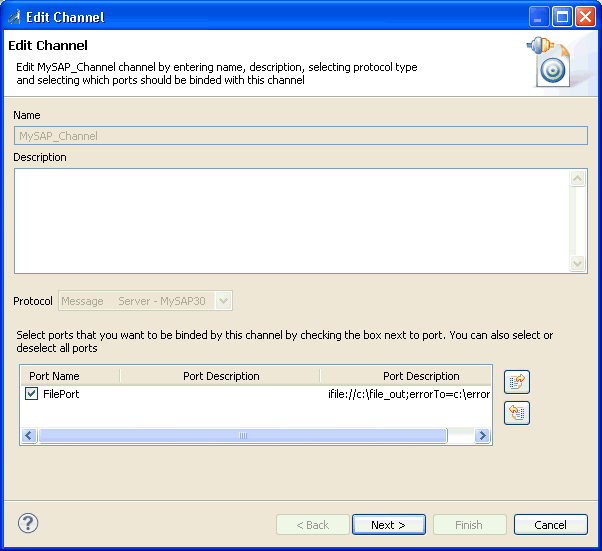
    The following image shows the Add Channel dialog box that opens, where you supply information about the channel.

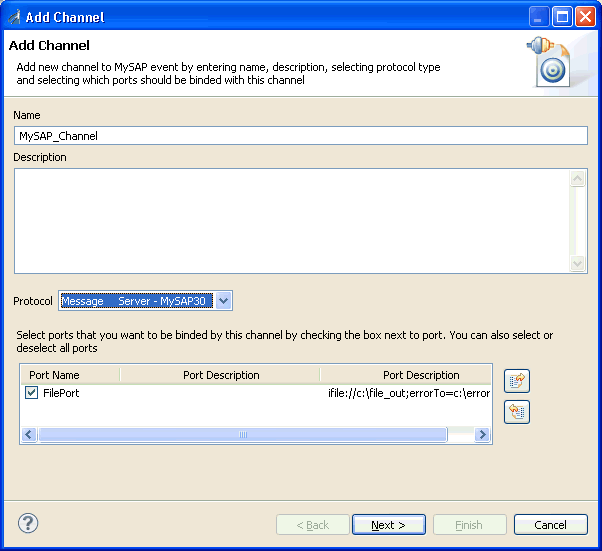
    1. In the Name field, type a name for the channel, for example, MySAP_Channel.
    2. In the Description field, optionally type a brief description (optional).
    3. From the Protocol drop-down list, select Message Server - MySAP 30.
    4. Under Port Name, select the check box for each port that this channel will bind to a listener.
  3. Click Next.

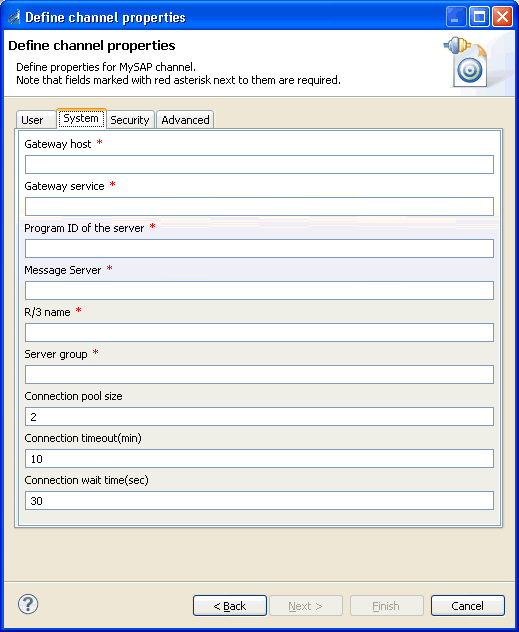
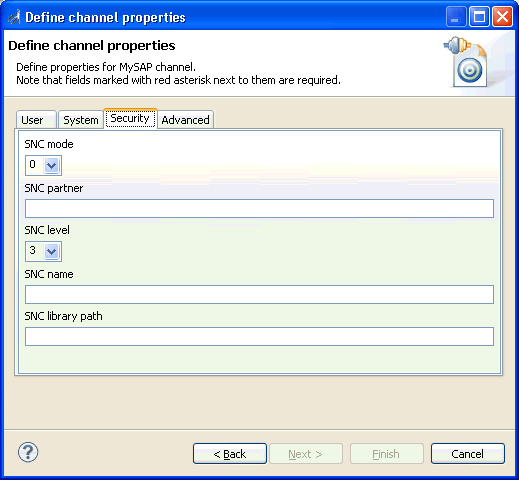
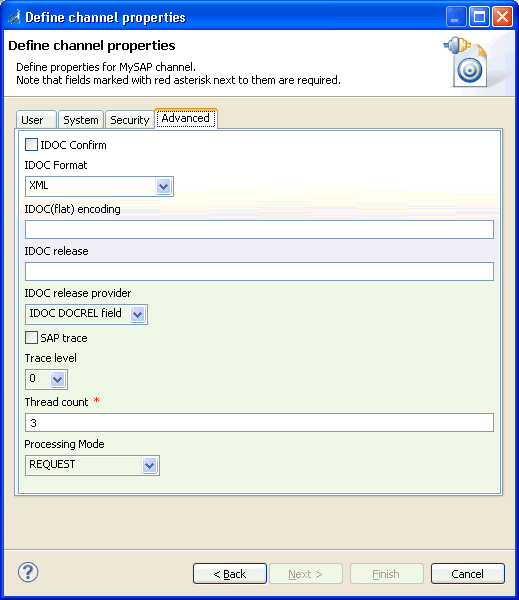
    The Define Channel Properties dialog box opens, as shown in the following image.

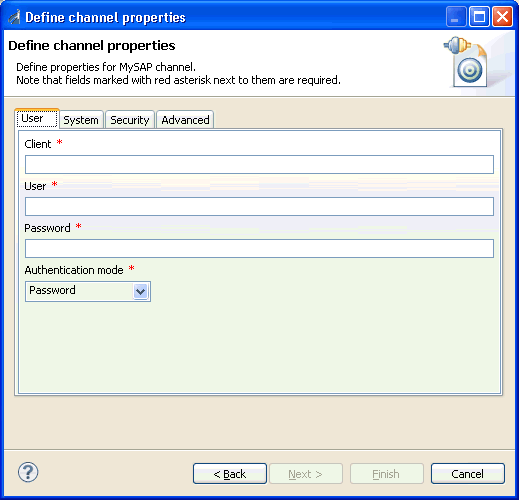
    The following tabs are available:

  4. Click Finish when you are done.

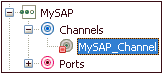
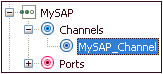
    The following image shows the channel that you added, which appears beneath the Channels node in the Events area of iWay Explorer. In this example, the channel is named MySAP_Channel.

    You are ready to start the channel to listen for events.

  5. Right-click the channel, for example, MySAP_Channel, and click Start from the menu.

    The channel is now active and will poll the SAP ERP system with the configured commands to generate events.

  6. To stop the channel at any time, right-click the channel, and click Stop from the menu.

Top of page

x
Procedure: How to Edit a Channel

After you create a channel, you can edit the information that you provided during the creation procedure.

  1. In the Events node of iWay Explorer, locate the name of the channel that you want to edit, for example, MySAP_Channel.
  2. Right-click the channel, and click Edit from the menu.

    The Edit Channel dialog box opens. It displays the values that you supplied when you created the channel.

  3. Use the fields on the dialog box to modify the properties as desired. You cannot change the name of the channel or its protocol.
  4. Click Next on the Edit Channel dialog box to open the Define Channel Properties dialog box.
  5. Use the tabs and fields on this dialog box to modify the properties as desired.
  6. Click Finish on the Define Channel Properties dialog box when you have made your edits.

    The modified properties are applied to the channel.


Top of page

x
Procedure: How to Delete a Channel
  1. Expand the Channels node in the Events area of iWay Explorer to locate the name of the channel that you want to delete, for example, MySAP_Channel.
  2. Right-click the channel, and click Delete from the menu.

    iWay Explorer displays a prompt, asking you to confirm the deletion of the selected channel, as shown in the following image.

  3. Click OK to proceed with the deletion.

Top of page

x
Configuring the User Tab

This section describes how to configure the User tab during the channel configuration process, which is shown in the following image.

The parameters available in the User tab are listed and described in the following table:

Parameter

Description

Client

Client number defined for the SAP ERP system for client communications.

User

Valid user ID for the SAP ERP system.

Password

Valid password for the SAP ERP system.

Authentication mode

From the Authentication mode drop-down list, select one of the following options.

  • Password. Use the value in the supplied field.
  • Logon ticket (SSO2). Specify the user to be $MYSAPSSO2$ and pass the base64 encoded ticket as the password parameter.
  • Logon ticket (X509). Specify the user to be $X509CERT$ and pass the base64 encoded certificate as the password parameter.

Note: The user and password parameters that are mentioned here refer to the User and Password parameter fields in iWay Explorer.


x
Configuring the System Tab

This section describes how to configure the System tab during the channel configuration process, which is shown in the following image.

The parameters available in the System tab are listed and described in the following table:

Parameter

Description

Gateway host

Enter the name of a SAP ERP Gateway server. The SAP ERP Gateway carries out CPI-C services within the SAP ERP world, which are based on TCP/IP. These services enable SAP ERP systems and external programs to communicate with one another.

Gateway service

Enter the service name (usually a compound of the service name and system number). This is the service name on the gateway host.

Program ID of the server

A program identifier that has been specified on the SAP ERP Gateway server (case sensitive). This is a unique identifier for your communication session specified by your system administrator. The value entered in this field must match the one exposed on the gateway.

Message Server

Connects to an ABAP message server.

For load balancing purposes, application servers from one SAP ERP system are usually configured in logon groups, where each group serves a particular kind of user. The message server is responsible for communication between the application servers. It passes requests from one application server to another within the system. It also contains information about application server groups and the current load balancing within them. It uses this information to choose an appropriate server when a user logs onto the system.

R/3 name

Identifies a unique instance on the application server. This value is a symbolic SAP ERP system name used to identify the system.

Server group

Identifies the logon group. This is the logon group that the user ID belongs with.

Connection pool size

Maximum number of connections for the pool. This sets the maximum number of connections that can be allocated from the pool.

Connection timeout(min)

Maximum time to keep open a free connection (in minutes). Connections that have not been used for at least the connection timeout interval are closed.

Connection wait time(sec)

Maximum wait for a free connection. This sets the maximum time to wait in a connection request for a free connection. If the pool is exhausted, and there is still no connection available after the specified time, then a JCO exception with the key JCO_ERROR_RESOURCE is generated. The default value is 30 seconds.


x
Configuring the Security Tab

This section describes how to configure the Security tab during the channel configuration process, which is shown in the following image.

The parameters available in the Security tab are listed and described in the following table:

Parameter

Description

SNC mode

Flag for activating SNC. Select 0 to disable SNC mode and 1 to enable SNC mode.

SNC partner

Specifies the SNC name of the application server. You can find the SNC name of the application server in the profile parameter snc/identity/as.

SNC level

Specifies the level of protection to use for the connection.

  • 1. Authentication only (default).
  • 2. Integrity protection
  • 3. Privacy protection.
  • 8. Use the value from snc/data_protection/use on the application server.
  • 9. Use the value from snc/data_protection/max on the application server.

SNC name

Specifies SNC name. Although this parameter is optional, it is not recommended for use to ensure that the correct SNC name is used for the connection.

SNC library path

Specifies the path and file name of the external library. The default is the system-defined library as defined in the SNC_LIB environment variable.


x
Configuring the Advanced Tab

This section describes how to configure the Advanced tab during the channel configuration process, which is shown in the following image.

The parameters available in the Advanced tab are listed and described in the following table:

Parameter

Description

IDOC Confirm

If this option is selected, a STATUS IDOC is returned to SAP ERP confirming receipt for every IDOC that is received.

When a standard IDOC is sent, the usual last status available through the SAP IDOC monitor is Data Sent to Port OK - 03, in the WE02 transaction IDOC list. If you want to use the WE02 transaction to ensure that the IDOC was received at the target destination, then enable this option. When an IDOC is received, the adapter returns a STATUS IDOC to SAP ERP and in the WE02 transaction IDOC list, the status of the IDOC is changed to 12, Dispatch OK.

Note that if a large number of IDOCs are sent in bursts, enabling this option may impact performance. If performance is an issue, then it is recommended to disable this option.

IDOC Format

Select an IDOC type from the drop-down list:

  • XML (default)
  • XML-CDATA-ENVELOPED
  • NATIVE IDOC

IDOC(flat) encoding

The type of encoding for IDOC processing.

IDOC release

Specifies the version in which the IDOC definition was released. You can assign segment definitions from previous releases to an IDoc type in the current release. This may be necessary if, for example, the partner is using an older release which supports your current IDoc type, but not your current segment definitions.

IDOC release provider

Specifies where the adapter will retrieve the release information.

  • IDOC DOREL field. Uses the information in the IDOC header.
  • SAP release. Retrieves the information from the user account logon.
  • user input. Uses the IDOC release field to retrieve the information.

SAP trace

Enables the SAP ERP Java connectors trace behavior.

  • Off (default). Only hard errors are written to the trace file (dev_rfc.trc) in append mode.
  • ON. Individual rfc*.trc and JCO*.trc are written for each request. This is useful in finding errors, but not recommended in a production environment.

Trace level

Indicates the level of detail in the SAP ERP traces. Select a value that ranges from 0 through 10 from the drop-down list.

Thread count

The number of open threads. By default, three threads are specified.

You must also configure iWay Service Manager for increased listener threads to take advantage of increased worker threads, and configure other parameters, such as Process In Parallel.

Processing Mode

Select the type of synchronous processing from the drop-down list. Possible values include REQUEST and REQUEST_RESPONSE.

If a channel is created with a processing mode set to REQUEST_RESPONSE, then this channel is listed during the WSDL creation process only if the object has a reply schema. Otherwise, the channel will not be listed.


iWay Software