Using the iWay Trading Partner Manager Web Application
The iWay Trading Partner Manager (iTPM) Web application
is responsible for managing trading partner data. This section describes
how to navigate and use the iTPM Web application during the creation
of a trading partner route.
x
Procedure: How to Access the iWay Trading Partner Manager Web Application
To
access the iWay Trading Partner Manager (iTPM) Web application:
-
Enter the following URL in your Web browser:
http://localhost:8089/index.html
The
User Authentication logon page opens.
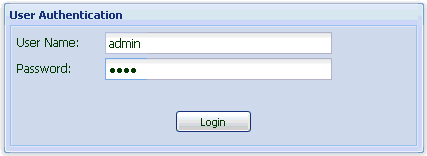
-
Enter admin as the user name (default)
and iway as a password.
-
Click Login.
The iWay Trading Partner Manager Web application opens,
as shown in the following image.
The various iTPM facilities
can be accessed by clicking the tabs at the top of the pane.
The
following sections describe the iTPM facilities in more detail:
-
For more
information about using the Partners facility, see Partner.
-
For more
information about using the Routes facility, see Routes.
-
For more
information about using the Standards facility, see Standards.
-
For more
information about using the Messages facility, see Message.
-
For more
information about using the Systems facility, see Systems.
-
For more
information about using the Environments facility, see Environments.
-
For more
information about using the Administration facility, see Administration.
x
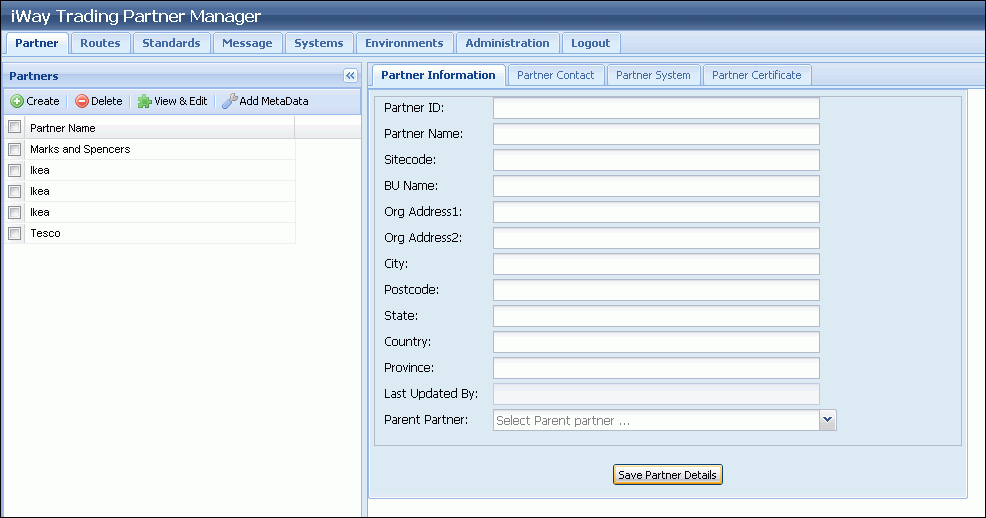
The Partner page is used to manage partner information,
partner contacts, partner systems, and partner certificates.
When a specific partner is selected in the left pane, and the View
and Edit button is clicked, the partner tabs in the
right pane provide all the related information about that partner.
The following tabs are available:
- Partner
Information
- Partner Contact
- Partner System
- Partner Certificate
As with all iWay Trading Partner Manager pages, the Partners
page has a number of common usability features, which are listed
and described in the following table:
|
Button
|
Description
|
|---|
|

|
Adds another entry of the particular object
(on this page, it adds a new Partner).
|
|

|
Deletes a selected partner.
|
|

|
Allows you to view and edit the properties
of the selected partner.
|
|
|
Adds any metadata value for the particular business
object.
|
Pagination Tool
Located at the bottom of the left pane for each facility, the
pagination tool allows you to quickly navigate through the pages
of all defined components (for example, partners, routes, system,
and so on). You can click the refresh  icon to refresh the current
page you are viewing.
icon to refresh the current
page you are viewing.

If a large number of components are defined, you can go to next
page by clicking the right arrow icon. To navigate to the last page
of the set, click the icon. By default, the first 25
objects of the set are displayed based on the latest edited information.
In this example, 1 - 25 of 231 means that there is a total of 231
partners defined in the system.
icon. By default, the first 25
objects of the set are displayed based on the latest edited information.
In this example, 1 - 25 of 231 means that there is a total of 231
partners defined in the system.
x
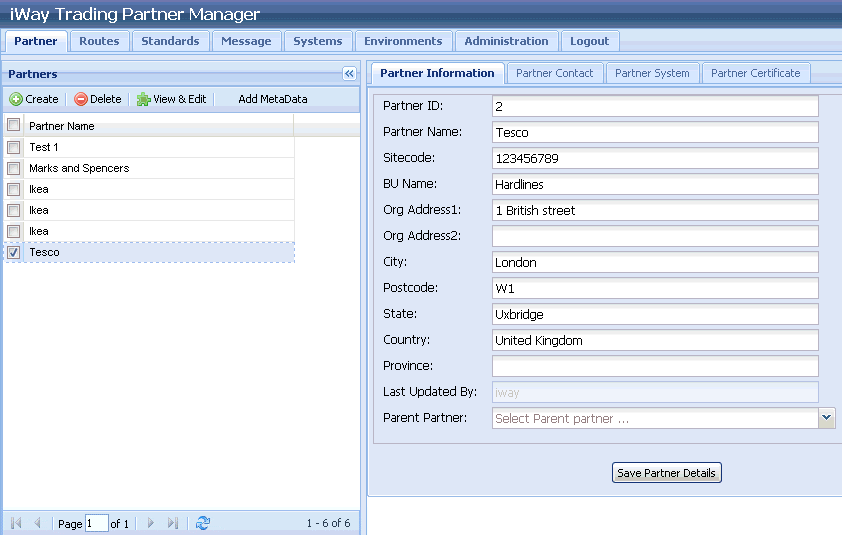
Procedure: How to Add a Trading Partner
To
add a trading partner using the iTPM Web application:
-
Select the Partners tab in the iTPM Web application.
The Partners pane opens, which contains the following tabs:
-
Partner
Information
-
Partner
Contact
-
Partner
System
-
Partner
Certificate
The Partner Information tab is selected
by default.
-
Click the Create button in the upper-left
hand corner of the screen.
The Create New Partner pane opens, as shown in the following
image.
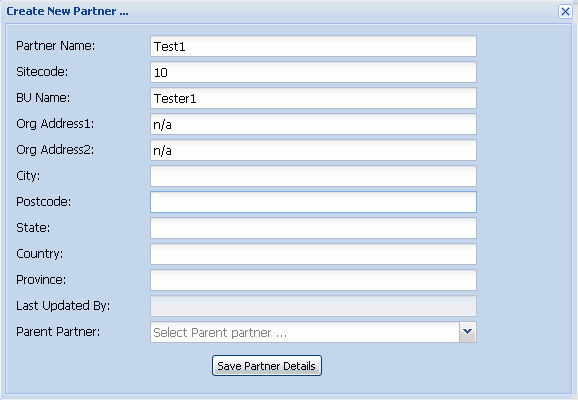
-
Enter the information for the trading partner you are creating.
-
Click Save Partner Details when you
are finished
The new trading partner is added, as shown in the following
image.
To edit an existing
trading partner, select the trading partner and click the View
and Edit button.
To delete an existing trading
partner, select the trading partner and click the Delete button.
-
To associate a trading partner system with the trading partner
you just created, select the trading partner in the left pane and
click the Partner Systems tab.
The Partner Systems pane opens, as shown in the following
image.
-
Click the Add icon in the lower-left corner of the Partner
Systems pane.
The Add Partner System pane opens,
as shown in the following image.
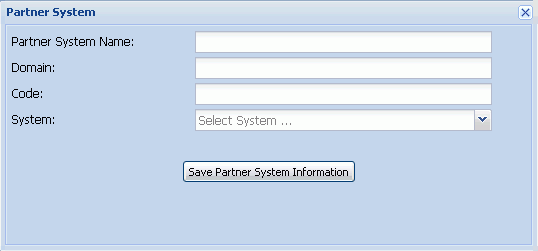
Note: The System
drop-down list is populated with available systems that have been
created using the Systems facility. As a result, you must define
a system before it can be associated with a trading partner. For
more information, see Systems.
-
Enter the information for the trading partner system you are
creating and select an existing system from the System drop-down
list.
-
Click Save Partner System Information when you
are finished.
The new trading partner system is added, as shown in the
following image.
To edit an existing
trading partner system, select the trading partner system and click
the Edit Partner System button.
To
delete an existing trading partner system, select the trading partner
system and click the Delete button.
The
following message is displayed below the new trading partner system:
No systemsMessage's assigned for this partnerSystem
-
To associate a system message with the trading partner system
you just created, click the Edit icon, which is located to the right
of the trading partner system, as shown in the following image.
The New/Edit PartnerSystemMessages
pane opens, as shown in the following image.
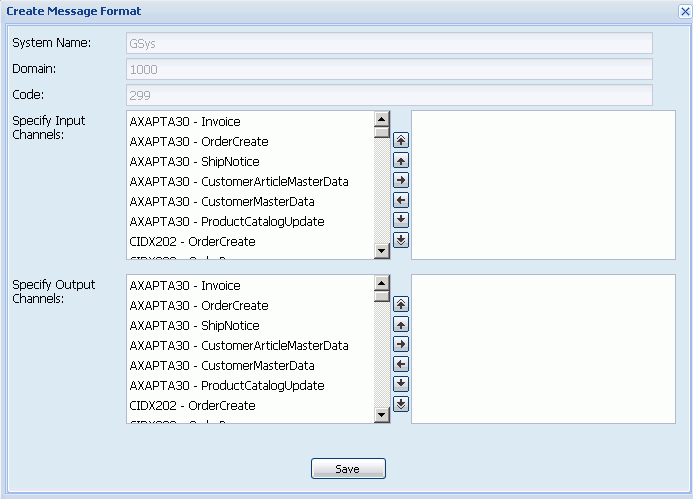
-
From the Message Types list on the left, select an available
system message and it to the BusinessChannels (Direction: IN or
Direction: OUT) sections accordingly.
-
Click Save when you are finished.
You are returned to the Partner Systems pane, as shown
in the following image.
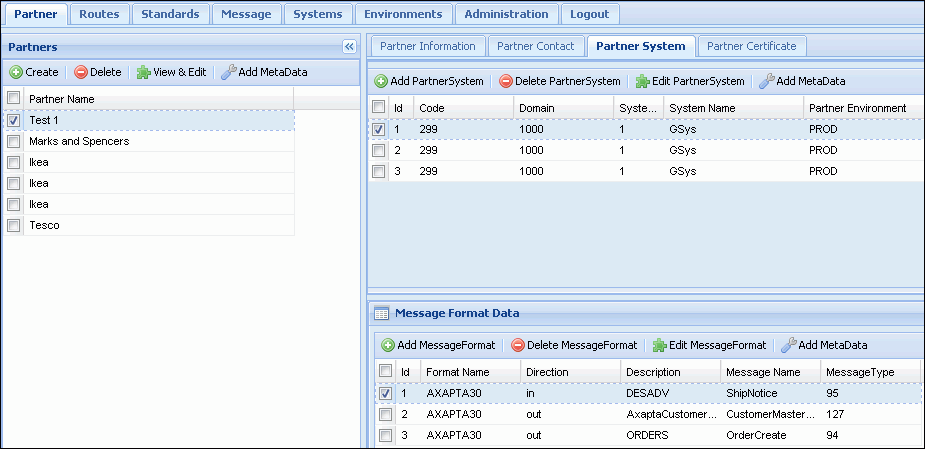
Notice that the system
message is now associated with the trading partner system.
You
are now ready to create a route for your trading partner. For more
information, see How to Create a Trading Partner Route.
x
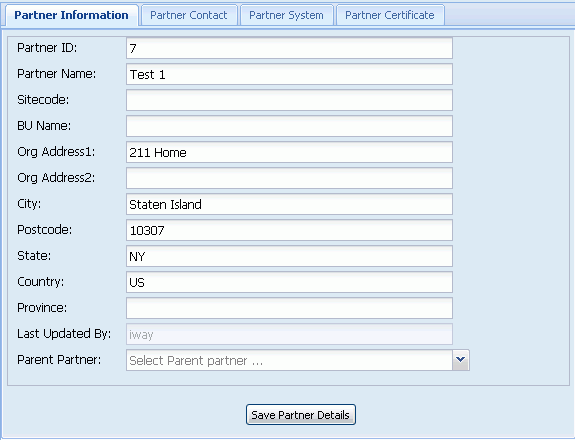
This section provides an example of the Partner Information
pane that is displayed in the browser window when you select the
Partner Information tab and then click View and Edit.
x
The Partner Contacts tab allows you to add, modify,
or delete contacts for the selected trading partner.

Notice that the Create, Delete, View and Edit, and TPA Properties
buttons are also available. These buttons provide the same functionality
as those found in the main Partners page. The only difference is
that they are relative to the contacts for the selected partner. They
relate to the partner contact, not the partner itself.
The following image shows the Add new contact for partner pane,
which allows you to provide the standard information about a contact.
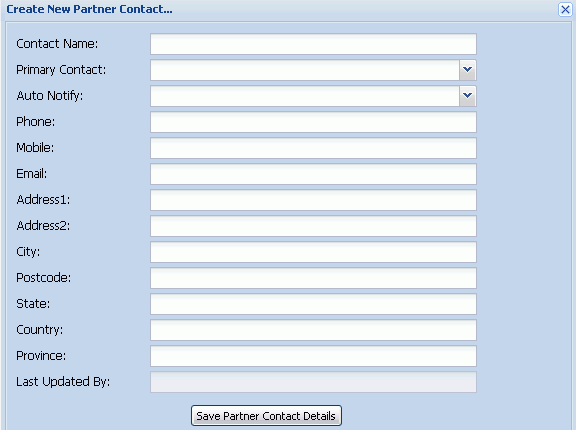
Click Save Partner Contact Details to save the entry that you
are editing.
x
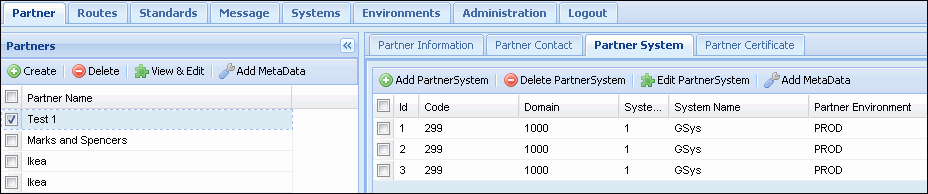
The Partner Systems tab associates systems to the selected
partner. Within each system, the message types can be passed in
or out from the particular system, as shown in the following image.
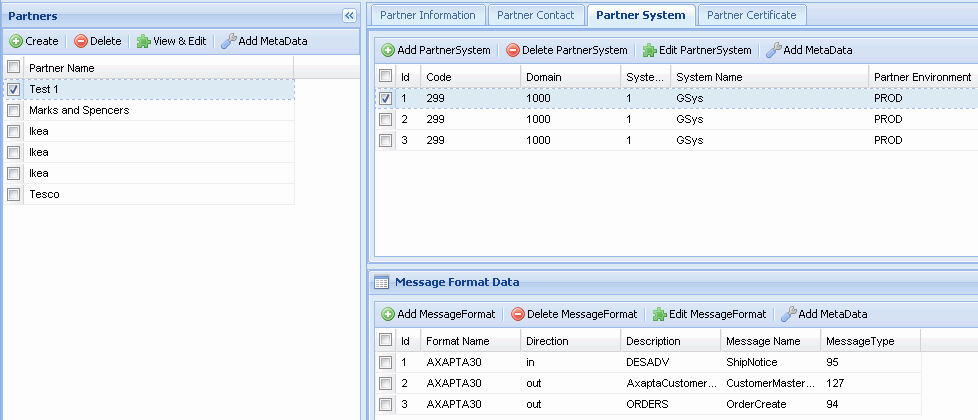
The Add MetaData button is located within
each system tabular group and next to each message. This allows
you to add specific properties for either the partner system or
for the combination of partner, system, and message.
x
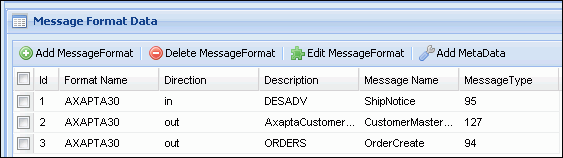
Partner System Message Page
To add a set of messages to be defined to interact between
the partner and the particular system, click the Add
MessageFormat button. To edit the set of messages that
are defined to interact between the partner and the particular system,
click the Edit MessageFormat button.
The New/Edit Partner System Messages pane opens.
This pane lists all the available message types and allows you
to define whether messages go in or out of the particular system.
By selecting single or multiple messages, you can include the
selected messages on the inbound business channel or outbound business
channel.
x
The Partner Certificates tab allows iTPM to manage and
reference keys and certificates that are used by iWay Service Manager.
Click the Create button to create a partner
certificate. Click the Edit button to edit
a partner certificate.
The Add new certificate for partner pane opens, as shown in the
following image.
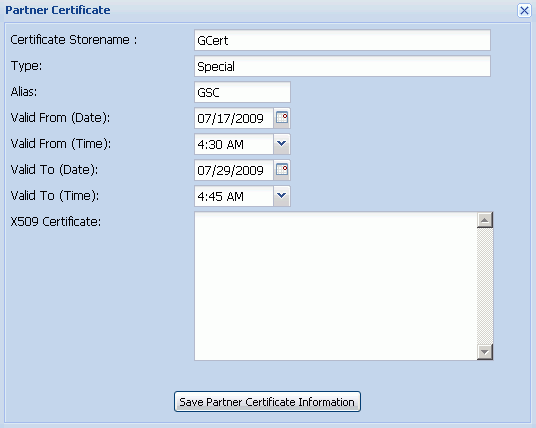
The following table lists and describes the available fields.
|
Field
|
Description
|
|---|
|
Certificate Storename
|
Refers to the certificate store or provider
in which the certificate is used in iWay Service Manager.
|
|
Type
|
Indicates whether the certificate is a public certificate
of a partner or a private key for local use by iWay Service Manager.
|
|
Alias
|
Indicates the alias being used by the certificate.
|
|
Valid From
|
Indicates the starting period for which
the certificate is valid.
|
|
Valid To
|
Indicate the ending period for which the certificate
is valid.
|
|
X509 Certificate
|
Contains the PEM encoded X509 certificate.
|
x
A business route is the combination of an inbound business
channel and an outbound business channel, where each channel is
a combination of a partner’s system sending or receiving messages.
When the main Routes page is accessed for the first time, there
are no routes that are loaded automatically. The Partner search
fields enable you to search for any one or two partners involved
in a business route irrespective of the direction.
Once the list of matching business routes is returned and a specific
route is selected, the Route Details tab displays the details for
the route.
x
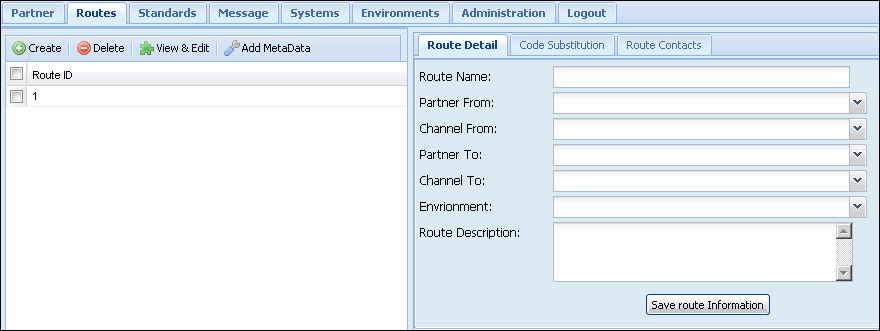
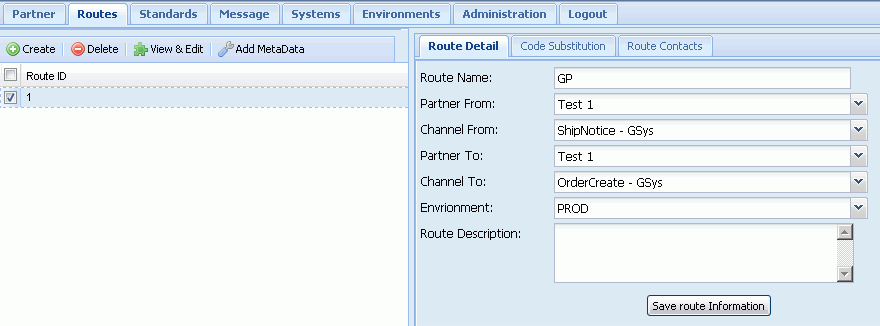
Procedure: How to Create a Trading Partner Route
To
create a trading partner route using the iTPM Web application:
-
Select the Routes tab at the top of the iTPM Web application.
The Partner Routes pane opens, which contains the following
tabs:
-
Route Details
-
Code Substitution
-
Route Contacts
The
Route Details tab is selected by default, as shown in the following
image.
-
Click the Create button in the upper-left
corner of the Partner Routes pane.
The Create New Route pane opens, as shown in the following
image.
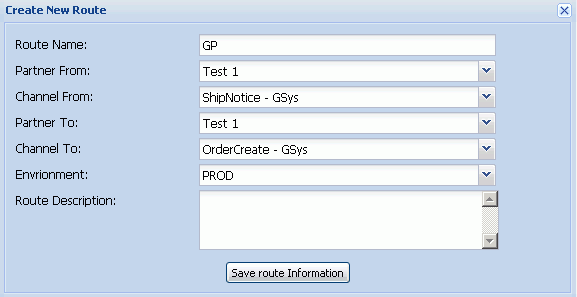
-
Enter the information for the trading partner route you are
creating as required.
-
Click OK when you are finished.
The new trading partner route is added, as shown in the
following image.
To edit an existing
trading partner route, select the trading partner route and click the View
and Edit button.
To delete an existing trading
partner route, select the trading partner route and click the Delete button.
x
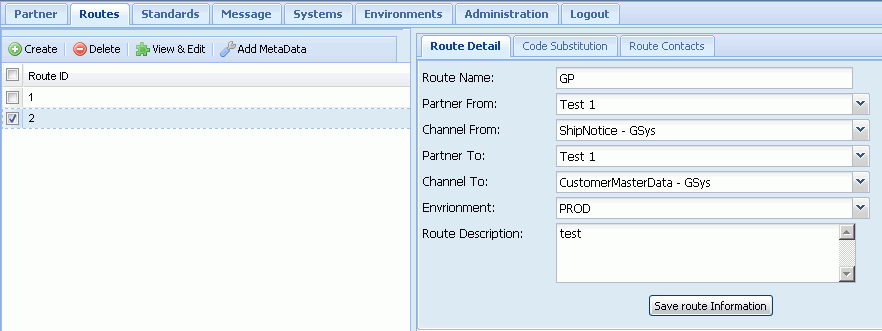
The Route Details tab on the main Route page allows
you to create business routes between the systems of partners and
the messages they exchange, as shown in the following image.
Click the Create button to create a new
business route. The TPM Edit BusinessRoute pane opens, as shown
in the following image.
From this pane, you can select an environment for the route.
For each direction, In (from a partner and channel) and Out (to
a partner and channel), a pair of drop-down lists reflect the partner
and the specific partner's system and message type combinations
for the selected environment.
x
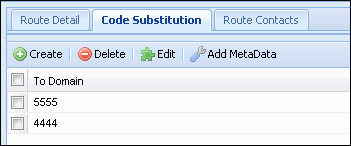
The Code Substitution tab on the main Route page allows
you to substitute values in messages where original values can be
substituted with alternate values of codes, as shown in the following
image.
x
The Route Contacts tab on the main Route page provides
the existing contact or contacts that are associated with the entire
business route.
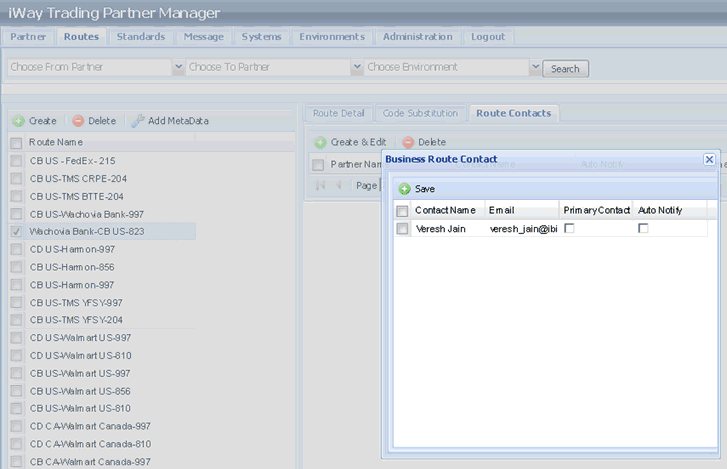
To add or edit the list of contacts assigned to the business
route click the Create button. You can also
specify whether the route is a primary route or a secondary route.
x
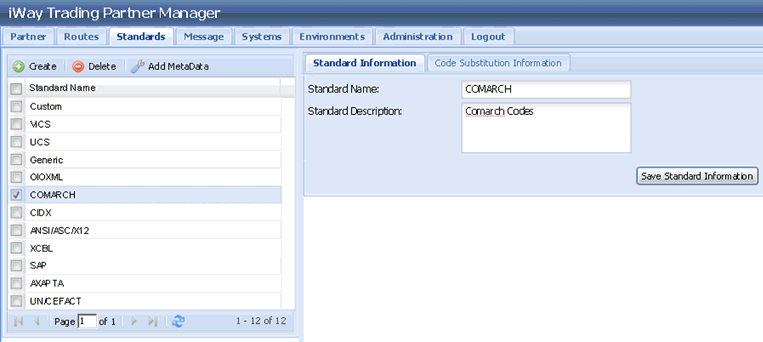
The Standards facility provides a grouping of message
formats and message types, and most importantly are holders of particular
sets of codes.
The following image shows the Standard Details tab, which lists
all defined standards.
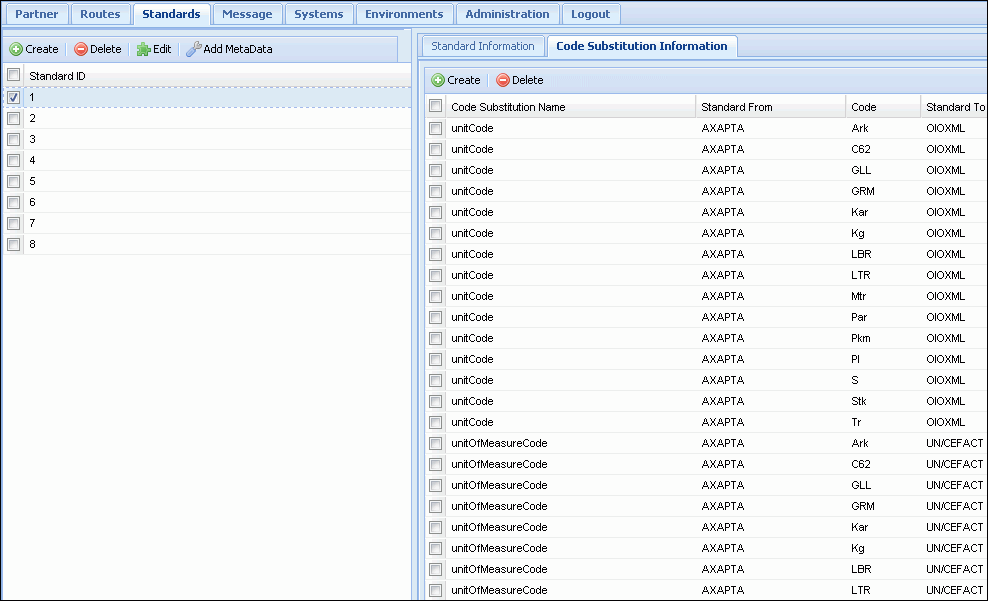
The following image shows the CodeSubstitutions tab, which shows
the code substitutions between two standards.
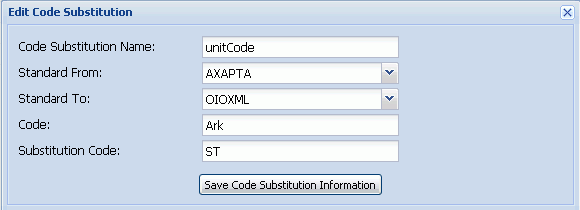
Select a specific code substitution to open the Edit Code Substitution
pane, as shown in the following image.
x
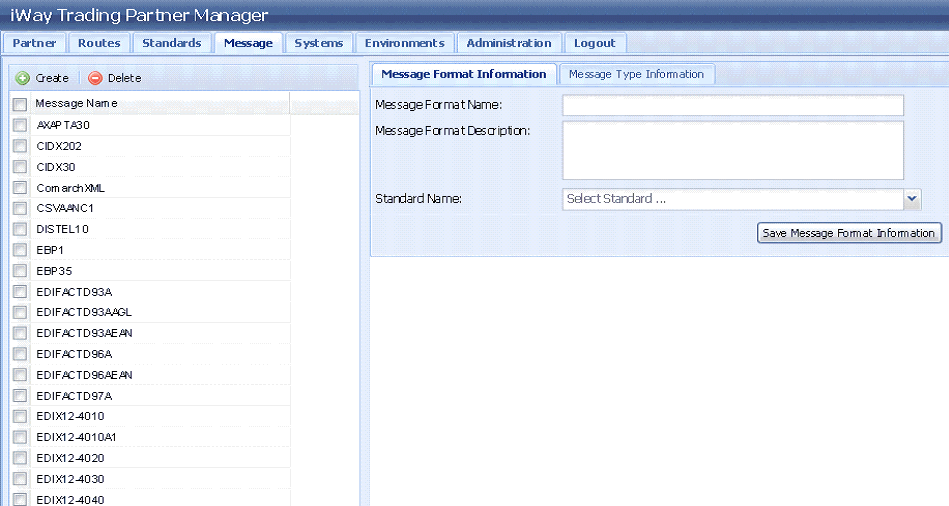
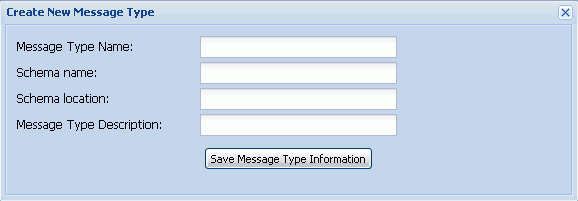
The main Message page allows you to edit message types
and formats. Formats are a grouping of message types within a defined
group.
You can choose a particular format from the list of message types
by clicking the Message Type Information tab, as shown in the following
image.

Click the Create button to add a new message
type, as shown in the following image.
The Schema name and Schema location fields can be used to reference
messages to a particular schema for use in either design-time (for
use with iWay Transformer) or run-time in iWay Service Manager,
for use with schema validation. Click Save Message Type Information
to save the message type.
x
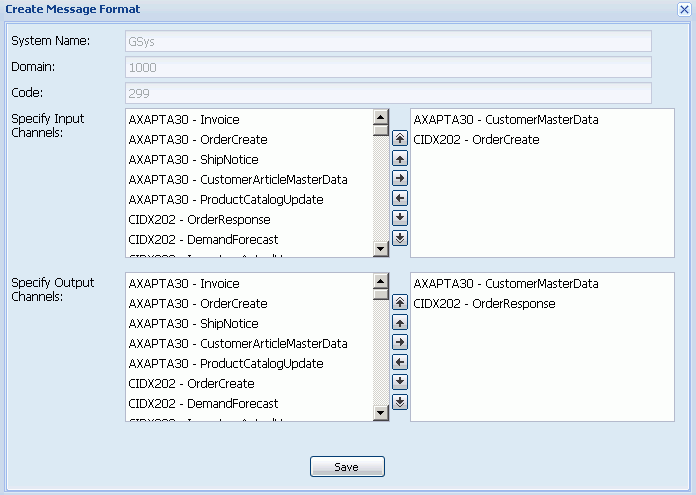
Procedure: How to Add a Message to the System
To
add a message to the system using the iTPM Web application:
-
Select the Message tab in the iTPM Web application.
The Messages pane opens, which contains the following tabs:
The Message Format Information
tab is selected by default.
-
Click the Create button at the upper-left
corner of the screen.
The Create New Message Format pane opens, as shown in the
following image.
-
Enter the information for the message you are creating.
-
Click Save Message Format Information when you are finished.
The New Message is Added, as shown in the following image.
To edit an existing
message, select the message and click the View and Edit button.
To
delete an existing message, select the message and click the Delete button.
-
To associate a message type with the message you just created,
select the message in the left pane and click the Message Type Information
tab.
The Message Type Information pane opens, as shown in the
following image.

-
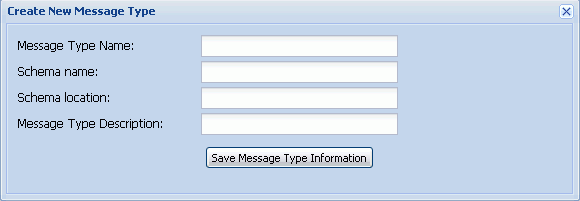
Click the Create button at the top of
the Message Type Information pane.
The Create New Message Type pane opens, as shown in the
following image.
-
Enter the information for the message type you are creating.
-
Click Save Message Type Information when
you are finished.
The new message type is added, as shown in the following
image.
To edit an existing system, select the system and click
the Edit icon.
To delete an existing system, select the system
and click the Delete icon.
You are now ready to add a trading
partner. For more information, see How to Add a Trading Partner.
x
The main Systems page allows users to define the technical
systems that partners use and which performs sending or receiving,
out or in respectively, of messages (which are instances of message
types).
Systems are direct mapping between iSM components (such as adapters,
channels, and listeners) and iTPM. Before a system can be defined,
the appropriate adapters, channels, or listeners must be created
and available in the iSM registry.
From the Edit pane, you can indicate which environment the system
is operating (for example, a production system or a test system).
A system can only be in one environment at a time.
Additionally, you can link the trading partners' systems to actual
iWay systems through iWay Service Manager adapter, channel, or listener
targets. In doing so, you can also look up a partner's system and
reference a runtime system (for example, to allow routing by a partner
system). As with all other trading partner objects, you can define
extended attributes about a particular system by clicking on the Add
Metadata button.
x
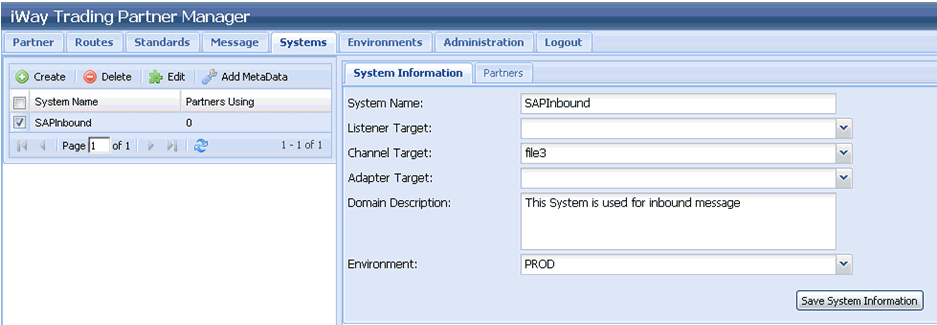
Procedure: How to Create a System
To
create a system using the iTPM Web application:
-
Select the Systems tab from the iTPM Web application.
The System pane is displayed, as shown in the following
image.
-
Click Create in the upper-left hand
corner of the System panes
The Create New System pane opens, as shown in the following
image.
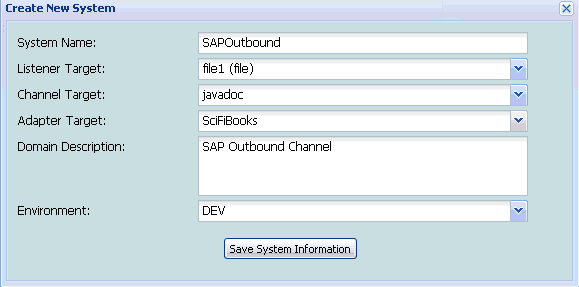
The Listener Target drop-down
list displays all the listeners defined in iSM. The Channel Target drop-down
list displays all the channels defined in iSM. The Adapter Target drop-down
list displays all the adapters defined in iSM.
-
Enter the information for the system you are creating.
-
Click Save System Information
The new system is added, as shown in the following image.
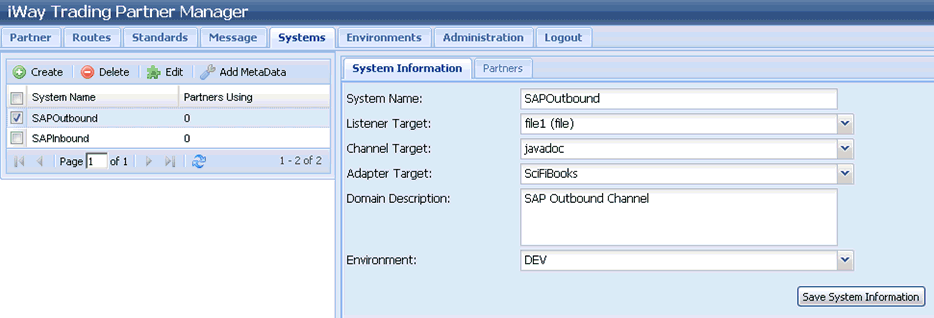
The number of partners
that are associated with a system are shown in the table that is
located in the left pane, under the Partners Using column.
To
view all the partners that are associated with a system, click on
the system name and then click the Partners tab
in the right pane. The associated partners for the selected system
are displayed, as shown in the following image.
To edit an existing
system, select the system name and click the Edit icon.
To
delete an existing system, select the system name and click the Delete icon.
You
are now ready to add a message to the system. For more information,
see How to Add a Message to the System.
x
The iWay Trading Partner Manager application, associated
database, and runtime functions are built based on a defined set
of business objects particular to trading partners and their e-business
messaging interactions. However, it is clear that not all trading partnerships
have the same needs and related information.
Adding Metadata allows you to define additional extended attributes
(information) about each iWay Trading Partner Manager (iTPM) business
object. For example, if you want to add information about a particular
System (for example, an FTP System or a Siebel System), you can
define metadata for the System object. Once metadata has been defined for
the particular business object (for example, System, Partner, Standard,
and so on), you can add TPA values for any defined metadata attribute
for the particular instance of the business object. For example,
if you want to store the FTP Active/Passive connection mode for
a sample FTP System, you would first define the Active/Passivemetadata
attribute on the System business object. Then assign a value to
the particular System (for example, MyFTPSystem).
This process of defining metadata for iTPM business objects is
analogous to adding a column in the particular table (for example,
the System table) for a particular field (for example, ActivePassiveType
column). On the main Systems page, adding a TPA value against ActivePassiveType
metadata attribute for a particular System is like adding a value in
that system's row in the ActivePassiveType column. This ability
to dynamically add virtual or logical columns to iTPM business objects
provides the extensibility feature of iTPM. Additionally, in order
to organize metadata, the metadata items can be related hierarchically to
one another, which aids in understanding and reduces duplication.
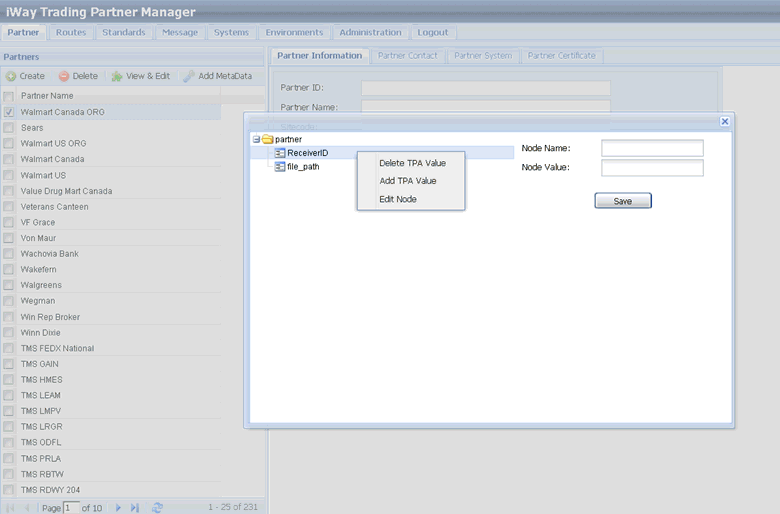
To add metadata for a partner object, select the partner object
in the left pane and click Add MetaData.
The following window opens, which allows you to add, delete, and
update metadata values.
x
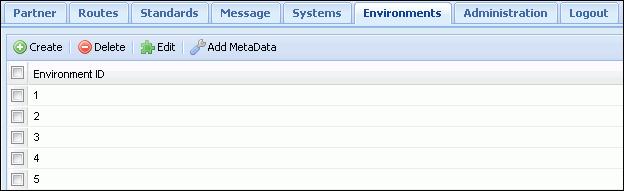
The main Environments page allows you to manage the
environments defined in iWay Trading Partner Manager. With different
environments, you can organize one’s infrastructure. Systems and
business routes can be associated to an environment.
x
The Administration tab allows those users designated
with the role of administrator to add, delete, and edit other users.
Administrators can also designate who else has the privilege of
administrator. The Administration tab is shown in the following image.

Note: Users who are not designated administrators will
not be able to access the Administration tab. It will appear to
be greyed out and is unable to be selected, as shown in the following
image.

iTPM does not allow all of the defined administrators to be deleted.
When deleting administrators and the current administrator is the
last administrator, an error is generated.
To add a user or administrator click the Create button.
To edit a current user click the View and Edit button.
The Create New User and Edit User panes are similar and are shown
in the following image.
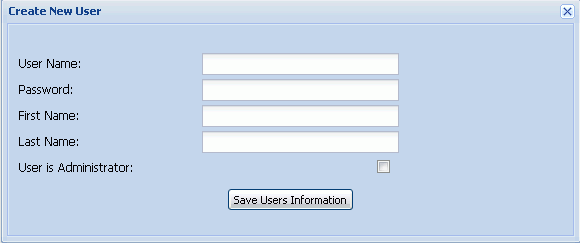
The following table lists and describes the available fields.
|
Field
|
Description
|
|---|
|
User Name
|
The login name for the user.
|
|
Password
|
The user’s password for logging into iTPM.
|
|
First Name
|
The user’s first name.
|
|
Last Name
|
The user’s last name.
|
|
User is Administrator
|
A check box that, if checked, will enable
the user administrative powers.
|
x
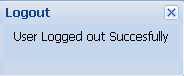
The Logout tab allows the current user to log out of
the current profile and log into another.