In this section: |
|
There are several ways you can use the Infoset Editor
depending on what type of control you want to use to display your
real-time event data.
This section describes the various buttons and fields that are located on the top toolbar of the Infoset Editor.
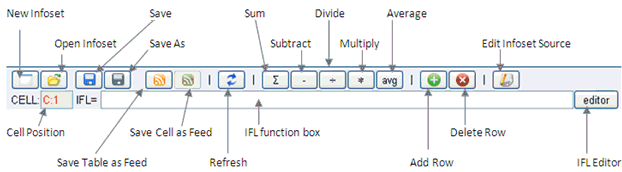
This section describes the various buttons and fields that are located on the bottom toolbar of the Infoset Editor.
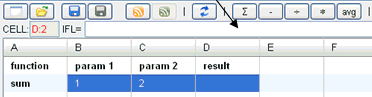
To begin a simple aggregation, create the following Infoset by double clicking on a cell and populating it with the corresponding cell.
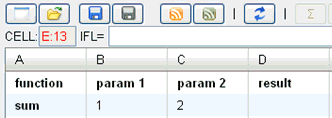
Select the cells to be aggregated; the last cell being the cell
to place the aggregation expression. Then click the Sigma button  .
.
This will construct a sum aggregation and place its value in the last cell. Notice that since the last cell is selected, its iFL expression is displayed in the iFL function box.
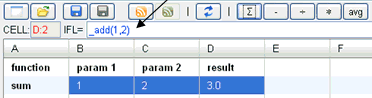
The Infoset cells cannot reference other cells so the iFL expression is 'pass by value'. This means if you change the value in B:1 or C:2, the expression in D:2 will still be _add(1,2) which evaluates to 3.0.
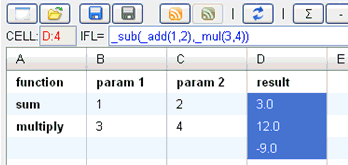
The cell D:2 can take part of yet another aggregation expression. By clicking the subtract button, the Infoset below subtracts the value in D:3 from D:2 by constructing an iFL expression of _sub(_add(1,2),_mul(3,4)).
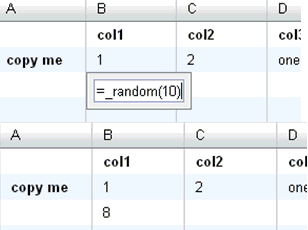
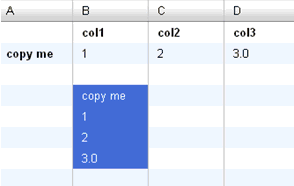
The Infoset Editor also allows you to copy and paste cells. Select the cell(s) you want to copy by pressing Ctrl-C. When selecting, the cells are placed in the order of selection. Before pasting, you must first select the same number of cells that you copied. Paste the cells by pressing Ctrl-V.
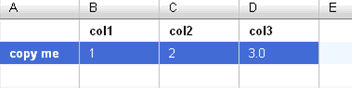
In the following image, four cells have been selected, which is the same number of cells that have been copied.
The Infoset Editor also allows you to format columns.
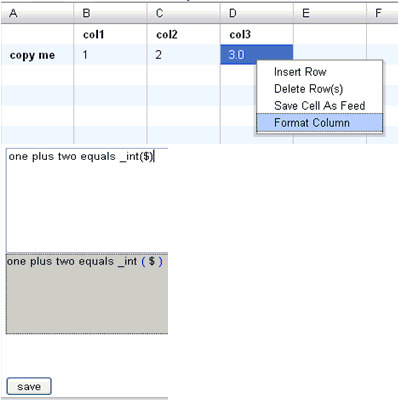
To format a column, right-click the column and select Format Column from the context menu.
An iFL expression editor is displayed. All formatting is performed using iFL, so you can use all of the supported functions. Use the string character ($) to identify the location where the contents of the cell should be inserted.
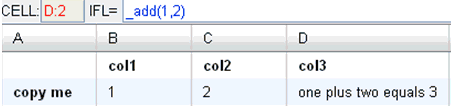
Notice that cell D:2 now contains the formatted/evaluated value, while the iFL expression field still contains the pre-evaluated value.
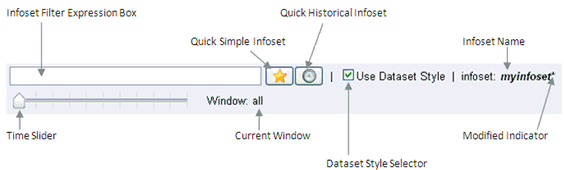
The bottom toolbar contains Infoset generators to quickly populate the Infoset grid.

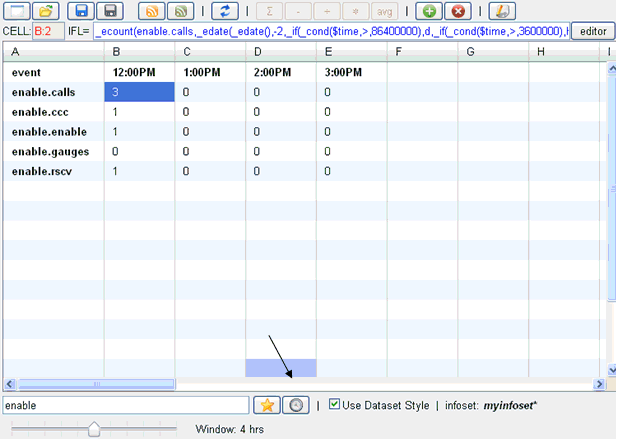
By entering the word 'enable' and clicking the Star button, the editor formatted the Infoset to contain only the events which contain the string 'enable' in its name. It then created seven columns; the first containing the event name and the others with the enable iFL event aggregation functions.
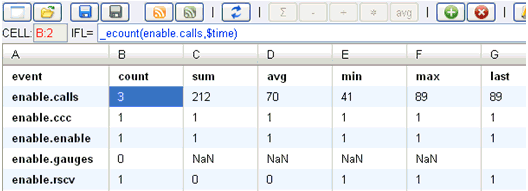
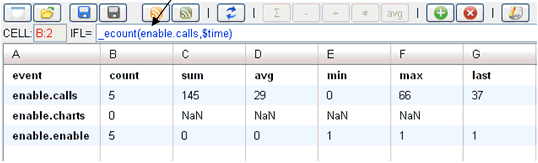
In cell B:2, the editor entered the _ecount(enable.calls,$time) function. which performs a count aggregation on the evenble.calls event table. The $time variable is set by the time slider, which is set to all rows in this example.

The sum, avg, min, max, and last columns are populated accordingly, as listed in the following table.
|
Column |
Function |
|---|---|
|
sum |
_esum(enable.calls,$time) |
|
avg |
_eavg(enable.calls,$time) |
|
min |
_emin(enable.calls,$time) |
|
max |
_emax(enable.calls,$time) |
|
last |
_elast(enable.calls) |
An event window is a period of time where iWay Enable searches for real-time event data. The sample Infoset in this section is an example of applying an event window to the Infoset. This Infoset limits the real-time data for its events to exist only between the present time and four hours ago. This is also referred to as a sliding window because it “slides” as time moves forward.

The Infoset Editor does not create fixed event windows where the real-time event data is between two fixed times. To create a fixed window, you must modify the iFL functions to take a third parameter. For example:
_ecount(enable.calls,endtime,begintime)
In this example, real-time data exists before endtime and after begintime. Both endtime and begintime are times in milliseconds since January 1, 1970, 00:00:00 GMT.
Historical Infosets aggregate real-time data into time intervals. The sample Infoset in this section was generated by clicking the Clock button. This creates an Infoset which uses time values as column names. In this example, since the Time Slider is set at four hours, the editor creates four columns for each hour.
The Infoset Editor aggregates differently based on the Time Slider value. You can use the following table for reference purposes to assist with time aggregation.
|
Time Window |
Time Aggregation |
Number of Columns |
|---|---|---|
|
All |
Minutes |
10 |
|
5 minutes |
Minutes |
5 |
|
10 minutes |
Minutes |
10 |
|
30 minutes |
Minutes |
25 |
|
1 hour |
Minutes |
25 |
|
4 hours |
Hours |
4 |
|
8 hours |
Hours |
8 |
|
12 hours |
Hours |
12 |
|
24 hours |
Hours |
24 |
|
7 days |
Days |
7 |
|
30 days |
Days |
25 |
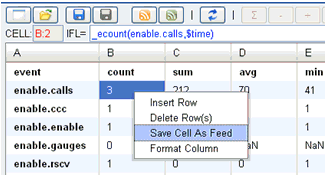
A gauge component can only accept a single value. The Infoset that is used as an example in this section lists events that are related to iWay Enable. To create a gauge that tracks the number of enable.calls events occurring, right-click on the cell which provides that data (for example, B:2) and select Save Cell As Feed from the context menu.
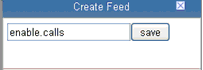
Provide a feed name in the Create Feed dialog box and click save.
Navigate to Resources, Gauges, Angular, and select any angular gauge type. Under sources, feed type, the name of your feed and enable.enable.calls appears. It is prepended with enable. to identify it as part of the iWay Enable namespace. All feeds saved from the Infoset Editor will have the enable. string prepended to its name. Save the gauge as a portlet so that it can be accessed by a composite application.
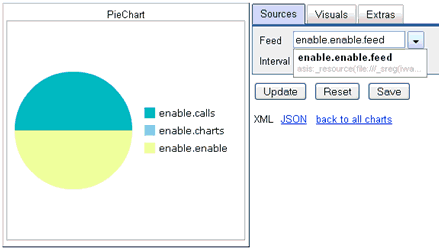
Save your Infoset as a table feed and provide a name (for example, enable.feed). Navigate to Resources and Charts, and select the pie chart. It should now be an available feed named enable.enable.feed. The feed name is prepended with the enable. string for namespaces.
Notice the values when you move your cursor over the chart. The pie chart is using only the first two columns of the Infoset; the event and count. Each row of the Infoset is a separate color on the pie chart. Please note this when you are formatting your Infoset. You can copy and paste a different aggregation in the second column if count is not preferred.
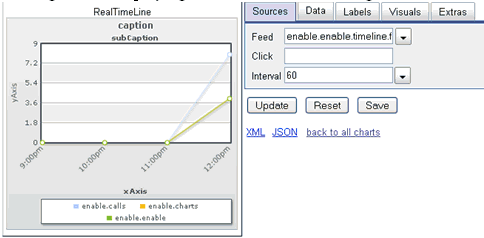
The following Infoset was created using the quick historical Infoset where the time slider is set to four hours. Click Save Table Feed and name it as enable.timeline.feed.

You can now generate a time line chart. The columns are updated with the current time to create a chart that displays data from within a sliding window.
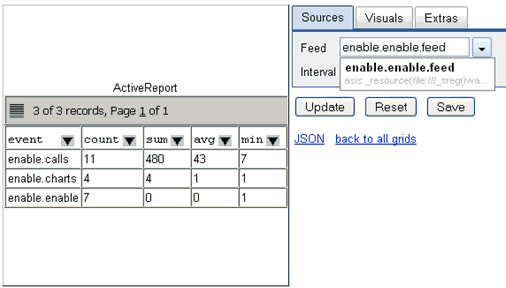
Using the same feed generated in creating a pie chart (enable.feed), you can generate an active report.
Using the same feed that was generated when creating a pie chart (enable.feed), you can generate cloud.
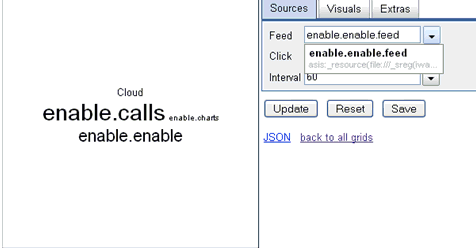
Like the pie chart, this control only consumes the second column of the Infoset. Copy and paste the preferred aggregation to the second column to alter the cloud.
Using the same feed that was generated in creating a pie chart (enable.feed), you can generate a bubble chart.
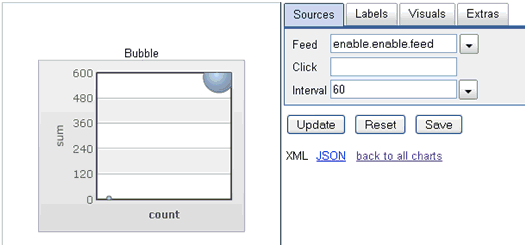
The bubble chart uses the first column for the bubble names, the second column for the X-axis, the third column for the Y-axis, and the fourth column for the bubble size. Your Infoset must have all four columns in order for this widget to work properly.
A dataset is a feed format that charts and grids require to populate themselves with data. Along with charts and grids, some server-side components understand and use it to relay or describe real-time data as well. When creating feeds for charts and grids, the Use Dataset Style option must be checked to ensure the feeds you create can be consumed by these widgets and controls.
This option should always be selected unless you intend to consume your own feed with a control that is not provided by iWay Enable. The following is an example of a simple dataset Javascript object:
{
     columns: [ {name:"column1"}, {name:"column2"} ],
     filter:"enable",
     rows:[{name:"row 1","values":["column2 value"}]
     type:"infoset"
}
Columns and rows are self explanatory. Filter field is the query used to select a specific set of events. In this case, a filter string of enable was used to search for event names which have the enable string in them. The type field is an internal field to assist with the type casting of this object.
| iWay Software |