This section provides an overview of the iWay Enable
facilities that are available in the iWay Service Manager Administration
Console to build and review real-time applications.
x
Applications are built using the elements provided by
iWay Enable, such as gauges and charts, that report statistics for
events that are related to key business objectives. The Application
is an efficient visual grouping of these elements onto a composite
page or dashboard, which allows you to easily focus and interpret
your real-time business data around key events.
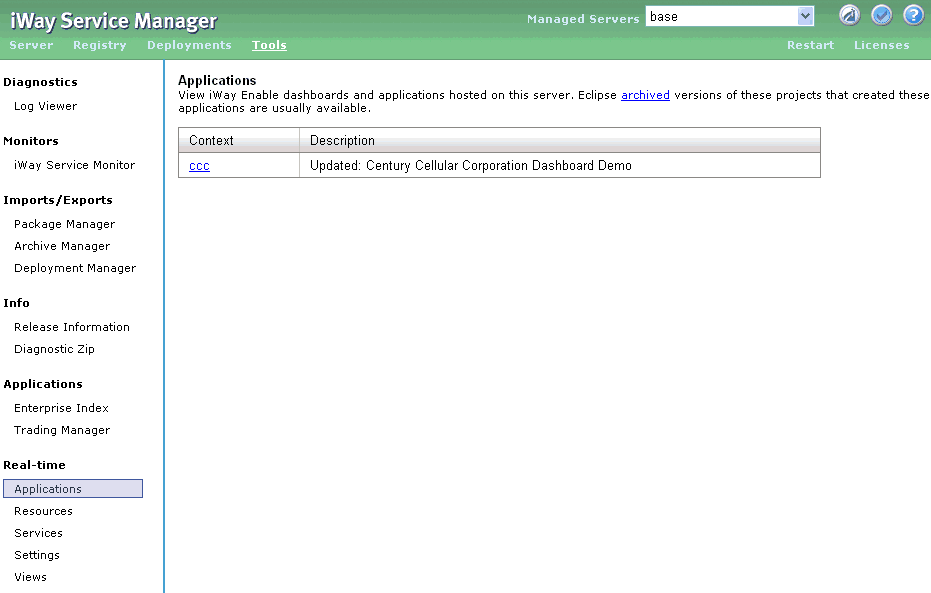
The Applications pane, shown in the following image, provides
a list of the Enable applications that are hosted on iWay Service
Manager. From this pane, you can select and view any of the listed
iWay Enable dashboards or applications.
x
iWay Enable ships with several demo applications.
- Century Cellular
Corporation (CCC) - monitors mobile phone sales transactions.
- Addrest (address
/ rest) - illustrates the entire implementation of a REST (Representational
State Transfer) style service.
- Rssforeal - illustrates
how to read, analyze, and visualize data collected from an arbitrary
RSS (Really Simple Syndication) feed.
Each demo application is packaged as an Eclipse-based project
archive. You can download a project archive from the iWay Service
Manager Administration Console. Each demo application is also delivered
in the following iWay Enable directory: iwayhome\etc\enable\demos.
You can load a demo application into iWay Integration Tools (Eclipse)
by importing the project.
A server-based configuration file named enable.xml controls the
definition and deployment of the demo applications. The file resides
in the iwayhome\config\base directory. As a security measure,
the file is read only when the server is started. For iWay Service
Manager to recognize any configuration changes, you must restart
the server.
Each demo application includes a readme.html file, which explains
deployment in more detail. You can access a deployed demo application
from the Applications pane in the iWay Service Manager Administration
Console.
For more information on using the demo applications, see:
x
Resources are items used to define the visual aspect
of an iWay Enable application. A collection of gauges and charts,
which can be configured and hosted as portlets, is available to
be incorporated into dashboards and composite applications. The following
image shows the iWay Enable Resources pane, which includes tabs
for Gauges, Charts, Grids, and Portlets.
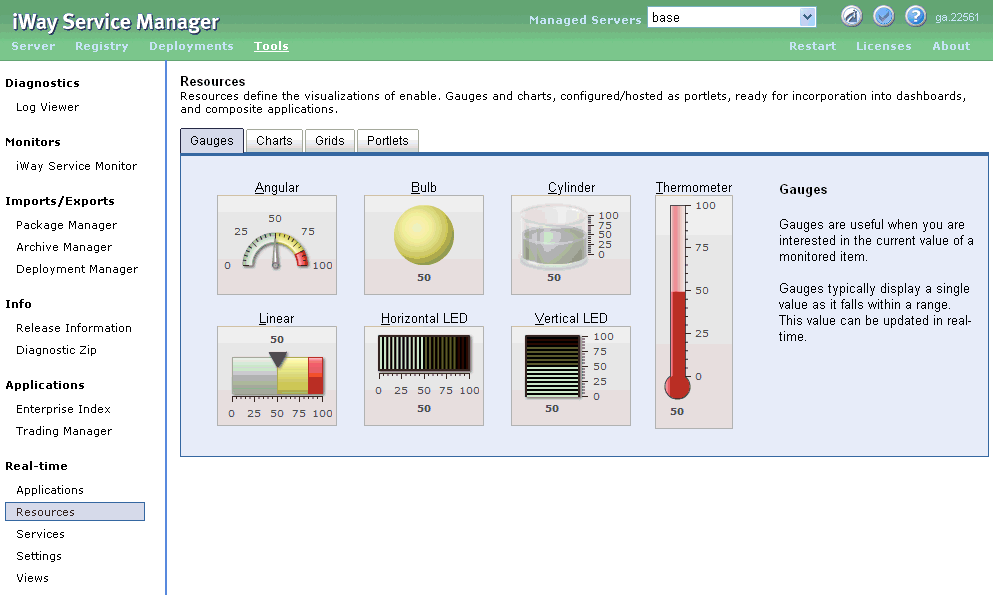
Gauges, charts, grids, and portlets can be incorporated into
an iWay Enable application to represent specific real-time data.
x
Gauges provide a visual interpretation of the current
value of a particular item, rather than providing historic information.
For example, an automobile fuel gauge focuses on the amount of fuel
that is currently available, as opposed to the fuel that was previously
available.
The main gauge types are Angular, Bulb, Cylinder, Linear, Horizontal
LED, and Vertical LED. Each main type offers additional selections
that allow you to match your data to the most appropriate gauge.
For example, linear gauges are used to indicate the progression
of a single value, while bulbs can be used along with color and
text to indicate a specific state, such as a warning.
When you select the gauge you want to use, the properties pane
opens, as shown in the following image. Through the series of property
tabs, you define such items as the data source that the gauge will
reflect, upper and lower limits of the data, and physical attributes of
the gauge, such as color and background.
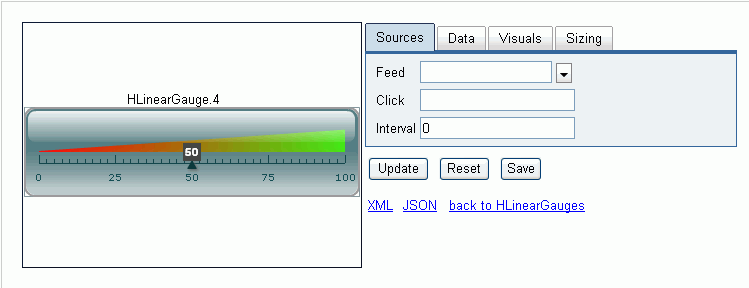
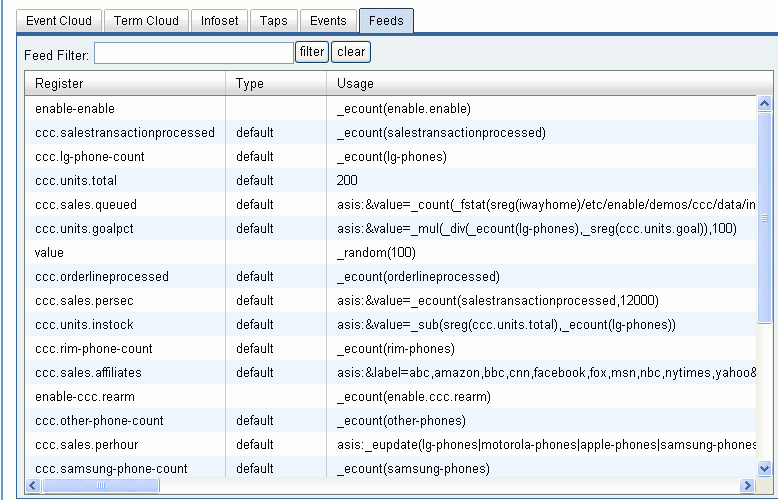
Sources tab
The Sources tab is used to configure how the selected gauge obtains
real-time data. This section lists and describes the various fields
that are available in this tab.
- Feed
(Optional) - Identifies the real-time feed from which the gauge
will update its data. If left blank, iWay Enable will automatically
generate a feed corresponding to the value that is entered in the
Value field, which is located in the Data tab. Leaving this field
blank is preferred. The drop-down lists shows any existing feeds
to which the gauge can subscribe, ensuring that the feed is in the
correct format required by the gauge.
- Click (Optional)
- Accepts a URL that is used by the gauge to change the location
of the window if it is clicked.
- Interval
(Required) - Accepts a number which represents the polling interval
in seconds. The gauge will use this value to update itself with
real-time data from the associated feed. If this value is zero or
null, the gauge will never update itself with real-time data.
Data tab
The Data tab is used to determine the real-time data that the
gauge will consume. This section lists and describes the various
fields that are available in this tab.
- Lower Limit
(Required) - A number value that is used to set the lower limit
of the gauge.
- Upper Limit
(Required) - A number value that is used to set the upper limit
of the gauge.
- Value (Required)
- An iFL (iWay Functional Language), which aggregates real-time event
data. iWay Enable uses this expression to automatically generate
a feed if the Feed field (located in the Sources tab) is left blank
and the Interval field (located in the Sources tab) value is greater
than zero.
Visuals tab
The Visuals tab is used to customize the visual aspects of the
gauge. This section lists and describes the various fields that
are available in this tab.
- Theme (Optional)
- The hexadecimal color value.
- Background
(Optional) - The hexadecimal color value.
- Style (Optional)
- The name of the style to use for this gauge. Style names can be found
in the iwayhome/etc/enable/style directory. The name of a
file in this directory (excluding the file extension) can be used
as a value in this field. These files can also be modified using
an external editor to further customize the appearance of the gauge.
Sizing tab
The Sizing tab is used to adjust the size and border settings
for the gauge.
Action Buttons
- Update -
Renders the gauge using the specified parameter values.
- Reset - Restores
the parameters to their original values.
- Save - Saves
the configuration as a portlet to be referred by a real-time dashboard via
an inline frame (IFRAME). The source for the portlet will be saved
in the iwayhome/etc/enable/portlets directory as a file called
portletname.isp, where portletname refers to the
name of the portlet.
Links
- XML -
Displays the XML source for the gauge, which contains all the parameter
values that were specified. This XML is used to render the gauge.
Advanced users can save this XML document to a different location
and refer to it using the iWay Enable Web API (enable.js), without
having it transformed and served by iWay Enable services.
- JSON - Displays
the JSON (JavaScript Object Notation) for the gauge, which contains
all the parameter values that were specified. Advanced users can
request the JSON object using JavaScript and override or extend
the values and pass it to the iWay Enable Web API (enable.js).
- back to -
Returns to the main gauge style selection gallery.
x
Charts provide a way to visualize data over a period
of time, therefore, it presents current and historic information.
Presenting information in a chart allows you to identify trends
and patterns in your data. Data streaming charts are automatically
updated with real-time data.
The main chart types are Real-Time Line, Real-Time Line - Dual
Y, Real-Time Column, Real-Time Stacked Column, Real-Time Area, and
Real-Time Stacked Area. When you select the chart type you want
to use, the properties pane opens, as shown in the following image. Through
the series of property tabs, you define such items as the data source
for the chart, events and aggregation, and the physical attributes
of the chart, such as the X and Y axis labels.
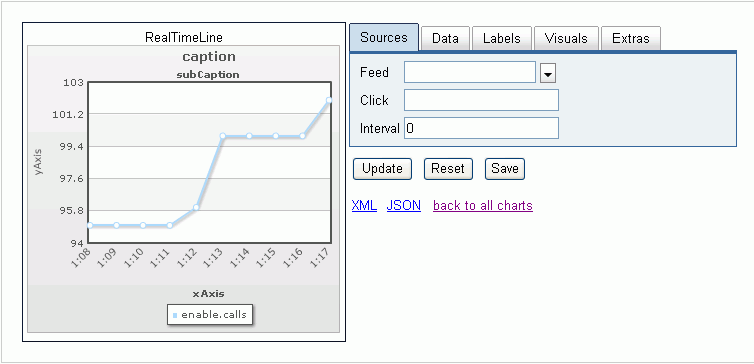
Sources tab
The Sources tab is used to configure how the selected chart obtains
real-time data. This section lists and describes the various fields
that are available in this tab.
- Feed (Optional)
- Identifies the real-time feed from which the chart will update its
data. If left blank, iWay Enable will automatically generate a feed
corresponding to the value that is entered in the Value field, which
is located in the Data tab. Leaving this field blank is preferred.
The drop-down lists shows any existing feeds to which the chart can
subscribe, ensuring that the feed is in the correct format required
by the chart.
Note: For the chart types listed on page
2 and page 3 of the resources page, a feed is a required parameter
and must be generated prior to the resource configuration. The feed
can be generated using the Infoset feature or manually using a register
set. For more information on generating feeds using an Infoset,
see How to Create a JSON Feed From an Infoset.
- Click (Optional)
- Accepts a URL that is used by the chart to change the location
of the window if it is clicked.
- Interval
(Required) - Accepts a number which represents the polling interval
in seconds. The chart will use this value to update itself with
real-time data from the associated feed. If this value is zero or
null, the chart will never update itself with real-time data.
Data tab
The Data tab is used to determine the real-time data that the
chart will consume. This section lists and describes the various
fields that are available in this tab.
Note: The Data tab is available only for chart types listed
on page 1 of the resources page. Since charts listed on pages 2
and 3 require a preexisting JSON feed, the Data tab is not applicable
to their configuration.
- Type (Required)
- The specified type for the chart. Specified, requires the
use of an existing JSON feed from the Sources tab. Only JSON feeds
will be made available for the selection. Historical (default),
creates a feed automatically based on the configured parameters.
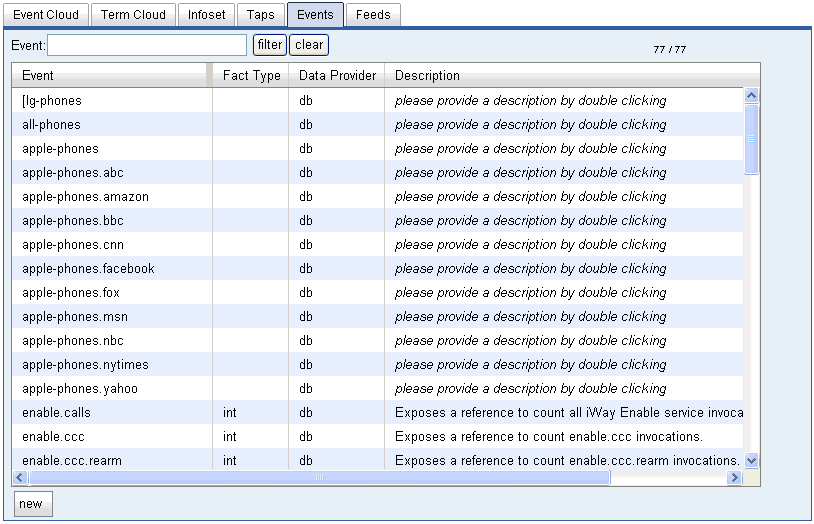
- Events (Required)
- A piped delimited list of events. Each event will appear on the chart
as a separate line. Events can be separated by a | character. The
drop-down list provides a list of events that is sorted alphabetically.
To search for a specific event, type in part of the event name and
the list of events will be filtered automatically.
- Aggregation
(Required) - Select an aggregation function from the drop-down list (COUNT,
AVG, SUM, MAX, or MIN) to perform against the events.
- History (Required)
- A numeric value in milliseconds, which determines the amount of
data to return.
- Data Range
(Required) - A numeric value indicating the number of labels to
show on the x-axis.
Note: There are two extra fields for the RealTimeLineDY chart:
- Lower
Limit (Required) - The lower bound for the right y-axis.
- Upper Limit
(Required) - The upper bound for the right y-axis.
Labels tab
The Labels tab is used to set the label values for the title,
subtitle (caption), x-axis, and y-axis.
Visuals tab
The Visuals tab is used to customize the visual aspects of the
chart. This section lists and describes the various fields that
are available in this tab.
- Theme (Optional)
- The hexadecimal color value.
- Background
(Optional) - The hexadecimal color value.
- Style (Optional)
- The name of the style to use for this chart. Style names can be found
in the iwayhome/etc/enable/style directory. The name of a
file in this directory (excluding the file extension) can be used
as a value in this field. These files can also be modified using
an external editor to further customize the appearance of the chart.
Extras tab
The Extras tab is used to adjust the border and legend settings
for the chart.
Action Buttons
- Update -
Renders the chart using the specified parameter values.
- Reset - Restores
the parameters to their original values.
- Save - Saves
the configuration as a portlet to be referred by a real-time dashboard via
an inline frame (IFRAME). The source for the portlet will be saved
in the iwayhome/etc/enable/portlets directory as a file called
portletname.isp, where portletname refers to the
name of the portlet.
Links
- XML - Displays
the XML source for the chart, which contains all the parameter values
that were specified. This XML is used to render the chart. Advanced
users can save this XML document to a different location and refer
to it using the iWay Enable Web API (enable.js), without having
it transformed and served by iWay Enable services.
- JSON - Displays
the JSON (JavaScript Object Notation) for the chart, which contains all
the parameter values that were specified. Advanced users can request
the JSON object using JavaScript and override or extend the values
and pass it to the iWay Enable Web API (enable.js).
- back to -
Returns to the main chart style selection gallery.
x
Grids are useful for displaying a large amount of information
at once, which is driven by an iWay Enable data set feed. Grids
can automatically be updated in real-time, and evaluate the entire
set at once.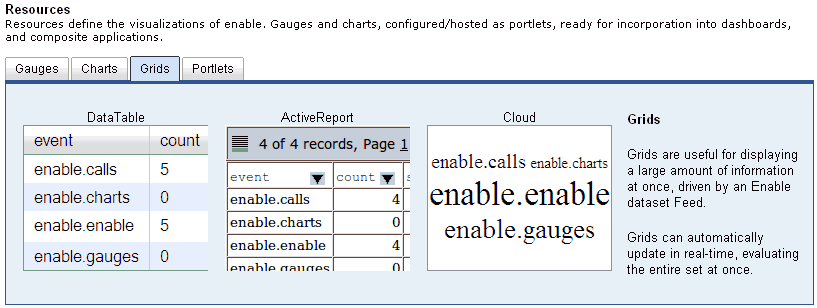
Sources tab
The Sources tab is used to configure how the selected grid obtains
real-time data.
- Feed (Required) - Identifies the real-time feed from which
the grid will update its data. The available feeds can be selected
from the associated drop down. Only feeds of the proper type will
be displayed in the drop down. This is a JSON feed generated prior to
the grid configuration.
- Interval (Required) - Accepts a number which represents the
pooling interval in seconds. The drop-down list is available for
common intervals such as minute, hour, and so on. The grid will
use this value to update itself with real-time data from the associated feed.
If the value is zero or null, the grid will never update itself
with real-time data.
- Click (Optional) - This parameter is available for the Cloud
resource. It takes a URL that is used by the widget to change the
location of the window if it is clicked.
Visuals tab
The Visuals tab is used to customize the visual aspects of the
grid. Note that not all configurations are applicable to all grids.
Since the grids are a different type and are capable of processing
various visual options, settings will vary for each grid type. This
section lists and describes all of the available settings.
- Background (Optional) - The hexadecimal color value.
- Font (Optional) - The type of font to be used.
- Size (Optional) - Size for the font. The default value is 10pt.
- Theme (Optional) - For Active Report, this is the overall theme
hexadecimal color value.
- Text Color (Optional) - For Data Table, this is the text hexadecimal
color value.
- Color (Optional) - For Cloud, this is the overall hexadecimal
color value.
- Hover Color (Optional)- For Cloud, the hexadecimal value.
- Hover Background (Optional) - For Cloud, the hexadecimal value.
- Highlight Color (Optional) - For Cloud, the hexadecimal value.
- Highlight Background (Optional) - For Cloud, the hexadecimal value.
x
Portlets are specifically designed to be referenced
through an inline frame (IFRAME) inside a CEP/BAM dashboard. They
are the output of the gauges and charts defined for your application.
iWay Enable is not packaged with any predefined portlets. For
more information on how to create a portlet, see Enabling Real-time Data Capture and Reporting. Once the portlet is
created, it can be viewed by right-clicking the portlet name and
selecting View from the context menu. As
a shortcut, you can also double-click the portlet name.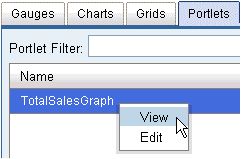
Selecting Edit from the context menu returns
you to the configuration page for the portlet where it can be edited
and saved. You can overwrite an existing portlet or save a new version.
There is no option available to delete a portlet using the console,
since a portlet can be used by an external application. You can
only delete a portlet manually.
To delete a portlet, navigate to the iwayhome\etc\enable\portlets
directory where the created portlets are stored. Open the index.html file
in an editor and remove the entry corresponding to the portlet you
want to delete. Each entry is contained within the <a> element.
This method will not permanently remove a portlet, since portlets
are stored on the file system in portletname.isp files, where portletname refers
to a specific portlet. The portlet is only removed from the Portlets
tab in the console. To remove a portlet permanently, you must delete
the corresponding .isp file from the iwayhome\etc\enable\portlets
directory.
x
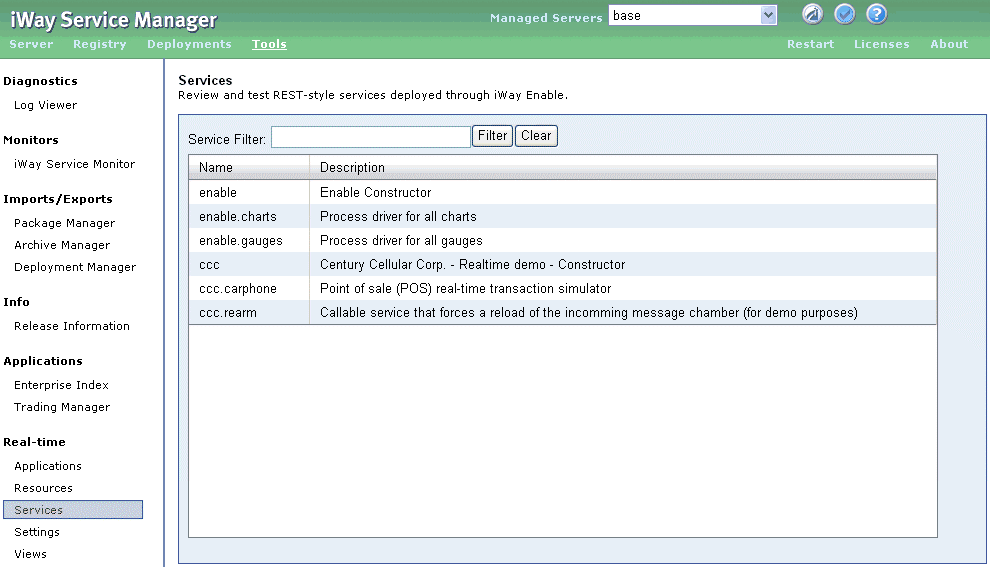
Services refer to process flows that are currently deployed
through iWay Enable, but are not yet bound to a transport (listener).
This late binding model allows iWay integrators to develop the process
flow and its business logic without having to decide on a specific
transport.
The Services pane, shown in the following image, assists you
with binding a service to a Representational State Transfer (REST)
style transport. REST refers to a collection of network architecture
principles that outline how resources are defined and addressed.
Enable gauges and charts require an initial XML document to configure
the Flash object that will render the gauge or chart in the composite
application or dashboard. Enable comes with pre-configured and pre-installed
process flows that serve these XML documents to a Web application.
If you are overriding any of these process flows to further customize
them or if you have changed the pre-installed process flows, you
can test them in the Services pane.
x
Running a REST Style Service
iWay Enable allows you to run a REST style service from
the iWay Service Manager Administration Console. To run a service,
in the iWay Enable Services pane, right-click the service name you
want to run and select Run from the menu.
The Service Parameters window opens with either no parameters
or showing a set of parameters that have been associated with the
service through a Register Set. For information on Register Sets,
see Configuring Register Sets. The following image shows a Service Parameters
window with several parameters.
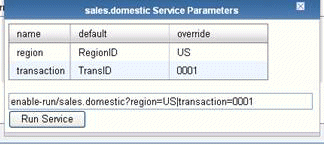
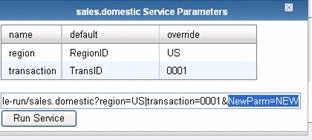
In the Service Parameters window, you can enter a parameter value
in the override column to override the default parameter value before
running the service. This window also displays a preview of the
URL string, which includes the parameters and their values, where the
parameters are separated by either an ampersand (&) or a vertical
bar (|). You can also add or edit parameters directly in the URL
string. The following image shows the addition of a parameter, NewParam=NEW.
To run the service (actually, the underlying process flow) with
the provided parameters, click Run Service.
In our example, the full URL for the service call is:
http://localhost:9999/ism/enable-run/sales.domestic?region=US|transaction=0001&NewParm=NEW
This underlying process flow (pFlow)
does not perform any task. It simply returns the incoming document,
as follows:
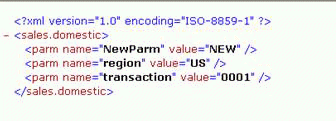
This response XML document represents the generic structure of
the request document being generated by the Enable component to
run a REST Style service call. The URL request string has been converted
into an XML representation, where the root of the document is the
name of the service (pFlow) that has been run, followed by a list
of the provided parameters and their values.
The design of the process flow should take into account if it
will be deployed as a REST full service, such it should be able
to process the XML document in the above format representing the
URL specific information.
The URL format for a REST style service call is
http://iSMhost:iSMPort/ism/enable-run/pFlowName?parm1=value1&parm2=value2...parmN=valueN
where:
- iSMhost:iSMPort
Is the host name and port number of the iWay Service Manager
that will be servicing the request.
- ism
Specifies that the iSM Console Listener will process the request.
- enable-run
Is the context endpoint that allows the run-time support
for REST style services.
- pFlowName
Is the name of the iSM process flow that can service the request.
- parmN=valueN
Is the Name-Value pair for parameters that will be passed
to the process flow for processing.
The following is the format of the XML document generated by
the iSM console once it receives a REST style service call on the
/ism/enable-run context endpoint.
<pFlowName>
   <parm name="parm1" value="value1"/>
   <parm name="parm2" value="value2"/>
   …..
   <parm name="parmN" value="valueN"/>
</pFlowName>