How to: |
An XML namespace is a collection of element type and attribute names. XML namespaces provide a way to distinguish between the duplicate element type and attribute names. A duplication may occur, for example, in an XSLT style sheet or in a document that contains element types and attributes from two different DTDs. In an XML namespace, an element type or attribute name is uniquely identified by a two-part name property: the name of its XML namespace and its local name.
You can configure XML namespaces globally or separately for each node. Individual XML namespace configuration enables you to accomplish more advanced purposes based on your requirements.
Note: Mapping multiple namespaces to the same URI and the ability to apply a namespace prefix for a subtree is supported.
The following example presents XML namespaces as a convenient solution to distinguish between two different XML element types named Address.
<Department>
<Name>DVS1</Name>
<addr:Address xmlns:addr="http://www.tu-darmstadt.de/ito/addresses">
<addr:Street>Wilhelminenstr. 7</addr:Street> <addr:City>Darmstadt</
addr:City>
<addr:State>Hessen</addr:State>
<addr:Country>Germany</addr:Country>
<addr:PostalCode>D-64285</addr:PostalCode>
</addr:Address >
<serv:Server xmlns:serv="http://www.tu-darmstadt.de/ito/servers">
<serv:Name>OurWebServer</serv:Name> <serv:Address>123.45.67.8</
serv:Address>
</serv:Server>
</Department>
Note the first Address element type. Its name belongs to the http://www.tu-darmstadt.de/ito/ XML namespace. It has a universal (two-part) name of “http://www.tu-darmstadt.de/ito/addresses” and “Address”. The second element type with the same first name “Address” belongs to the http://www.tu-darmstadt.de/ito/servers XML namespace. It has a universal name of {http://www.tu-darmstadt.de/ito/servers}Address. Thus, each universal name is preserved as unique, meeting the requirement that each element type in an XML document needs to have a unique name.
You can configure your Ebix Entry project to use XML namespaces by loading a set of namespaces from an existing Ebix Entry project or you can opt to create your own set. Either way, ensure that you select the Contains Namespace check box when configuring your input.
Note: If the Contains Namespace check box is not selected, the namespaces will not be loaded.
In addition, ensure that all namespaces from your input data file are described in your XML or schema structure, and that the prefixes are consistent (contain the same URI).
To provide better understanding of namespace mapping rules, you can draw the parallel between namespace mapping in Transformer and long distance telephone calling using your land line. As an example, imagine that you need to phone your aunt who currently resides in France from New York, USA. In order to complete the call to your aunt, your long distance calling plan must first have the country code for France on your calling plan’s list of permitted country codes. Otherwise the call to France will not be completed. In the same manner, the namespaces from your input data file can be compared to a list of country codes to be dialed. You cannot map the namespace from your input data file successfully, unless it is included in your schema or XML structure namespace list, which in this example, is similar to a long distance calling plan.
Note: While designing projects with namespaces, check your schema and input data for consistency. Your mapping values will not appear in the output if the same namespace prefix from the incoming data has a different URI in your structure file.
Namespaces with different prefixes that have the same URI are treated as the same namespace, according to the rules outlined in XML Namespace Specifications.
For example, the following namespaces are described in your dictionary:
<a1:getMessages xmlns:a1="uri:wsdl:org.iway.sp2.customer.v1"
xmlns:internal="uri:wsdl:org.iway.sp2.internal.v1">
...
In addition, your input data has the following namespaces:
<customer:getMessages xmlns:customer="uri:wsdl:org.iway.sp2.customer.v1"
xmlns:internal="uri:wsdl:org.iway.sp2.internal.v1">
...
The namespaces customer and a1 will be treated as the same namespace while mapping the output values.

Note: If you are dealing with dynamic namespaces for incoming data, in which the URI cannot be determined in design time, it is recommended that you deselect the Contains Namespace check box on the Dictionary tab. This will ensure that incoming data values appear in the output.
To load an XML namespace from another project:
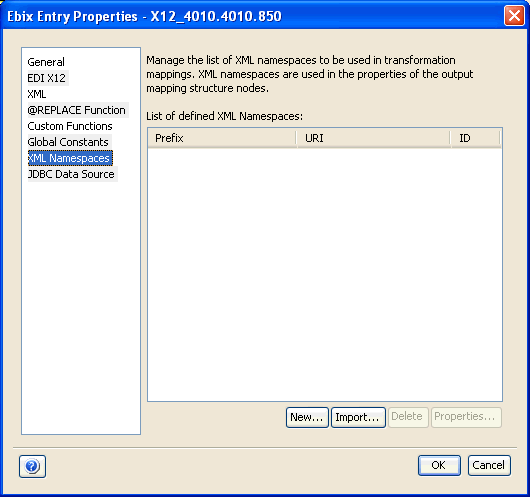
The following image shows the XML Namespaces category with areas for prefix, URI, and ID values.

The Open dialog box appears.
To create a new XML namespace for an Ebix Entry project:
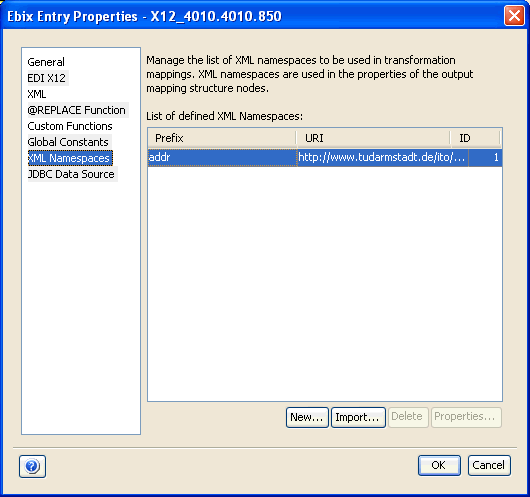
The following image shows the XML Namespaces category with columns for prefix, URI, and ID values.

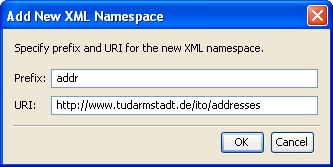
The Add New XML Namespace dialog box opens.

For example, a prefix value of addr with the following URI:
http://www.tu-darmstadt.de/ito/addresses
is the equivalent of including the following in your actual data:
xmlns:addr="http://www.tu-darmstadt.de/ito/addresses"
The new XML namespace is added to the list.

An identification number for each XML namespace appears automatically in the ID column.
Note: To attach XML namespaces, left-click the appropriate node in the Output pane and select Properties. When the Output Node Properties dialog box opens, click the XML Namespace tab (if it is not already active) and then, select the Apply Namespace URI check box.
| iWay Software |