Creating Events

In this section:

How to:

Events are generated as a result of activity on an application system. You can use these events to trigger an action in your application. For example, SAP R/3 can be configured to generate an event when customer information is updated. If your application needs to perform when this event happens, it becomes the consumer of that event.

To create an iWay event, you must create a port and a channel.

The following dispositions are available when using iWay Explorer integrated with Designer.

This section explains how to first create a port for an event, and then how to associate the port with a channel. In addition, there are procedures on editing and deleting ports and channels.


Top of page

x
Creating an Event Port

This section explains how to create a port, and how to edit and delete an existing port.


Top of page

x
Procedure: How to Create an Event Port for the File Disposition

To create an event port:

  1. From the Explorer tab in the Navigator pane, expand the Events node under the repository in which you will work.
  2. Expand the adapter node in which you want to create the event port.
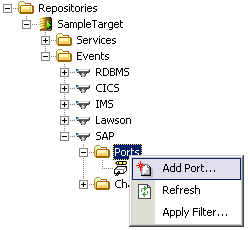
  3. Right-click the Ports node and select Add Port from the drop-down list.

    The following image shows an expanded SAP adapter node and the Ports node drop-down list.
    The New Port - Port Name and Description dialog box opens, as shown in the following image.
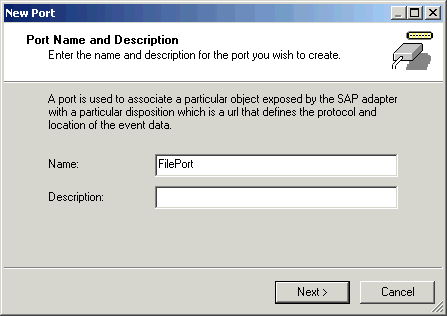
  4. In the Name field, type a name for the event port.
  5. In the Description field, type a description for the event port (optional).
  6. Click Next.

    The Define Port dialog box opens, as shown in the following image.
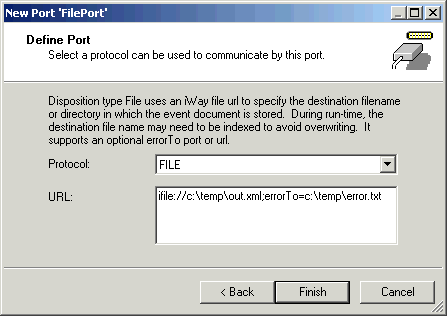
  7. From the Protocol drop-down list, select the FILE communication protocol for the event port.
  8. The URL field contains the format of the URL that designates where the event data will be written. Replace the items found in brackets with appropriate values.
  9. Click Finish.

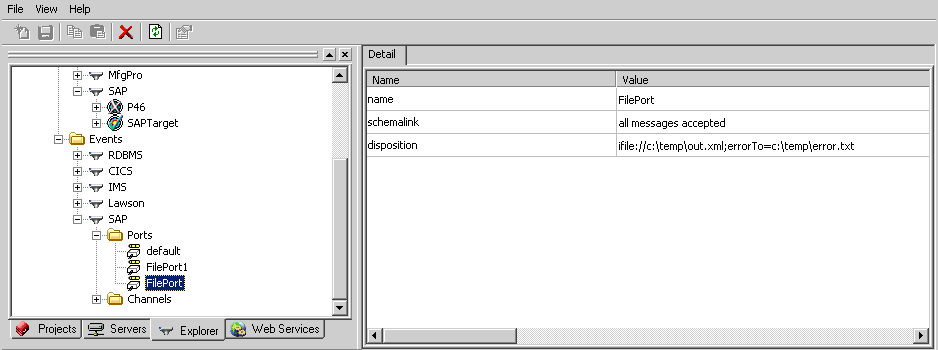
    The new port appears in the list under the Ports node in the Navigator pane. Select the port to see the port details in the right pane, as shown in the following image.
Top of page

x
Procedure: How to Create an Event Port for the iBSP Disposition

To create a port for an iBSP disposition:

  1. From the Explorer tab in the Navigator pane, expand the Events node under the repository in which you will work.
  2. Expand the adapter node in which you want to create the event port.
  3. Right-click the Ports node and select Add Port from the drop-down list.

    The New Port - Port Name and Description dialog box opens.

  4. In the Name field, type a name for the event port.
  5. In the Description field, type a description for the event port (optional).
  6. Click Next.

    The Define Port dialog box opens.

    1. From the Protocol drop-down list, select IBSP.
    2. In the URL field, type an iBSP destination in the form of:
      ibsp:[svcName];[mthName];responseTo=[pre-defined port name or another 
      disposition url];errorTo=[pre-defined port name or another 
      disposition url]

      The following table lists and defines the parameters for the iBSP disposition.

      Parameter

      Description

      svcName

      Name of the service created with iBSP.

      mthName

      Name of the method created for the business service.

      responseTo

      Location where responses to the business service are posted. Predefined port name or another full URL. This is optional.

      errorTo

      Location where error documents are sent. Predefined port name or another full URL. This is optional.

  7. Click OK.

    The new port appears in the list under the Ports node in the Navigator pane. Select the port to see the port details in the right pane.


x
Procedure: How to Create an Event Port for the MSMQ Disposition

To create a port for an MSMQ disposition:

  1. From the Explorer tab in the Navigator pane, expand the Events node under the repository in which you will work.
  2. Expand the adapter node in which you want to create the event port.
  3. Right-click the Ports node and select Add Port from the drop-down list.

    The New Port - Port Name and Description dialog box opens.

  4. In the Name field, type a name for the event port.
  5. In the Description field, type a description for the event port (optional).
  6. Click Next.

    The Define Port dialog box opens.

    1. From the Protocol drop-down list, select MSMQ.
    2. In the URL field, type a MSMQ destination in the form of:
      msmq://[machineName]/private$/[qName];errorTo=[pre-defined port name or 
      another disposition url]

      The following table defines the parameters for the MSMQ disposition.

      Parameter

      Description

      machineName

      Machine name where the Microsoft Queuing system is running.

      private$

      For private queues only, enter private$. Private queues are queues that are not published in Active Directory. They appear only on the local computer that contains them. Private queues are accessible only by Message Queuing applications that recognize the full path name or format name of the queue.

      qName

      Name of the private queue where messages are placed.

      errorTo

      Location where error documents are sent. Predefined port name or another full URL. This is optional.

  7. Click OK.

    The new port appears in the list under the Ports node in the left pane. Select the port to see the port details in the right pane.


x
Procedure: How to Create an Event Port for the JMS Queue Disposition

To create a port for a JMS Queue disposition:

  1. From the Explorer tab in the Navigator pane, expand the Events node under the repository in which you will work.
  2. Expand the adapter node in which you want to create the event port.
  3. Right-click the Ports node and select Add Port from the drop-down list.

    The New Port - Port Name and Description dialog box opens.

  4. In the Name field, type a name for the event port.
  5. In the Description field, type a description for the event port (optional).
  6. Click Next.

    The Define Port dialog box opens.

    1. From the Protocol drop-down list, select JMSQ.
    2. In the URL field, type a JMS Queue destination in the form of:
      jmsq:[myQueueName]@[myQueueFac];jndiurl=[myurl];jndifactory=[myfactory
      ];user=[user];password=[xxx];errorTo=[pre-defined port name or 
      another disposition url]

      The following table lists and defines the parameters for the JMS Queue disposition.

      Parameter

      Description

      myQueueName

      Name of a queue to which events are emitted.

      myQueueFac

      Resource that contains information about the JMS Server.

      jndi_url

      URL to use to contact the JNDI provider. The syntax of this URL depends on the JNDI provider that is used.

      jndi_factory

      Is JNDI context.INITIAL_CONTEXT_FACTORY and is provided by the JNDI service provider.

      user

      User ID associated with this queue.

      password

      Password for the user ID.

      errorTo

      Location where error logs are sent. Predefined port name or another disposition URL. The URL must be complete, including the protocol. This is optional.

  7. Click OK.

    The new port appears in the list under the Ports node in the Navigator pane. Select the port to see the port details in the right pane.


x
Procedure: How to Create an Event Port for the SOAP Disposition

To create a port for a SOAP disposition:

  1. From the Explorer tab in the Navigator pane, expand the Events node under the repository in which you will work.
  2. Expand the adapter node in which you want to create the event port.
  3. Right-click the Ports node and select Add Port from the drop-down list.

    The New Port - Port Name and Description dialog box opens.

  4. In the Name field, type a name for the event port.
  5. In the Description field, type a description for the event port (optional).
  6. Click Next.

    The Define Port dialog box opens.

    1. From the Protocol drop-down list, select SOAP.
    2. In the URL field, type an SOAP destination, using the following format:
      soap:[wsdl-url];soapaction=[myaction];responseTo=[pre-defined port name or 
      another disposition URL];errorTo=[pre-defined port name or another 
      disposition url]

      The following table lists and defines the parameters for the SOAP disposition.

      Parameter

      Description

      soap

      The URL to the WSDL file that is required to create the SOAP message, for example:

      http://localhost:7001/ibsp/IBSPServlet/test/service.ibs?wsdl

      where:

      service

      Is the name of the iWay Business Service you created using iWay Explorer.

      soapaction

      The method called by the SOAP disposition, for example:

      service.method@test@@

      where:

      service

      Is the name of the iWay Business Service you created using iWay Explorer.

      method

      Is the method being used.

      test

      Is the license that is being used by the iWay Business Service.

      responseTo

      Location where responses are posted. Predefined port name or another URL. Predefined port name or another disposition URL. The URL must be complete, including the protocol. This is optional.

      errorTo

      Location where error logs are sent. Predefined port name or another disposition URL. The URL must be complete, including the protocol. This is optional.

  7. Click OK.

    The new port appears in the list under the Ports node in the Navigator pane. Select the port to see the port details in the right pane.


x
Procedure: How to Create an Event Port for the HTTP Disposition

To create a port for an HTTP disposition:

  1. From the Explorer tab in the Navigator pane, expand the Events node under the repository in which you will work.
  2. Expand the adapter node in which you want to create the event port.
  3. Right-click the Ports node and select Add Port from the drop-down list.

    The New Port - Port Name and Description dialog box opens.

  4. In the Name field, type a name for the event port.
  5. In the Description field, type a description for the event port (optional).
  6. Click Next.

    The Define Port dialog box opens.

    1. From the Protocol drop-down list, select HTTP.
    2. In the URL field, type an HTTP destination in the form of:
      http://[myurl];responseTo=[pre-defined port name or another 
      disposition url];

      where:

      url

      Is the URL target for the post operation, for example,

      http://myhost:1234/docroot
      responseTo

      Is the location where responses are posted, if desired.

  7. Click OK.

    The new port appears in the list under the Ports node in the Navigator pane. Select the port to see the port details in the right pane.


Top of page

x
Procedure: How to Create an Event Port for the MQSeries Disposition

To create a port for an MQSeries disposition:

  1. From the Explorer tab in the Navigator pane, expand the Events node under the repository in which you will work.
  2. Expand the adapter node in which you want to create the event port.
  3. Right-click the Ports node and select Add Port from the drop-down list.

    The New Port - Port Name and Description dialog box opens.

  4. In the Name field, type a name for the event port.
  5. In the Description field, type a description for the event port (optional).
  6. Click Next.

    The Define Port dialog box opens.

    1. From the Protocol drop-down list, select MQ Series.
    2. In the URL field, type an MQSeries destination in the form of:
      mqseries:/[qManager]/
      [qName];host=[hostname];port=[port];channel=[channnelname];errorTo=[
      pre-defined port name or another disposition url]

      The following table lists and defines the parameters for the MQSeries disposition.

      Parameter

      Description

      qManager

      Name of the queue manager to which the server must connect.

      qName or respqueue

      Name of the queue where messages are placed.

      host

      Host on which the MQ server is located (MQ Client only).

      port

      Number to connect to an MQ server queue manager (MQ client only).

      channel

      Case-sensitive name of the channel that connects with the remote MQ server queue manager (MQ client only). The default channel name for MQSeries is SYSTEM.DEF.SVRCONN.

      errorTo

      Location where error documents are sent. Predefined port name or another full URL. This is optional.

  7. Click OK.

    The new port appears in the list under the Ports node in the Navigator pane. Select the port to see the port details in the right pane.


x
Procedure: How to Edit a Port

To edit an existing port:

  1. In the left pane, right-click the port you want to edit.
  2. Select Edit from the drop-down list.

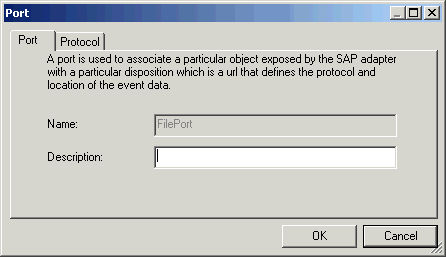
    The Port dialog box opens, as shown in the following image.
    From this dialog box you can change the port description and, from the Protocol tab, the protocol type and destination of the event information.

  3. Make the necessary changes and click OK.

Top of page

x
Procedure: How to Delete a Port

To delete a port:

  1. In the left pane, expand the Ports node and right-click the port you want to delete.
  2. Select Delete from the drop-down list.

    A confirmation window opens, asking you to confirm deleting the port.

  3. Click Yes.

The port is removed from the Ports list in the Navigator pane.


Top of page

x
Creating a Channel

This section explains how to create a channel, and how to edit and delete an existing channel.


Top of page

x
Procedure: How to Create a Channel

To create a channel:

  1. From the Explorer tab in the Navigator pane, expand the Events node under the repository in which you will work.
  2. Expand the adapter node in which you want to create the event.
  3. Right-click the Channel node and select Add Channel from the drop-down list.

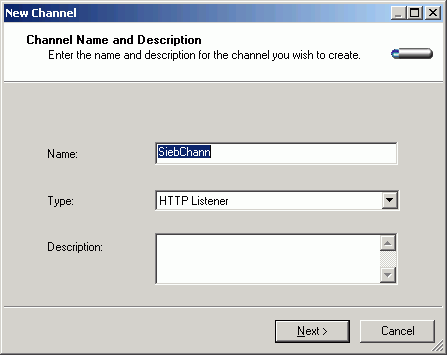
    The New Channel - Channel Name and Description dialog box opens, as shown in the following image.
  4. In the Name field, type a name for the channel.
  5. From the Type drop-down list, select the type of listener. The available types depend on the event adapter you are creating the channel for.
  6. In the Description field, type a description for the channel (optional).
  7. Click Next.

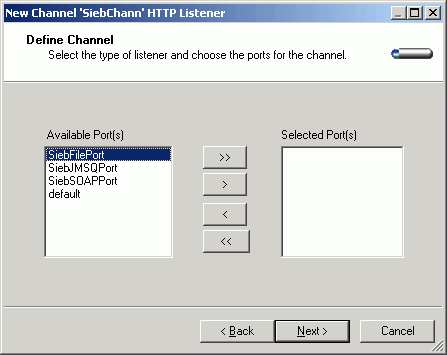
    The Define Channel dialog box opens. The option selections in this dialog box are based on the adapter you are working with and the existing ports for that adapter. The following image is an example of a Define Channel dialog box.

  8. Associate one or more ports with the channel by moving your selections from the Available Port(s) pane to the Selected Port(s) pane using the arrow buttons in the dialog box.
  9. Click Next.

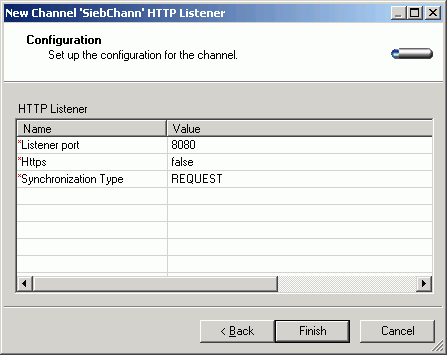
    The channel Configuration dialog box opens. The configuration parameters that appear will depend on the adapter you are working with and the type of channel you are creating. The following image is an example of the Configuration dialog box.

  10. Type or select the appropriate values for the configuration parameters.
  11. Click Finish.

    The new channel appears in the Channels list of the selected adapter.

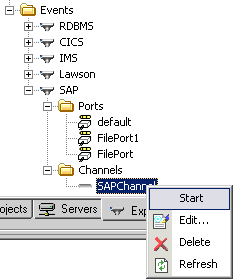
  12. Right-click the channel you created and select Start from the drop-down list, as shown in the following image.


Top of page

x
Procedure: How to Edit a Channel

To edit an existing Channel:

  1. In the Navigator pane, right-click the channel you want to edit.
  2. Select Edit from the drop-down list.

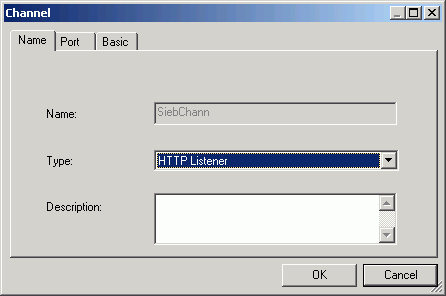
    The Channel dialog box opens. The following image is an example of this dialog box.

    From the Channel dialog box you can change the channel configuration values. Use the tabs to access all parameters.

  3. Make the necessary changes and click OK.

Top of page

x
Procedure: How to Delete a Channel

To delete a channel:

  1. In the Navigator pane, expand the Channels node and right-click the channel you want to delete.
  2. Select Delete from the drop-down list.

    A confirmation window opens.

  3. Click Yes.

    The channel is removed from the Channels list in the Navigator pane.


iWay Software