Once a project exists, you can change its properties
and begin to build the project by adding elements, such as process
flows, services, adapters, emitters, and schemas. Project elements
are either created in Designer or imported to the project. For example,
a process flow can be created in Designer or imported from another
source, while services, adapters, and emitters are imported from
Service Manager.
This section explains how to:
- Open and
close a project
- Refresh a project
- Import a process
flow to a project
- Reload services,
adapters, and emitters into a project
- Add schemas
to a project
x
Opening and Closing a Project
To gain access to a project and its components you must
open the project. To open a project, either click the project icon
or right-click the project node and select Open from
the drop-down list. The project node in the Navigator pane expands
to display the project components.
Note: Opening a project automatically connects you to
the repository where the project resides.
To close a project, right-click the project node and select Close from
the drop-down list. When you close a project, you have the option
to save the project. Once a project is closed it cannot be changed
in Designer until it is opened again. Although the resources of
a closed project do not appear in the Navigator pane, they still
reside on the local file system.
x
The refresh option reloads a project from the repository
and displays the most current version of that project in the Designer
window.
To refresh a project, select Refresh from
the View menu or right-click the project and select Refresh from
the drop-down list.
x
Viewing Project Properties
The project properties are the project name and description,
and where it is stored (in the iWay Registry or a configuration).
To view project properties, right‑click the project of interest
and select Properties from the drop‑down
list. The properties dialog box opens displaying two tabs, Content
and Configuration or Registry, from which you can obtain project
information.
x
Importing a Process Flow to a Project
Multiple Designer users can be using a single repository,
but only those projects and process flows that you create or import
into your project will appear in your instance of Designer. The
import feature allows you to bring a process flow used by or created
for an outside project into one or more of your projects. You can
import a process flow to your project from either:
- An XML file
(created by exporting a process flow to a file)
- A repository
- A configuration
or Registry of Service Manager where the process flow of interest is
published
The following procedures explain how to import a process flow
from each of these options.
x
Procedure: How to Import a Process Flow From a File
To import
a process flow from a file:
-
Under
the project to which you want to import a process flow, right-click
the Processes node and select Import From.
-
Select File.
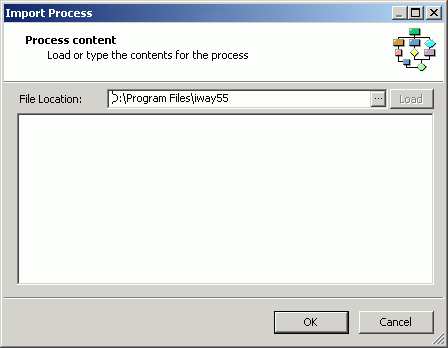
The Import Process - Process content dialog box opens,
as shown in the following image.
-
In the
File Location field, type or browse to the location of the XML process
flow file you want to import, or type the content for the process
in the text pane located under the File Location field.
To browse to a file:
-
Click the ellipsis (...) found next to the File Location field.
The Select Process File dialog box opens, as shown in the
following image.

-
Use the Look in and File name fields to browse to the process flow
file you want to import.
-
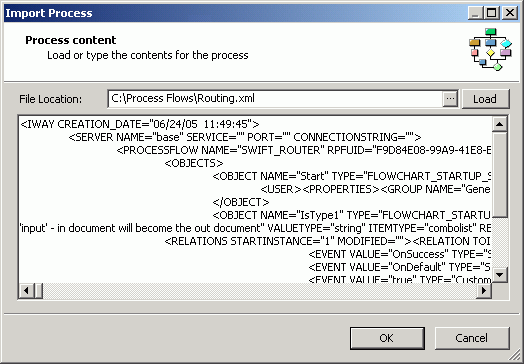
Click Open.
The file contents appear in the text pane of the Process
Content dialog box. The following image shows an example of this
dialog box with a loaded process flow file.
-
Click OK.
An Identifier Confirmation window opens, as shown in the
following image.
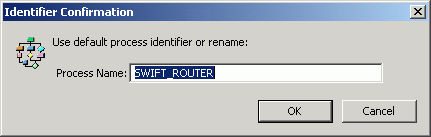
-
In the
Process Name field, type a new name for the process flow or accept
the default name.
-
Click OK.
The process
flow is imported to the selected project and appears in the Navigator
pane under the project Processes node.
x
Procedure: How to Import a Process Flow From a Repository
Importing
a process flow from a repository is useful if you want to restore
a process flow that you deleted from your Designer view.
To
import a process flow from a repository:
-
Right-click
the Processes node where you want the process flow to reside, and
select Import From, and then Repository.
The Import Process(es) dialog box opens, as shown in the
following image. This dialog box contains three columns to identify
a process flow; Process Name, Version, and Description.
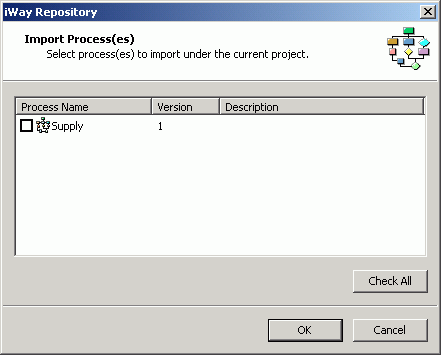
-
In the
Process Name column, select the process flow you want to restore.
-
Click OK.
The process
flow appears in the Navigator pane under the selected Processes node.
x
Procedure: How to Import a Process Flow From a Configuration or Registry
To import
a process flow from a Service Manager configuration or the iWay
Registry:
-
Right-click
the Processes node and select Import From.
-
Select Configuration or Registry.
The Import Process(es) - Locate a Process Server dialog
box opens, as shown in the following image.
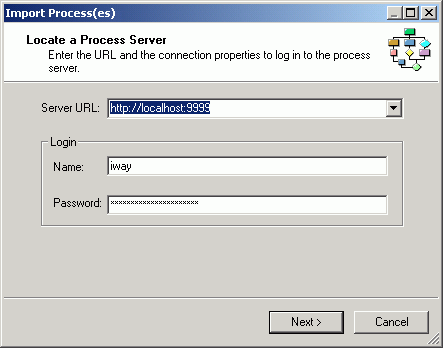
-
In the
Server URL, accept the default location or type a location of the Service
Manager from which you want to import the process flow(s).
-
In the
Login area, type a name and password in the corresponding fields to
access the Service Manager.
-
Click Next.
The Import From dialog box opens, as shown in the following
image.

-
Depending
on where you want to import the process flow from, select either
the iWay Registry, or Configuration ID and then select the Service
Manager configuration you want to access from drop-down list.
-
Click Next.
The Import Process(es) dialog box opens. This dialog box
contains three columns to identify the available process flows;
Name, Type, and Description. When you select iWay Registry, the
available process flows appear under a Registry node in the Name
column. The following image is an example of the Import Process(es)
dialog box when you are importing from a configuration, where the
available process flows appear under a System node in the Name column.
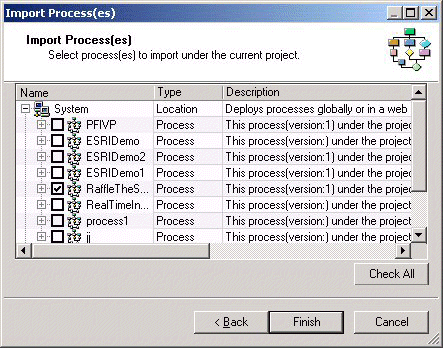
-
In the
Name column, select the process flow or process flows you want to
import. To select all process flows, click Check All.
-
Click Finish.
The process
flow is imported to the selected project and appears in the Navigator
pane under the Processes node.
x
Reloading Services, Adapters, and Emitters into a Project
When updates or changes to services, adapters or emitters
are made on the Service Manager, you might want to reflect these
changes in the projects that use that instance of Service Manager.
To reload services, adapters, and emitters from the iWay Server
to a project, right-click the Services, Adapters, or Emitters node
and select reload from the drop-down list.
For a status of the reload, see the Results tab of the Message
Log pane. For example, if a reload of services was successful, the
following message appears.
All available services have been loaded from iWay server.
Reload: Succeeded
x
Adding a Schema to a Project
Once you create a project, you can add schemas that
might be used within the project.
When a schema exists in the project, you can right-click the
schema to view it, remove (delete) or edit it, and view its properties.
x
Procedure: How to View a Schema
To view
a schema available to Designer:
-
In the
Navigator pane, expand the project node you want to work with.
-
Expand
the Schemas node and right-click the schema you want to view.
-
Select View from
the drop-down list.
The schema
appears in an Internet Explorer window.
x
Procedure: How to Add a Schema
To add
a schema to the Schema node:
-
In the
Navigator pane, expand the project node you want to work with.
-
Expand
the Schemas node and select Add from the
drop-down list.
The Adding iWay Schema - Schema Configuration dialog box
opens, as shown in the following image.
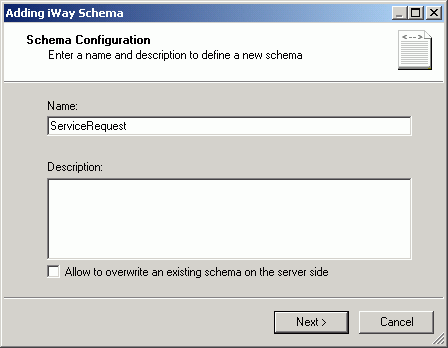
-
In the
Name field, type a name for the schema you are adding.
-
In the
Description field, type a brief description of the schema. This
is optional.
-
If this
schema name exists and you want to overwrite it, check Allow
to overwrite an existing schema on the server side.
-
Click Next.
The Schema Content dialog box opens.
-
In the
Schema Location field, type or browse to the location of the schema
you want to load, or type the schema in the text pane located under
the Schema Location field.
To browse to the schema:
-
Click the ellipsis (...) found next to the Schema Location
field.
The Select Schema File dialog box opens, as shown in the
following image.
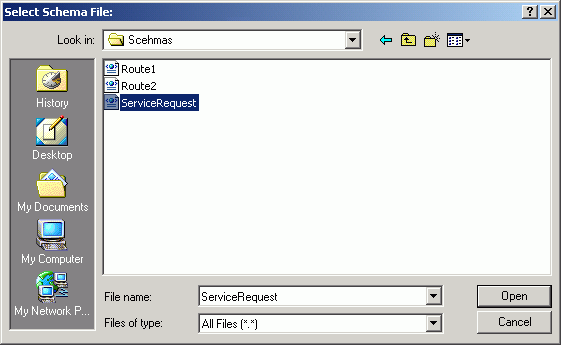
-
Use the Look in and File name fields to browse to the schema you
want to load.
-
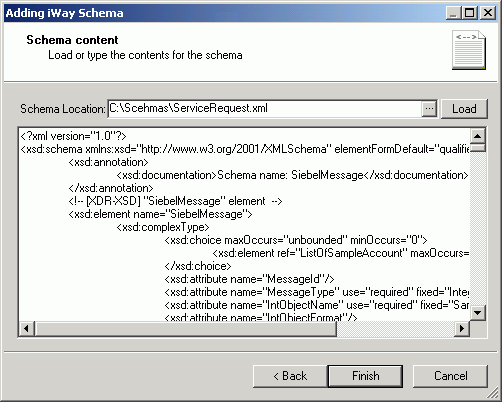
Click Open.
The schema appears in the text pane of the Schema content
dialog box. The following image shows an example of this dialog
box with schema loaded.
-
Click Finish.
The schema
you added appears under the Schemas node in the Navigator pane.
The Message Log pane displays the status of adding the schema to
the project.
x
Procedure: How to Edit a Schema
To edit
a schema available to Designer:
Note: Editing a schema
is currently not supported.
-
In the
Navigator pane, expand the project node you want to work with.
-
Expand
the Schemas node and right-click the schema you want to edit.
-
Select Edit from
the drop-down list.
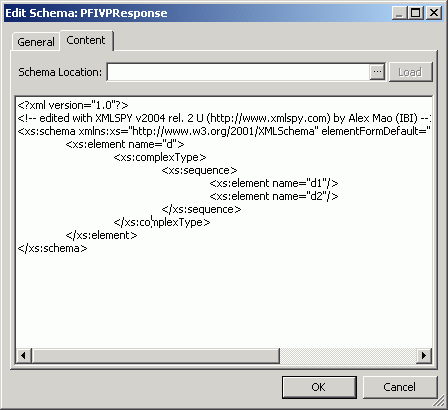
The Edit Schema dialog box opens. This dialog box, shown
in the following image, provides two tabs; General and Content.
-
In the
Content tab, make the necessary changes to the schema.
-
Click OK.
The edits
made to the schema are now in affect.
x
Procedure: How to Delete a Schema
To delete
a schema from a process flow project:
-
In the
Navigator pane, expand the project node you want to work with.
-
Right-click
the Schemas node and select the schema you want to delete.
Warning: Before you continue, be sure that you want
to remove the selected schema. When you perform the next step, the
schema is automatically removed without further confirmation.
-
Select Remove from
the drop-down list.
The selected
schema no longer appears under the Schemas node.