To create a project:
- In the Navigator pane, select the Projects tab.
- In the Projects tab, connect to the repository in which you want to create the project. For details on Designer repositories, see Using Repositories.
-
From
the File menu, choose New (or right-click the
repository icon and click New Project).
The Designer Project Information dialog box opens, as shown in the following image.
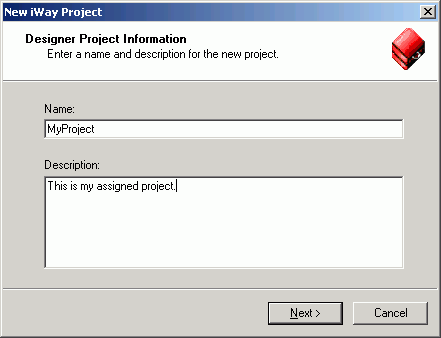
- In the Name field, type a descriptive name for the project.
- In the Description field, type a brief description of the project. This is optional.
-
Click Next.
The Designer Project Bindings dialog box opens, as shown in
the following image.

-
Choose
whether to create the project within the iWay Registry or in one of
the iWay run‑time configurations. When you select Configuration
ID, the available iWay configurations appear in a drop-down list.
The default configuration is base.
See the introductory information in this section, Creating a Project, for an explanation on creating a project in the iWay Registry or in a server configuration.
-
Click Finish.
The new project appears as a node under the repository in which it was created. An example of a new project node, Work05, and its subfolders is shown in the following image. It was created under the iWay repository.
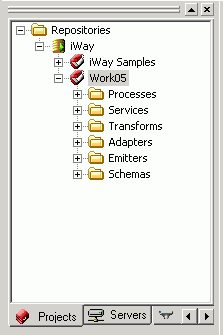
A newly created project includes the following default elements:
Processes node contains the process flows you create for the project.
Services node contains the agents that are defined in Service Manager.
Transforms node contains the transformation files published on Service Manager.
Adapters node contains the adapters available in Service Manager.
Emitters node contains the emitters defined in Service Manager.
Schemas node contains the schema you define, as well as default schemas (PFIVP, PFIVPResponse, and Any).
- To save the project to the repository, right-click the project node and select Save from the drop-down list.