The following procedure describes how to create a channel using iWay Explorer.
To create an MQSeries channel:
-
Click
the iWay Events tab.
The iWay Events window opens. The iWay adapters that appear in the left pane support events.
-
In the
left pane, expand the DOTNET node.
The ports and channels nodes appear in the left pane.
- Select the channels node.
-
In the
right pane, move the pointer over Operations and
select Add a new channel.
The Add a new DOTNET channel dialog box opens in the right pane and contains fields to enter a name, description, and channel type.
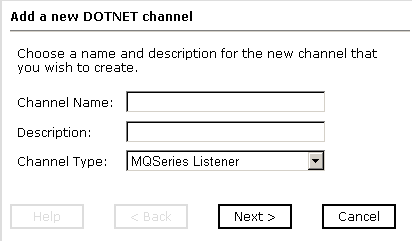
- Type a name (for example, NewChannel) and a brief description for the channel.
- From the Channel Type drop-down list, select MQSeries Listener.
-
Click Next.
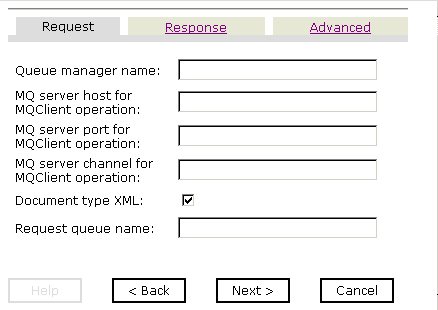
The following image shows the MQSeries information that appears in the right pane.
-
For each
field on the Request, Response, and Advanced tabs, type or select
the information.
The following table lists and describes the parameters for the MQSeries channel.
Parameter
Description
Queue manager name
Name of the queue manager to which the server must connect.
MQ server host for MQClient operation
Host on which the MQ server is located (for the MQ Client only).
MQ server port for MQClient operation
Number to connect to an MQ server queue manager (for the MQ client only).
MQ server channel for MQClient operation
Case-sensitive name of the channel that connects with the remote MQ server queue manager (for the MQ client only). SYSTEM.DEF.SVRCONN is the default channel name for MQSeries.
Document type XML
Leave the default selection.
Request queue name
Queue where the message is routed and where request documents are received. The name of the queue is case-sensitive and conforms to the following format:
Host\queue type$\qName
where:
- Host
Is the machine name where the MQSeries queuing system is running.
- queue type
Private queues are queues that are not published in Active Directory and appear only on the local computer where they reside. Private queues are accessible only by Message Queuing applications that recognize the full path name or format name of the queue.
- qName
Is the name of the queue where messages are placed, for example,
iwaykxc1\Private$\DOTNET
Sync type
Choose from three options:
- Select REQUEST_RESPONSE if the event application expects a response sent back to it.
- Select REQUEST_ACK when a TCP/IP acknowledgement (ACK) is sent back to the event application.
- Select REQUEST if the event application does not expect a response.
Message wait interval (ms)
Interval (in milliseconds) when to check for new input. Optional. The default is 3 seconds.
Mode of operation
Choose threaded or sequential.
- Threaded indicates processing of multiple requests simultaneously.
- Sequential indicates single processing of requests.
Thread limit
If you selected threaded processing, indicate the maximum number of requests that can be processed simultaneously. The default is 3.
-
Click Next.
The Select Ports dialog box opens in the right pane and may include lists of available and current ports with arrow buttons to enable you to move ports from one list to the other.
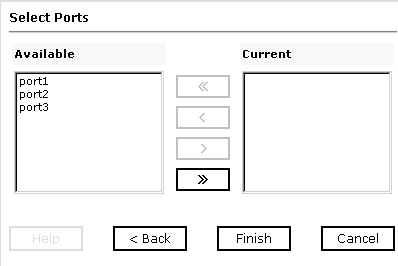
- Select an event port from the list of available ports. To select more than one, hold down the Ctrl key and click each port you want to move.
- To transfer the selected port(s) to the list of current ports, click the single right arrow button. To transfer all event ports, click the double right arrow button.
-
Click Finish.
The following image shows that summary information appears in the right pane.
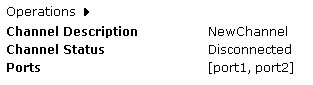
The summary information provides the channel description, channel status, and current ports. All the information is associated with the channel you created.
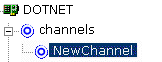
The following image shows that the channel also appears under the channels node in the left pane. An X over the icon indicates that the channel is currently disconnected.
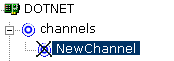
You must start the channel to activate your event configuration.
To create an HTTP channel:
-
Click
the iWay Events tab.
The iWay Events window opens. The iWay adapters that appear in the left pane support events.
-
In the
left pane, expand the DOTNET node.
The ports and channels nodes appear in the left pane.
- Select the channels node.
-
In the
right pane, move the pointer over Operations and
select Add a new channel.
- Type a name (for example, NewChannel) and a brief description for the channel.
- From the Channel Type drop-down list, select HTTP Listener.
-
Click Next.
The following image shows the Edit channels information that opens in the right pane.
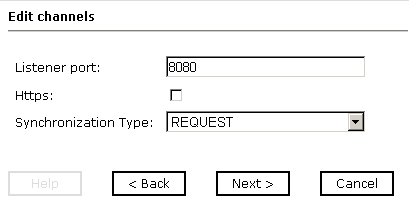
-
Supply
the values for the listener port, HTTPS, and synchronization type.
The following table lists and describes the parameters required for creating an HTTP channel.
Parameter
Description
Listener port
Port on which to listen for .Net event data.
Https
Use Https (HTTP over SSL). This is not selected by default.
Synchronization Type
- Select REQUEST if the event application does not expect a response.
- Select REQUEST_RESPONSE if the event application expects a response sent back to it.
- Select REQUEST_ACK when a TCP/IP acknowledgement (ACK) is sent back to the event application.
-
Click Next.
The Select Ports dialog box opens in the right pane and may include lists of available and current ports with arrow buttons to enable you to move ports from one list to the other.
- Select an event port from the list of available ports. To select more than one, hold down the Ctrl key and click each port you want to move.
- To transfer the selected port(s) to the list of current ports, click the single right arrow button. To transfer all event ports, click the double right arrow button.
-
Click Finish.
The following image shows that summary information appears in the right pane.
The summary information provides the channel description, channel status, and current ports. All the information is associated with the channel you created.
The following image shows that the channel also appears under the channels node in the left pane. An X over the icon indicates that the channel is currently disconnected.
You must start the channel to activate your event configuration.
To create a JMSQ channel:
-
Click
the iWay Events tab.
The iWay Events window opens. The iWay adapters that appear in the left pane support events.
-
In the
left pane, expand the DOTNET node.
The ports and channels nodes appear in the left pane.
- Select the channels node.
-
In the
right pane, move the pointer over Operations and
select Add a new channel.
The Add a new DOTNET channel information appears in the right pane.
- Type a name (for example, NewChannel) and a brief description for the channel.
- From the Channel Type drop-down list, select JMS Listener.
-
Click Next.
The Edit channels information for the JMS Listener channel appears in the right pane and includes the Request, Response, and Advance tabs.
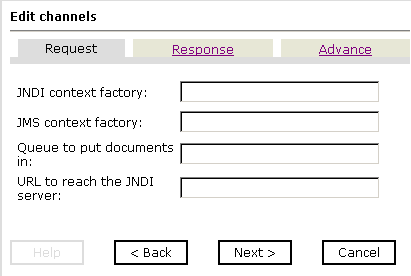
-
For each
field on each tab, type or select the information.
The following table lists and describes the parameters for the JMS Listener.
Parameter
Description
JNDI context factory
Is JNDI context. INITIAL_CONTEXT_FACTORY is provided by the JNDI service provider.
JMS context factory
Resource that contains information about the JMS Server.
Queue to put documents in
JNDI name of a queue to which events are emitted.
URL to reach the JNDI server
URL to use to contact the JNDI provider. The syntax of this URL depends on the JNDI provider being used. This value corresponds to the standard JNDI property,
java.naming.provider.url.
Synchronization type
Choose from three options:
- Select REQUEST if the event application does not expect a response.
- Select REQUEST_RESPONSE if the event application expects a response sent back to it.
- Select REQUEST_ACK when a TCP/IP acknowledgement (ACK) is sent back to the event application.
Poll interval (msec)
Interval (in milliseconds) when to check for new input. Optional. The default is 3 seconds.
Processing Mode
Choose threaded or sequential.
- Threaded indicates processing of multiple requests simultaneously.
- Sequential indicates single processing of requests.
Thread limit (0 for unlimited)
If you selected threaded processing, indicate the maximum number of requests that can be processed simultaneously. The default is 3.
-
Click Next.
The Select Ports dialog box opens in the right pane and may include lists of available and current ports with arrow buttons to enable you to move ports from one list to the other.
- Select an event port from the list of available ports. To select more than one, hold down the Ctrl key and click each port you want to move.
- To transfer the selected port(s) to the list of current ports, click the single right arrow button. To transfer all event ports, click the double right arrow button.
-
Click Finish.
The following image shows that summary information appears in the right pane.
The summary information provides the channel description, channel status, and current ports. All the information is associated with the channel you created.
The following image shows that the channel also appears under the channels node in the left pane. An X over the icon indicates that the channel is currently disconnected.
You must start the channel to activate your event configuration.
To create a Table channel:
-
Click
the iWay Events tab.
The iWay Events window opens. The iWay adapters that appear in the left pane support events.
-
In the
left pane, expand the DOTNET node.
The ports and channels nodes appear in the left pane.
- Select the channels node.
-
In the
right pane, move the pointer over Operations and
select Add a new channel.
The Add a new DOTNET channel dialog box opens in the right pane and contains fields to enter a name, description, and channel type.
- Type a name (for example, NewChannel) and a brief description for the channel.
- From the Channel Type drop-down list, select Table Listener.
-
Click Next.
The Table Listener configuration properties appears in the right pane. The following image shows the Table listener properties that must be configured, depending on the type of Table you want to create.

-
Click
the appropriate tab according to your database requirements.
The following table lists and describes the parameters needed to define a Table Listener.
Parameter
Description
Host
Name or URL of the machine where the database is installed.
Port
Port on which the Host database is listening.
Database Name
- For SQL Server and EDA Server Listener
SID
- For Oracle Listener
Data Source
- For JDBC-ODBC Bridge Listener
- Database name of
the database where the table specified in the SQL statement is located.
When you access a non-relational database, and the server component is an SSCTL server component, the database name must be the service name and you must specify it. If the server component is installed on USS, you can leave the database field blank.
- For an Oracle Listener, the SID is a unique name for the database service, chosen by the database administrator or the person who installed Oracle E-Business Suite.
- For JDBC-ODBC Bridge Listener, this is the name of the data source configured under the ODBC Driver Manager. For more information, see your ODBC Driver Manager documentation.
User
Database user ID to access the table.
Password
Database password associated with the user ID.
Polling Interval
Interval, in milliseconds, at which to check for new input.
SQL Query
SQL SELECT statement that the listener issues to poll the table.
If the SQL statement includes a date column or long text column, you must provide a value for the SQL Post-query parameter. The value you provide must not contain a date column or a long text column. This applies whether you provide an SQL statement here or rely upon the default.
For example, the following SELECT statement retrieves all unprocessed records from the DISCRETE_JOBS table:
SELECT * FROM WIP_DISCRETE_JOBS D
WHERE DJ.WIP_ENTITY_ID >
(SELECT WIP_ENTITY_ID
FROM WIP.TEMP_NEW_WORK_ORDER_ENTITY_ID)
Important: When a SQL Query joins two or more tables, a SQL Post Query must be used. Also, do not use a semicolon at the end of a SQL statement for a SQL Query or a SQL Post Query.
Post Query
A SQL statement that is executed after each new record has been read from the table. This is case sensitive: the case used to specify the column names must match the case used in the SELECT statement that polled the table. If the SQL Query property was omitted so that a default SELECT statement polled the table, the case used to specify the column names must match the case used to define the columns in the DBMS's native schema.
If you do not specify a value for SQL Post-query, each record read from the table will be deleted after it has been read. How this happens depends on whether you specify the Delete Keys property. If you:
-
Specify the Delete Keys property, by
default the adapter issues a DELETE statement with a WHERE clause containing
every key column specified for the Delete Keys property.
At run-time this will be faster than if you had not specified the Delete Keys property if there is an index on the key, or if there are fewer key columns than there are columns in the SELECT statement that polled the table.
- Do not specify the Delete Keys property, by default the adapter issues a DELETE statement with a WHERE clause that specifies every column from the SELECT statement that polled the table.
You can choose to retain the table's data once it has been read by specifying a value for this parameter, as shown in the examples that follow.
Note that the SQL Post-query and Delete Keys parameters are mutually exclusive, as Delete Keys applies to the default DELETE statement, and SQL Post-query overrides the default DELETE statement. You can provide a value for one or the other, but not for both.
There are two field operators, ? and ^, that you can use in a post-query SQL statement; for more information, see The Post-query Parameter Operators.
Important: When a SQL Query joins two or more tables, a SQL Post Query must be used. Also, do not use a semicolon at the end of a SQL statement for a SQL Query or a SQL Post Query.
Delete Keys
Comma-separated list of key columns to be used in the default DELETE statement. DELETE operates on keys, so specify the table's key columns.
This is case sensitive: the case used to specify the column names must match the case used in the SELECT statement that polled the table. If the SQL Query property was omitted so that a default SELECT statement polled the table, the case used to specify the column names must match the case used to define the columns in the DBMS's native schema.
Note that the Delete Keys and SQL Post Query parameters are mutually exclusive, as Delete Keys applies to the default DELETE statement, and SQL Post Query overrides the default DELETE statement. You can provide a value for one or the other, but not for both. For more information, see the description of the SQL Post-query parameter in this table.
-
Click Next.
The Select Ports dialog box opens in the right pane and may include lists of available and current ports with arrow buttons to enable you to move ports from one list to the other.
- Select an event port from the list of available ports. To select more than one, hold down the Ctrl key and click each port you want to move.
- To transfer the selected port(s) to the list of current ports, click the single right arrow button. To transfer all event ports, click the double right arrow button.
-
Click Finish.
The following image shows that summary information appears in the right pane.
The summary information provides the channel description, channel status, and current ports. All the information is associated with the channel you created.
The following image shows that the channel also appears under the channels node in the left pane. An X over the icon indicates that the channel is currently disconnected.
You must start the channel to activate your event configuration.
To create a TCP Channel:
-
Click
the iWay Events tab.
The iWay Events window opens. The iWay adapters that appear in the left pane support events.
-
In the
left pane, expand the DOTNET node.
The ports and channels nodes appear in the left pane.
- Select the channels node.
-
In the
right pane, move the pointer over Operations and
select Add a new channel.
The Add a new DOTNET channel dialog box opens in the right pane.
- Type a name (for example, NewChannel) and a brief description for the channel.
- From the Channel Type drop-down list, select TCP channel.
-
Click Next.
The Edit channels information appears in the right pane.
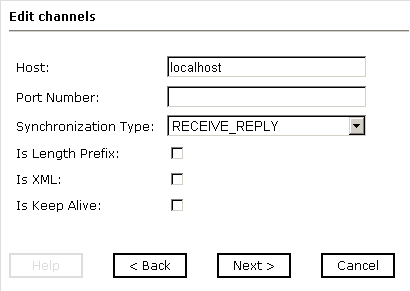
-
For each
field, type or select the information.
The following table lists and describes the parameters for the TCP Listener.
Parameter
Description
Host
Host name of the application server.
Port Number
For TCP/IP, specify port number.
Synchronization Type
Choose from three options:
- Select RECEIVE_REPLY if the event application expects a reply sent back to it.
- Select RECEIVE_ACK when a TCP/IP acknowledgement (ACK) is sent back to the event application.
- Select RECEIVE if the event application does not expect a response.
Is Length Prefix
For .Net events that send data back that is not in XML format. The TCP/IP event application must prefix the data with a 4-byte binary length field when writing the data to the TCP/IP port.
Is XML
For .Net events that send data back in XML format. No preparser is required.
Is Keep Alive
Maintains continuous communication between the event transaction and the channel.
-
Click Next.
The Select Ports dialog box opens in the right pane and may include lists of available and current ports with arrow buttons to enable you to move ports from one list to the other.
- Select an event port from the list of available ports. To select more than one, hold down the Ctrl key and click each port you want to move.
- To transfer the selected port(s) to the list of current ports, click the single right arrow button. To transfer all event ports, click the double right arrow button.
-
Click Finish.
The following image shows that summary information appears in the right pane.
The summary information provides the channel description, channel status, and current ports. All the information is associated with the channel you created.
The following image shows that the channel also appears under the channels node in the left pane. An X over the icon indicates that the channel is currently disconnected.
You must start the channel to activate your event configuration.
-
Click
the iWay Events tab.
The iWay Events window opens. The iWay adapters that appear in the left pane support events.
-
In the
left pane, expand the DOTNET node.
The ports and channels nodes appear in the left pane.
- Select the channels node.
-
In the
right pane, move the pointer over Operations and
select Add a new channel.
The Add a new DOTNET channel dialog box opens in the right pane and contains fields to enter a name, description, and channel type.
- Type a name (for example, NewChannel) and a brief description for the channel.
- From the Channel Type drop-down list, select File channel.
-
Click Next.
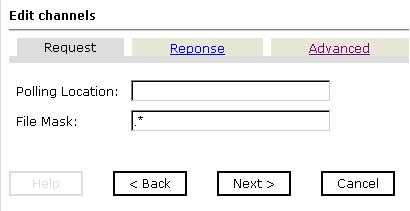
The Edit channels information for the File channel appears in the right pane, showing a Request tab, a Response tab, and an Advanced tab.
A table that lists parameters and their definitions for each channel type follows the image.
-
For each
field on each tab, type or select the information.
The following table lists and describes the parameters for the File Listener.
Parameter
Description
Polling Location
The target file system location for the .Net XML file.
File Mask
The file name to be used for the output file generated as a result of this operation.
Synchronization Type
Choose from three options:
- Select REQUEST if the event application does not expect a response.
- Select REQUEST_RESPONSE if the event application expects a response sent back to it.
- Select REQUEST_ACK when a TCP/IP acknowledgement (ACK) is sent back to the event application.
Response/Ack Directory
The target file system location for the .Net XML file.
Error Directory
Directory to which documents with errors are written.
Poll interval (msec)
Interval (in milliseconds) when to check for new input. Optional. The default is 3 seconds.
Processing Mode
Choose threaded or sequential.
- Threaded indicates processing of multiple requests simultaneously.
- Sequential indicates single processing of requests.
Thread limit
If you selected threaded processing, indicate the maximum number of requests that can be processed simultaneously. The default is 3.
-
Click Next.
The Select Ports dialog box opens in the right pane and may include lists of available and current ports with arrow buttons to enable you to move ports from one list to the other.
- Select an event port from the list of available ports. To select more than one, hold down the Ctrl key and click each port you want to move.
- To transfer the selected port(s) to the list of current ports, click the single right arrow button. To transfer all event ports, click the double right arrow button.
-
Click Finish.
The following image shows that summary information appears in the right pane.
The summary information provides the channel description, channel status, and current ports. All the information is associated with the channel you created.
The following image shows that the channel also appears under the channels node in the left pane. An X over the icon indicates that the channel is currently disconnected.
You must start the channel to activate your event configuration.
- Expand the iWay Events node.
- Expand the DOTNET node.
- Select the channel you want to start or stop.
-
To start
the channel, move the pointer over Operations and
select Start the channel.
The channel becomes active and the X over the icon disappears.
- To stop the channel, move the pointer over Operations and select Stop the channel.