Creating a Channel

How to:

The following procedures describe how to create a channel for your event. All defined event ports must be associated with a channel. You can create three types of channels:


Top of page

x
Procedure: How to Create an HTTP Channel

To create an HTTP channel using iWay Explorer:

  1. Click the iWay Events tab.

    The adapters in the left pane support events.

  2. Expand the Siebel node.

    The ports and channels nodes appear in the left pane.

  3. Click the channels node.
  4. In the right pane, move the pointer over Operations and select Add a new channel.
    1. When the Add a new channel window opens, type a name for the channel, for example, NewChannel.
    2. Type a brief description.
    3. From the drop-down list, select HTTP Listener.
  5. Click Next.

    The Edit Channels window opens in the right pane.

  6. Provide values for the parameters from the following table.

    The following table includes the name and description of each parameter.

    Parameter

    Description

    Listener port

    Port on which to listen for Siebel event data.

    Synchronization Type

    Synchronization types are not applicable to Siebel events.

  7. Click Next.

    The following image shows the Select Ports pane that opens with a list of the ports that are currently associated in the Current field on the left. On the right is a list of available ports in the Available field. The pane also includes arrow buttons, a Help button, and three action buttons.
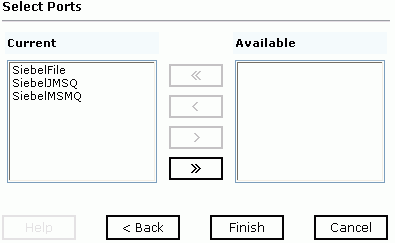
    1. Select an event port from the list of current ports.
    2. Click the single right arrow button to transfer the port to the list of available ports. To associate all the event ports, click the double right arrow button.
  8. Click Finish.

    The following image is an example of the summary window that opens, showing a description of the channel, its status, and available ports.

    All the information in the summary is associated with the channel you created.

    The following image shows a channel that appears beneath the channels node in the left pane. An X over the icon indicates that the channel is currently disconnected. You must start the channel to activate your event configuration.

  9. In the right pane, move the pointer over Operations and select Start the channel.

    The channel you created becomes active.

    The X that was over the icon disappears.

  10. To stop the channel, move the pointer over Operations and select Stop the channel.


x
Procedure: How to Create a File Channel

To create a channel using iWay Explorer:

  1. Click the iWay Events tab.

    The adapters in the left pane support events.

  2. Expand the Siebel node.

    The ports and channels nodes appear in the left pane.

  3. Click the channels node.
  4. In the right pane, move the pointer over Operations and select Add a new channel.

    The Add a new channel window opens.

    1. Type a name for the channel, for example, NewChannel.
    2. Type a brief description.
    3. From the drop-down list, select File Listener.
  5. Click Next.

    The Edit Channels window opens with three tabs in the right pane.

    1. In the Request tab, provide values for the parameters from the following table.

      The following table includes the name and description of each parameter.

      Parameter

      Description

      Polling Location

      The target file system location for the Siebel XML file.

      File Mask

      The file name to be used for the output file generated as a result of this operation.

    2. In the Response tab, provide values for the parameters from the following table.

      The following table includes the name and description of each parameter.

      Parameter

      Description

      Synchronization Type

      Synchronization types are not applicable to Siebel events.

      Response/Ack Directory

      Choose from three options:

      • REQUEST
      • REQUEST_RESPONSE
      • REQUEST_ACK

    3. In the Advanced tab, provide values for the parameters from the following table.

      The following table includes the name and description of each parameter.

      Parameter

      Description

      Error Directory

      Directory to which documents with errors are written.

      Poll interval (msec):

      The interval (in milliseconds) when to check for new input. Optional. The default is 3 seconds.

      Processing Mode

      Choose Sequential or Threaded.

      • Sequential indicates single processing of requests.
      • Threaded indicates processing of multiple requests simultaneously.

      Thread limit

      If you selected threaded processing, indicate the maximum number of requests that can be processed simultaneously.

  6. Click Next.

    The following image shows the Select Ports pane that opens with a list of the ports that are currently associated in the Current field on the left. On the right is a list of available ports in the Available field. The pane also includes arrow buttons, a Help button, and three action buttons.

    1. Select an event port from the list of current ports.
    2. Click the single right arrow button to transfer the port to the list of available ports. To associate all the event ports, click the double right arrow button.
  7. Click Finish.

    The summary window opens. A summary provides the channel description, channel status, and available ports. All the information is associated with the channel you created.

    The channel appears under the channels node in the left pane. An X over the icon indicates that the channel is currently disconnected. You must start the channel to activate your event configuration.

  8. In the right pane, move the pointer over Operations and select Start the channel.

    The channel you created becomes active.

    The X that was over the icon disappears.

  9. To stop the channel, move the pointer over Operations and select Stop the channel.


x
Procedure: How to Create an MQSeries Channel

To create an MQSeries channel using iWay Explorer:

  1. Click the iWay Events tab.

    The adapters in the left pane support events.

  2. Expand the Siebel node.

    The ports and channels nodes appear in the left pane.

  3. Click the channels node.
  4. In the right pane, move the pointer over Operations and select Add a new channel.

    The Add a new channel window opens.

    1. Type a name for the channel, for example, NewChannel.
    2. Type a brief description.
    3. From the drop-down list, select MQSeries Listener.
  5. Click Next.

    The Edit Channels panes opens on the right and has three tabs.

    1. In the Request tab, provide values for the parameters from the following table.

      The following table includes the name and description of each parameter.

      Parameter

      Description

      Queue manager name

      Name of the queue manager to which the server must connect.

      MQ server host for MQClient operation

      Host on which the MQ Server is located (MQ Client only).

      MQ server port for MQClient operation

      The number to connect to an MQ Server queue manager (MQ client only).

      MQ server channel for MQClient operation

      The case-sensitive name of the channel that connects with the remote MQ Server queue manager (MQ client only). The default channel name for MQSeries is SYSTEM.DEF.SVRCONN.

      Document type XML

      Keep the default selection.

      Request queue name

      Queue where the message is routed and where request documents are received. The name of the queue is case-sensitive.

    2. In the Response tab, provide values for the parameters from the following table.

      The following table includes the name and description of each parameter.

      Parameter

      Description

      Synchronization Type

      Synchronization types are not applicable to Siebel events.

    3. In the Advanced tab, provide values for the parameters from the following table.

      The following table includes the name and description of each parameter.

      Parameter

      Description

      Error Directory

      Directory to which documents with errors are written.

      Message wait interval (msec):

      The interval (in milliseconds) when to check for new input Optional. The default is 3 seconds.

      Mode of operation

      Choose Sequential or Threaded.

      • Sequential indicates single processing of requests.
      • Threaded indicates processing of multiple requests simultaneously.

      Thread limit

      If you selected threaded processing, indicate the maximum number of requests that can be processed simultaneously.

  6. Click Next.

    The following image shows the Select Ports pane that opens with a list of the ports that are currently associated in the Current field on the left. On the right is a list of available ports in the Available field. The pane also includes arrow buttons, a Help button, and three action buttons.

    1. Select an event port from the list of current ports.
    2. Click the single right arrow button to transfer the port to the list of available ports. To associate all the event ports, click the double right arrow button.
  7. Click Finish.

    The summary window opens. A summary provides the channel description, channel status, and available ports. All the information is associated with the channel you created.

    The channel appears under the channels node in the left pane. An X over the icon indicates that the channel is currently disconnected. You must start the channel to activate your event configuration.

  8. In the right pane, move the pointer over Operations and select Start the channel.

    The channel you created becomes active.

    The X that was over the icon disappears.

  9. To stop the channel, move the pointer over Operations and select Stop the channel.


x
Procedure: How to Edit a Channel

To edit an existing channel:

  1. In the left pane, select the channel you want to edit.
  2. In the right pane, move the pointer over Operations and select Edit.

    The Edit channels window opens.

  3. Make the required changes to the channel configuration and click Finish.

Top of page

x
Procedure: How to Delete a Channel

To delete an existing channel:

  1. In the left pane, select the channel you want to delete.
  2. In the right pane, move the pointer over Operations and select Delete.

    A confirmation dialog box opens.

  3. To delete the channel you selected, click OK.

    The channel disappears from the list in the left pane.


iWay Software