To create a channel:
- Click the iWay Events node.
- In the left pane, expand the Salesforce node.
-
Right-click the Channels node and select Add
Channel from the context menu.
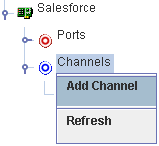
The Add Channel dialog box opens, where you supply information about the channel.
-
Perform the following steps:
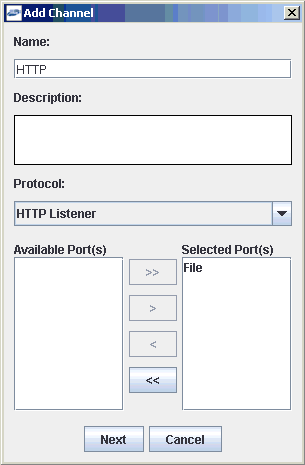
- In the Name field, type a name for the channel, for example, HTTP.
- In the Description field, type a brief description.
-
From the Protocol drop-down list, select HTTP Listener.
Note: For the current release, only the HTTP protocol is supported.
- From the Available Ports area, select a port you want to assign to this channel and click the right arrow to move it to the Selected Ports area.
-
Click Next.
The Salesforce Event Adapter dialog box opens, where you must select an available listener type (HTTP or HTTPS) and provide values for the required parameters accordingly.
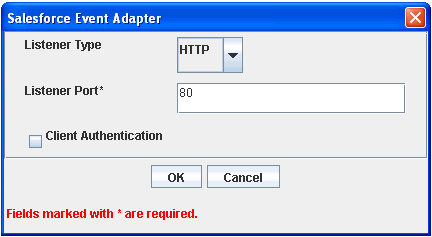
Note: For demonstration purposes, this procedure uses the HTTP listener as an example. If you want to use HTTPS, you must configure certificate management for the iWay Application Adapter for Salesforce before you configure an HTTPS listener. For more information on configuring certificates, see Certificate Management.
- From the Listener Type drop-down list, select HTTP.
-
Type 80 in the Listener Port field.
Note: Ensure that port 80 is accessible to the Internet from your system. This port is used to indicate where Salesforce will send the outbound message.
- If client authentication is required, select the Client Authentication check box (optional).
-
Click OK.
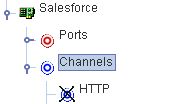
The channel you created is added beneath the Channels node in the left pane. In the right pane, a table summarizes the information associated with the channel. You are ready to start the channel to listen for events.
-
In the left pane, right-click the channel and select Start.
The channel you created is now active.
- To stop the channel at any time, right-click the channel.
- Select Stop.