Configuring JNDI Properties

In this section:

The Java Naming and Directory Interface (JNDI) is a Java API for a directory service that allows Java software clients to discover and look up data and objects using a name. Like all Java APIs that interface with host systems, JNDI is independent of the underlying implementation.

The application uses JNDI properties specified in the application server context to resolve WSO2 Identity Server location and credentials of users for entitlement service calls (such as making authorization decisions).

There are currently three JNDI properties that must be set:

To be available for the application, JNDI properties must be set in the application server. Depending on the application server implementation, the setting procedure may vary.


Top of page

x
Configuring JNDI Properties in Apache Tomcat

How to:

This section describes how to configure JNDI properties in Apache TOmcat.


x
Procedure: How to Configure JNDI Properties in Apache Tomcat

To configure JNDI properties in Apace Tomcat:

  1. Open the context.xml file by navigating to TOMCAT_LOCATION/conf/context.xml.
  2. Add the following fragment to <Context>:
    <Environment override="true" type="java.lang.String" value="https://195.160.232.136" name="is.wso2.url"/>
    <Environment override="true" type="java.lang.String" value="admin" name="is.wso2.username"/>
    <Environment override="true" type="java.lang.String" value="admin" name="is.wso2.password"/>

    Outlined properties must be reinitialized according to the WSO2 Identity Server configuration. The username and password should be the credentials of the admin user (or the user that has Manage and Login permissions).

    Note: When using multiple user stores (for example, LDAP), it is recommended to explicitly specify the domain for user names upon authentication to avoid domain confusion, for example, PROJECTS.LOCAL/WSO2user. To use internal users, specify the PRIMARY/ domain, for example, PRIMARY/admin.

    <Environment override="true" type="java.lang.String" value="PRIMARY/admin" name="is.wso2.username"/>

Top of page

x
Configuring JNDI Properties in GlassFish

How to:

This section describes how to configure JNDI Properties in GlassFish.


x
Procedure: How to Configure JNDI Properties in GlassFish

To configure JNDI properties in GlassFish:

  1. Go to the GlassFish Management Console.

    By default, this location is:

    http://localhost:4848/common/index.jsf
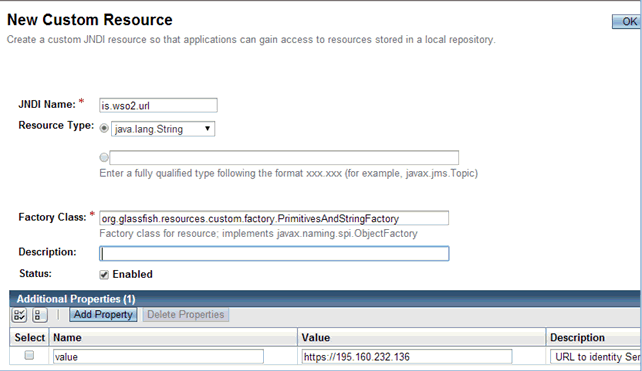
  2. Click Resources, select GNDI, and click Custom Resources.
  3. Click New.
  4. Set the property name (one of those provided) to resource type = java.lang.String.

    You can also set the description. The Status Enabled check box must be selected.

  5. In the Additional Properties table, create an additional property on the same pane, then click the Add Property button.
  6. Set the Name property to value.

    Value property should be set to the actual value of a corresponding property (for example, https://195.160.232.136 or admin). A description is optional.

  7. Click OK. Repeat this procedure from step one to create all three JNDI properties.

iWay Software