El ejemplo siguiente presenta un resumen de los pasos que va a seguir. Puede modificar estos pasos de acorde a los requisitos de su aplicación. Las ubicaciones de los archivos especificados se corresponden a las ubicaciones de archivos Windows utilizadas en este procedimiento.
|
Paso |
Nombre del archivo |
Ubicación del archivo | |
|---|---|---|---|
|
1 |
Cree un página de inicio de sesión HTML. Despues de iniciar la sesión correctamente, se crea una cookie que contiene el id. de usuario (IBIC_user) introducido en la página. |
SIGNON.HTM |
WebFOCUS77\ibi_html |
|
2 |
Cree una página principal con un conjunto de marcos que, al ejecutarse, presente opciones de menú personalizadas y un informe. |
HOME.HTM |
WebFOCUS77\ibi_html |
|
3 |
Cree las páginas del marco. |
MENU.HTMLOADMEM.HTMWELCOME.HTM |
WebFOCUS77\ibi_html |
|
4 |
Modifique el archivo CGIVARS.WFS para asignar el valor de id. de usuario a una variable ampersand de Dialogue Manager. |
CGIVARS.WFS |
ibi\WEBFOCUS77\client\conf\etc |
|
5 |
Cree un origen de datos de usuarios con los nombres de éstos y las opciones a las que pueden acceder. |
USERLST.MASUSERLST.DAT |
srv77\ggdemo |
|
6 |
Cree un origen de datos de menús que identifique y proporcione una etiqueta para todas las opciones de menú disponibles, la ubicación del archivo al que accede la opción y el marco de destino de su salida. Puede personalizar el contenido de este archivo para su aplicación. |
MENULST.MASMENULST.DAT |
srv77\ggdemo |
|
7 |
Cree un procedimiento que genere un menú personalizado para un usuario. |
FHSUB.FEX |
srv77\ggdemo |
|
8 |
Cree una página de visualización HTML en que aparezca el menú personalizado. |
SUBMENU.HTM |
srv77\ggdemo |
|
9 |
Cree los formularios que invocan las selecciones de informe en el menú. |
1MYGRAPH.THM2MYGRAP.HTM |
WebFOCUS77\ibi_html |
|
10 |
Cree los procedimientos que generan los informes específicos del usuario. |
FHSUB.FEX |
srv77\ggdemo |
Nota:
- Los procedimientos utilizados por el Servidor de informes WebFOCUS para crear la salida, además los archivos HTM en que ésta se encuentra insertada, deben ser accesibles al Servidor de informes.
- Las páginas de inicio, que son menús que solicitan informes, y las imágenes se almacenan en el Cliente WebFOCUS, en el servidor Web.
El archivo siguiente se llama SIGNON.HTM. Modifique las líneas en negrita para aplicarlas al servidor Web de su centro.
SIGNON.HTM:
<html>
<head>
<meta http-equiv="Content-Language" content="nl-be">
<meta http-equiv="Content-Type" content="text/html;
charset=windows-1252">
<meta name="GENERATOR" content="Microsoft FrontPage 4.0">
<meta name="ProgId" content="FrontPage.Editor.Document">
<title>Please Identify yourself!</title>
</head>
<body stylesrc="submenu.htm" bgcolor="#CECF9C">
<p> </p>
<form method="POST" action="/ibi_apps/WFServlet"
name="Signon">
<table border="0" width="100%" height="112">
<tr>
<td width="66%" height="19" align="right" colspan="2">
<p align="center"><img border="0"
src="http://localhost/ibi_html/IB_LOGO.GIF"></p>
<p align="center"> </td>
</tr> <tr>
<td width="66%" height="19" align="right" colspan="2">
<p align="center"><b><u><font face="Verdana" size="3">Log on to
WebFOCUS reporting</font></u></b></p>
<p align="center"> </td>
</tr>
<tr>
<td width="31%" height="19" align="right"><font face="Verdana"
size="2"><b>User ID</b></font></td>
<td width="35%" height="19"><input type="text" name="IBIC_user"
size="20"></td>
</tr>
<tr>
<td width="31%" height="18" align="right"><font face="Verdana"
size="2"><b>Password</b></font></td>
<td width="35%" height="18"><input type="password"
name="IBIC_pass" size="20"></td>
</tr> <tr>
<td width="31%" height="57">
<p align="right"><input type="reset" value="Reset"
name="B2"></td>
<td width="35%" height="57"><input type="submit" value="Submit"
name="B1"></td>
</tr>
</table>
<p> </p>
<p> </p>
<p> </p>
<p> </p>
<p> </p>
<input type="hidden" name="IBIWF_action" value="WF_SIGNON">
<input type="hidden" name="IBI_random" value=''>
<input type="hidden" name="WF_SIGNON_MESSAGE"
value="http://localhost/IBI_HTML/HOME.HTM">
</form>
<p> </p>
</body>
</html>A continuación le mostramos la página SIGNON.HTM cuando se accede a ella desde el navegador Web.

En este ejemplo, vamos a crear la página principal con un conjunto de marcos. Los siguientes archivos HTML proporcionan el contenido de cada marco utilizado: MENU.HTM (marco de rótulo), LOADMEN.HTM (marco de contenidos) y WELCOME.HTM (marco de consulta).
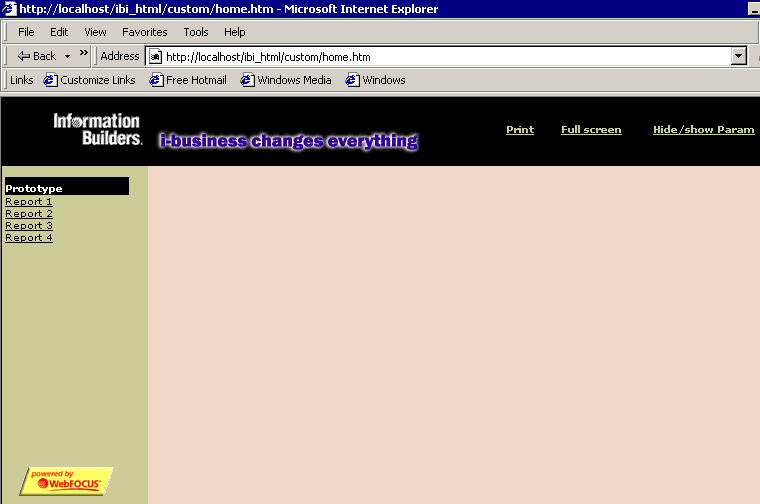
El archivo siguiente se llama HOME.HTM. Modifique las líneas en negrita para aplicarlas al servidor Web de su centro.
HOME.HTM:
<html>
<head>
<meta http-equiv="Content-Type" content="text/html;
   charset=windows-1252">
<title>Webfocus Reporting</title>
<meta name="GENERATOR" content="Microsoft FrontPage 4.0">
<meta name="ProgId" content="FrontPage.Editor.Document">
<meta name="Microsoft Border" content>
<meta base href="http://localhost/">
</head>

<frameset id="header" rows="68,*" framespacing="0" border="0"
   frameborder="0">
<frame name="banner" scrolling="no" noresize target="contents"
   src="MENU.HTM" marginwidth="0" marginheight="0" NOBORDER>
 <frameset id="bodypart" cols="146,*">
 <frame name="contents" target="main" src="LOADMEN.HTM"
    scrolling="auto" marginwidth="3" marginheight="11">
   <frameset id="querypart" rows="80,*">
   <frame name="QueryFrame" src="WELCOME.HTM" target="bottom"
      marginwidth="0" marginheight="0" scrolling="no" noresize>
   <frame name="ReportFrame" src="WELCOME.HTM" scrolling="auto"
      noresize marginwidth="12" marginheight="1" target="_self">
   </frameset>
 </frameset>
 <noframes>
  <body>
  <p>This page uses frames, but your browser doesn't support them.</p>
  </body>
 </noframes>
</frameset>
</html>
-
El archivo siguiente se llama MENU.HTM. Proporciona el contenido del marco superior (rótulo). Modifique las líneas en negrita para aplicarlas al servidor Web de su centro.
MENU.HTM:
<HTML>
<HEAD>
<meta base href="http://localhost/ibi_html" target="contents">
<TITLE>The JavaScript Menu Object</TITLE>
<script language="Javascript"><!---
function doprint()
{
 parent.document.frames.bodypart.all("Reportframe").focus();
 window.print();
}
function Show_query()
{
 if (parent.frames('QueryFrame').document.title == 'Query')
 {
  x=parent.frames('QueryFrame').document.all('Query').offsetHeight-10;
  parent.document.all("header").all("bodypart").all("QueryPart")
  .rows=x+",*";
 }
}

function Hide_A_query()
{
 if (parent.document.all("header").all("bodypart").all("QueryPart")
  .rows =='0,*')
 {
  resize()
 }
 else
 {
  parent.document.all("header").all("bodypart").all("QueryPart")
  .rows='0,*';
 }
}

function resize(){
var
x=parent.frames('QueryFrame').document.all('Query').offsetHeight-10;
parent.document.all("header").all("bodypart").all("QueryPart")
.rows=x+",*";
}
El código siguiente valida la consulta.
function dovalidation(Checktype){
  var boodschap=''
  var frm=parent.frames('QueryFrame').frminput

// Check Required !!!
  for (x=0;x<Checktype.length;x++) {
  if (Checktype[x][2]=='R') {
     if (frm.elements(Checktype[x][0]).value == '') {
       boodschap=boodschap + '"'+Checktype[x][1]+'" is mandatory ! \n'
   }  }   }
// End Check Required
  if (boodschap != '') {return boodschap};
// Check Type !!!
  for (x=0;x<Checktype.length;x++)
  {
    if (Checktype[x][3]=='N')
    {
      var anum=/(^\d+$)|(^\d+\,\d+$)/
      if (anum.test(frm.elements(Checktype[x][0]).value))
      {
    if ((Checktype[x][4] > frm.elements(Checktype[x][0]).value) ||
       (Checktype[x][5] < frm.elements(Checktype[x][0]).value))
    {
    boodschap=boodschap+'"'+Checktype[x][1]+'" must be within range
    ('+Checktype[x][4]+'-'+Checktype[x][5]+')! \n';
    }
    else
    {}
      }
      else
      {
      boodschap=boodschap+'"'+Checktype[x][1]+'" must be a number !
       \n';
      }
    }
    else
    {
      if (Checktype[x][3]=='T')
      {
    if (frm.elements(Checktype[x][0]).value.length < Checktype[x][4]
      ||
        frm.elements(Checktype[x][0]).value.length > Checktype[x][5])
{ boodschap=boodschap+'"'+Checktype[x][1]+'"length must be within range ('+Checktype[x][4]+'-'+Checktype[x][5]+')! \n'; } } else { if((Checktype[x][3]=='D')&&(frm.elements(Checktype[x][0]).value.length > 0)) { var dateStr = frm.elements(Checktype[x][0]).value; var datePat = /^(\d{1,2})(\/|-)(\d{1,2})\2(\d{2}|\d{4})$/; // To require a 4 digit year entry, use this line instead: // var datePat = /^(\d{1,2})(\/|-)(\d{1,2})\2(\d{4})$/; var matchArray = dateStr.match(datePat); if (matchArray == null) { boodschap=boodschap+'"'+Checktype[x][1]+'" is not a valid date! \n'; return boodschap; } day = matchArray[1]; month = matchArray[3]; year = matchArray[4]; if (month < 1 || month > 12) { boodschap=boodschap+'"'+Checktype[x][1]+'" :month must be between 1 and 12.'; return boodschap; } if (day < 1 || day > 31) { boodschap=boodschap+'"'+Checktype[x][1]+'" :day must be between 1 and 31.'; return boodschap; } if ((month==4 || month==6 || month==9 || month==11) && day==31) { boodschap=boodschap+'"'+Checktype[x][1]+'" : month '+month+' does not have 31 days!'; return boodschap; } if (month == 2) { var isleap = (year % 4 == 0 && (year % 100 != 0 || year % 400 == 0)); if (day>29 || (day==29 && !isleap)) { boodschap=boodschap+'"'+Checktype[x][1]+'" : February ' + year + 'does not have ' + day + ' days!'; return boodschap; } } } } } } return boodschap } function breakout() { mywindow=window.open("","Titel","scrollbars=yes,status=no"); mywindow.location.href=parent.frames('ReportFrame').location.href; } //--> </script> <style fprolloverstyle>A:hover {color: #FFFF00; font-family: Verdana; font-size:8pt; font-weight: bold} </style> <base target="contents"> </HEAD> <BODY style="font-family: Verdana; font-size: 8pt" class="regular" bgcolor="#000000" link="#CECF9C" vlink="#CECF9C" alink="#CECF9C"> <table border="0" width="600" bgcolor="#000000" cellspacing="0" cellpadding="0" bordercolor="#000000" height="62"> <tr> <td> </td> <td width="57" align="center" height="1"> <p align="center"><font color="#CECF9C" size="1"> <b> <a href='javascript:void 0' onclick='doprint();'>Print</a> </b></font> </td> <td width="86" height="1" align="center"> <p align="center"><font color="#CECF9C" size="1"> <b><a href='javascript:void 0' onclick='breakout();'> Full screen</a></b></font> </td> <td width="138" align="center" height="1"> <p align="center"><font color="#CECF9C" size="1"> <b><a href='javascript:void 0'onclick='Hide_A_query();'> Hide/show Param</a></b></font> </td> </tr> </table> </BODY> -
El archivo siguiente se llama LOADMENU.HTM. Proporciona el contenido del marco izquierdo (contenidos). Modifique las líneas en negrita para aplicarlas al servidor Web de su centro.
LOADMEN.HTM:
<html> <head> <title>Welcome text</title> <SCRIPT LANGUAGE="JavaScript"> <!-- function loadmenu() { IBI_random=Math.random()*Math.random()*Math.random()*100 ; loadurl="http://localhost/ibi_apps/ WFServlet?IBIF_ex=fhsub&IBI_random="+IBI_random parent.frames[1].location.href=loadurl } // --> </SCRIPT> </head> <body bgcolor="#E0E0BE" onload="loadmenu()"> <p align="center">Loading Menu ....</p> <p align="center">Stand by ..</font></p> </SCRIPT> </body> </html> -
El archivo siguiente se llama WELCOME.HTM. Proporciona el marco vacío inicial que quedará reemplazado por la salida de informe. No es necesaria ninguna modificación.
WELCOME.HTM:
<html>
<head>
<meta http-equiv="Content-Language" content="nl-be">
<meta http-equiv="Content-Type" content="text/html;
charset=windows-1252">
<meta name="GENERATOR" content="Microsoft FrontPage 4.0">
<meta name="ProgId" content="FrontPage.Editor.Document">
<title>Welcome text</title>
<base target="_self">
</head>
<body bgcolor="#E0E0BE"></body>
</html>
El siguiente ejemplo explica cómo modificar los archivos SITE.WFS.
-
Abra el archivo SITE.WFS, situado por defecto en
Windows: drive:\ibi\WEBFOCUS77\client\conf\etc
UNIX: /ibi/WEBFOCUS77/client/conf/etc
z/OS: /ibi/WEBFOCUS77/client/conf/etc
Nota: En muchos lugares, los desarrolladores no tienen acceso a los archivos .WFS en el servidor Web. Póngase en contacto con su administrador de sistemas o con el personal correspondiente.
-
En IBICOMMD.WFS, añade las siguientes líneas después del código <ifndef>EDACS3... <endif>:
<sendvar>
RUSER=&IBIC_user
<endsendvar>
Si está modificando SITE.WFS, añada estas líneas después del comentario.
Este paso envía el id. de usuario a una variable de Dialogue Manager llamada &RUSER, que se emplea para seleccionar las opciones del menú en el procedimiento FHSUB.
- Guarde el archivo y salga.
El siguiente archivo máster para el origen de datos de usuarios se llama USERLST.MAS. Este archivo debe crearse en la ruta de búsqueda de los servidores de informes WebFOCUS, APP PATH o EDAPATH en EDASPROF.PRF. Para más detalles, consulte Lógica de aplicaciones WebFOCUS.
FILENAME=USERLST, SUFFIX=FIX,
 SEGNAME=USERLST,SEGTYPE=S0,$
   FIELD=USER ,ALIAS=USER, USAGE=A8  , ACTUAL=A8  ,$  user ID
   FIELD=MKEY ,ALIAS=MKEY, USAGE=A2  , ACTUAL=A2  ,$  menu key
   FIELD=DUMM ,ALIAS=DUMM, USAGE=A70 , ACTUAL=A70 ,$  filler
El origen de datos es USERLST.DAT:
CEO     01
ADMIN   02
El id. de usuario CEO sólo tiene acceso a la opción 01 del menú. El id. de usuario ADMIN sólo tiene acceso a la opción 02 del menú.
El siguiente archivo máster para el origen de datos de menús se llama MENULST.MAS:
FILENAME=MENULST, SUFFIX=FIX,
 SEGNAME=TCSTAB04,SEGTYPE=S0,$
  FIELD=MKEY , ALIAS=MKEY,  USAGE=A2  ,  ACTUAL=A2  , INDEX=I ,$ menu key
   FIELD=RAP  , ALIAS=RAP ,  USAGE=A25 , ACTUAL=A25 ,$  menu text
   FIELD=HTM  , ALIAS=HTM ,  USAGE=A35 , ACTUAL=A35 ,$  HTML page
   FIELD=FRM  , ALIAS=FRM ,  USAGE=A12 , ACTUAL=A12 ,$  target frame
   FIELD=DUMM , ALIAS=DUMM ,  USAGE=A6  , ACTUAL=A6  ,$   filler
El origen de datos es MENULST.DAT:
01REPORT1                 ibi_html/1myqrap.htm        QueryFrame
02REPORT2                 ibi_html/2myqrap.htm        QueryFrame
El archivo siguiente se llama FHSUB.FEX. El comando JOIN asocia los usuarios a sus opciones de menú permitidas. El comando DEFINE define dinámicamente los hipervínculos que aparecen en el menú personalizado.
El valor de la variable &RUSER de Dialogue Manager es pasada al procedimiento por el bloque <sendvar> del archivo SITE.WFS.
Modifique las líneas en negrita para aplicarlas a su centro.
-************************************************************************
-* Calling from : LOADMEN.htm
-* Files called : sub.htm
-* Used &VARS   : &RUSER -> Web user ID (IBIC_user or equivalent)
-* Files used   : MENULIST.DAT -> fixed file with menu items
-*                USERLST.DAT  -> fixed file with users and privileges
-* Files created: rlist.htm -> temporary file with menu list
-*                H1.FOC    -> temporary file used in JOIN
-************************************************************************
-************************************************************************
-* Change these for customization:
-* &HOMEURL : Web server URL
-* &LSTDIR  : Location of userlst.dat and menulst.dat
-* &LSTDIR  : Location of rlist.htm
-************************************************************************
-*SET &ECHO=ALL;
-SET &HOMEURL='HTTP://localhost/';
-SET &LSTDIR='drive\IBI\APPS\GGDEMO\';
-SET &EDAHTMDIR='drive\IBI\APPS\GGDEMO\';
-SET &USERDAT='&LSTDIR.EVAL' || 'userlst.dat' ;
-SET &MENUDAT='&LSTDIR.EVAL' || 'menulst.dat' ;
-SET &LISTLOC='&EDAHTMDIR.EVAL' || 'rlist.htm' ;
-SET &RUSERL=&RUSER.LENGTH;
-SET &OLENGTH='A' || &RUSERL.EVAL;
-SET &UPUSER=UPCASE(&RUSERL.EVAL,'&RUSER.EVAL','&OLENGTH.EVAL');
FILEDEF USERLST DISK &USERDAT.EVAL
FILEDEF MENULST DISK &MENUDAT.EVAL
FILEDEF RLIST   DISK &LISTLOC.EVAL
-RUN
-************************************************************************
-* This code creates temporary file containing all menu items
-* with index on MKEY fields needed in JOIN.
-************************************************************************
TABLE FILE MENULST
PRINT *
ON TABLE HOLD AS H1 FORMAT FOCUS INDEX MKEY
END
-RUN
-************************************************************************
-* This will build the HTML syntax needed for dynamic user menu
-* with selection on user ID.
-************************************************************************
JOIN MKEY IN USERLST TO ALL MKEY IN H1 AS A
DEFINE FILE USERLST
TAGP1/A25='<TR> <TD WIDTH="100%" >' ;
TAGP2/A150=
 '<A HREF='  || '&HOMEURL.EVAL' || HTM ||
 ' TARGET="' || FRM || '" ONCLICK="Prepare();" >' ;
TAGP3/A80='<FONT SIZE="1" COLOR="#000000" >'|| RAP ||
'</FONT></A></TD></TR>';
END
TABLE FILE USERLST
PRINT TAGP1 TAGP2 TAGP3
WHERE USER EQ '&UPUSER.EVAL';
ON TABLE HOLD AS RLIST FORMAT ALPHA
END
-RUN
-************************************************************************
-* This will call the HTM file that contains the !IBI.FIL syntax.
-************************************************************************
-HTMLFORM SUBMEN
La página de visualización HTML es invocada por el procedimiento y debe ser accesible al Servidor de informes WebFOCUS. En Windows y UNIX, la extensión siempre es .HTM.
El archivo siguiente se llama SUBMEN.HTM. Se fusiona con la salida generada por el procedimiento FHSUB. Modifique las líneas en negrita para aplicarlas al servidor Web de su centro.
<html>
<head>
<meta http-equiv="Content-Language" content="nl-be">
<meta http-equiv="Content-Type" content="text/html;
charset=windows-1252">
<meta name="GENERATOR" content="Microsoft FrontPage 4.0">
<meta name="ProgId" content="FrontPage.Editor.Document">
<title>Submenu</title>

<SCRIPT LANGUAGE='JavaScript'>
<!-- shields up!

function Prepare () {
parent.document.all("header").all("bodypart").all("QueryPart")
 .all("Reportframe").src="welcome.htm"
parent.document.IBI_random=Math.floor((Math.random()*100000));
}

function Hide_query()
{
parent.document.all("header").all("bodypart").all("QueryPart")
 .rows="26,*";
parent.document.all("header").all("bodypart").all("QueryPart")
 .all('QueryFrame').src='welcome.htm';
}

function set_rand()
{
parent.document.IBI_random=Math.floor((Math.random()*100000));
}
//  -->
</SCRIPT>

<style fprolloverstyle>A:hover {color: #808000; font-size: 10pt;
  font-family: Verdana; font-weight: bold}
</style>
<meta base href="http://localhost/ibi_html" target="main">
<base target="main">
</head>

<body style="font-family: Verdana; font-size: 8pt" bgcolor="#CECF9C"
  onload="set_rand()">
<table border="0" width="100%" cellspacing="0" cellpadding="0">
<tr>
<td width="100%" bgcolor="#000000">
<p align="left"><b><font size="1" color="#FFFFFF">Prototype
</font></b>
</td>
</tr>
!IBI.FIL.RLIST;
<tr>
<td width="100%"><font size="1" color="#CECF9C">.</font></td>
</tr>
</table>
<p> </p>
<p> </p>
<p> </p>
<p> </p>
<p> </p>
<p> </p>
<p align="center"><img border="0" src="http://localhost/ibi_html/
template/powered.gif" align="baseline"></p>
</body>
</html>
-
El archivo siguiente se llama 1MYQRAP.HTM. No es necesaria ninguna modificación. El archivo debe almacenarse en el Cliente WebFOCUS, bajo el directorio ibi\WebFOCUS\ibi_html.
1MYQRAP.HTM:
<html>
<head>
<title>Query</title>
<meta name="Microsoft Border" content>
</head>
<body name="test" topmargin="1" style="font-family: Verdana;
  font-size:8pt" bgcolor="#D8D9B0" onload="resize()">

<DIV  ID="Query" style="width: 713; height: 159">
<script Language="JavaScript">
<!--

function Form1_Validator(theForm){
  var boodschap = ''
  var terug = true
//
//Checktype[[Fieldname,Text, Required, Type,rangefrom,rangeto]]
//   Type=(T,N,D), T -> Rangefrom & rangeto = length, N > range= real
     range !!! - Daterange not yet supported
//
  var Checktype=[[],[]];
//
// End of Validation definition
//
//
  parent.frames("Reportframe").document.write('<br><p align="center">
  <b><font face="Verdana" size="2">Please Wait...<BR>WebFocus is
    working for you</font></b></p>');

fun1()
  return (terug)
}
function Hide_query() { parent.document.all("header").all("bodypart").all("QueryPart") .rows="26,*"; } function resize(){ var x=document.all("Query").offsetHeight-10; parent.document.all("header").all("bodypart").all("QueryPart") .rows=x+",*"; } function checkaction(){ if (parent.document.all("header").all("bodypart").all("QueryPart").rows == '26,*') { resize() } else { parent.document.all("header").all("bodypart").all("QueryPart") .rows='26,*'; } } function fun1() { document.frminput.IBI_random.value=Math.floor((Math.random()*100000)); } //--></script> <form method="GET" action="/ibi_apps/WFServlet" style="font-weight:bold" name="frminput" onsubmit="return Form1_Validator(this)" target="ReportFrame"> <input type="hidden" name="IBIF_ex" value="REPORT1"> <input type="hidden" name="IBI_random" value=""> <table name="tble" border="0" width="759" cellspacing="1" style="font-family:Verdana; font-size: 8pt" height="94"> <tr> <td width="759" align="right" bgcolor="#CFD09F" colspan="4" height="11"> <p align="left"><font face="Verdana" size="1"><u><b> Please provide Parameters for Report 1 </b></u></font> </td> </tr> <tr> <td width="82" align="right" bgcolor="#D8D9B0" height="25"> <font face="Verdana" size="1">Variable 1 </font></td> <td width="212" bgcolor="#D8D9B0" height="25"> <font face="Verdana" size="1"> <select size="1" name="AMP_VAR1" style="font-family:Verdana; font-size: 8pt"> <option value="ACTION">ACTION</option> <option value="MYSTERY">MYSTERY</option> <option value="CLASSIC">CLASSIC</option> <option value="CHILDREN">CHILDREN</option> <option value="MUSICALS">MUSICALS</option> </select></font></td> <tr> <td width="70" align="right" bgcolor="#D8D9B0" height="1"> <p></p> </td> <td width="104" bgcolor="#D8D9B0" height="27"> <font face="Verdana" size="1"> <input type="submit" value="Run" name="B1"></font> </td> </tr> </table> </form> </DIV> </body> </html> -
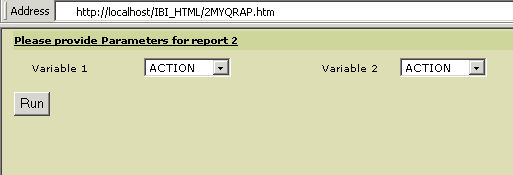
El archivo siguiente se llama 2MYQRAP.HTM. No es necesaria ninguna modificación.
2MYQRAP.HTM:
<html> <head> <title>Query</title> <meta name="Microsoft Border" content> </head> <body name="test" topmargin="1" style="font-family:Verdana; font-size:8pt" bgcolor="#D8D9B0" onload="resize()"> <DIV ID="Query" style="width: 713; height: 159"> <script Language="JavaScript"> <!-- function Form1_Validator(theForm){ var boodschap = '' var terug = true // //Checktype[[Fieldname,Text, Required, Type,rangefrom,rangeto]] // Type=(T,N,D), T -> Rangefrom & rangeto = length, N > range= real range !!! - Daterange not yet supported // var Checktype=[[],[]]; // End of Validation definition parent.frames("Reportframe").document.write('<br> <p align="center"><b><font face="Verdana" size="2">Please Wait...<BR>WebFocus is working for you</font></b></p>'); fun1() return (terug) } function Hide_query() { parent.document.all("header").all("bodypart").all("QueryPart") .rows="26,*"; } function resize(){ var x=document.all("Query").offsetHeight-10; parent.document.all("header").all("bodypart").all("QueryPart") .rows=x+",*"; } function checkaction() { if (parent.document.all("header").all("bodypart").all("QueryPart") .rows =='26,*') { resize() } else { parent.document.all("header").all("bodypart").all("QueryPart") .rows='26,*'; } } function fun1() { document.frminput.IBI_random.value=Math.floor((Math.random()*100000)); } //--></script> <form method="GET" action="/ibi_apps/WFServlet" style="font-weight: bold" name="frminput" onsubmit="return Form1_Validator(this)" target="ReportFrame"> <input type="hidden" name="IBIF_ex" value="REPORT2"> <input type="hidden" name="IBI_random" value=""> <table name="tble" border="0" width="759" cellspacing="1" style="font-family:Verdana; font-size: 8pt" height="94"> <tr> <td width="759" align="right" bgcolor="#CFD09F" colspan="4" height="11"> <p align="left"><font face="Verdana" size="1"> <u><b>Please provide Parameters for Report 2</b></u></font> </td> </tr> <tr> <td width="82" align="right" bgcolor="#D8D9B0" height="25"> <font face="Verdana" size="1">Variable 1 </font></td> <td width="212" bgcolor="#D8D9B0" height="25"> <font face="Verdana" size="1"> <select size="1" name="AMP_VAR1" style="font-family:Verdana; font-size: 8pt"> <option value="ACTION">ACTION</option> <option value="MUSICALS">MUSICALS</option> <option value="CLASSIC"> CLASSIC</option> <option value="CHILDREN">CHILDREN</option> <option value="FOREIGN">FOREIGN</option> <option value="MYSTERY">MYSTERY</option> </select></font></td> <td width="82" align="right" bgcolor="#D8D9B0" height="1"> <font face="Verdana" size="1">Variable 2</font> <td width="212" bgcolor="#D8D9B0" height="25"> <font face="Verdana" size="1"> <select size="1" name="AMP_VAR2" style="font-family:Verdana; font-size: 8pt"> <option value="ACTION">ACTION</option> <option value="MUSICALS">MUSICALS</option> <option value="CLASSIC"> CLASSIC</option> <option value="CHILDREN">CHILDREN</option> <option value="FOREIGN">FOREIGN</option> <option value="MYSTERY">MYSTERY</option> </select></font></td> </tr> <tr> <td width="70" align="right" bgcolor="#D8D9B0" height="1"> <p></p> </td> <td width="104" bgcolor="#D8D9B0" height="27"> <font face="Verdana" size="1"> <input type="submit" value="Run" name="B1"></font></td> </tr> </table> </form> </DIV> </body> </html>
A continuación le mostramos la página 1MYQRAP.HTM cuando se accede a ella desde el navegador Web.

A continuación le mostramos la página 2MYQRAP.HTM cuando se accede a ella desde el navegador Web.
El archivo siguiente se llama REPORT1.FEX.
DEFINE FUNCTION SUBTRACT (VAL1/D8, VAL2/D8) SUBTRACT/D8.2 = VAL1 - VAL2; END TABLE FILE MOVIES PRINT TITLE LISTPR IN 35 WHOLESALEPR AND COMPUTE PROFIT/D8.2 = SUBTRACT(LISTPR,WHOLESALEPR); BY CATEGORY WHERE CATEGORY EQ '&_VAR1'; ON TABLE HOLD FORMAT HTMTABLE AS REPORT1 END -HTMLFORM BEGIN <HTML> <BODY> <H2>MOVIE SALES PROFIT</H2> <!--WEBFOCUS TABLE REPORT1> <HR> <P>Parameters selected </P> <UL> <LI> CATEGORY: &_VAR1 <LI> CURRENT DATE : &DATEDMYY <LI> CURRENT TIME : &TOD <LI> CURRENT USER : &RUSER </UL> </BODY> </HTML> -HTMLFORM END
Nota: La línea de comentarios HTML debe cerrarse con una etiqueta de cierre de comentario (-->) o un corchete angular de cierre (>), sin ninguna otra etiqueta HTML.