In this section: |
To edit a control on the design screen using a menu option:
To edit a control on the design screen using a function key:
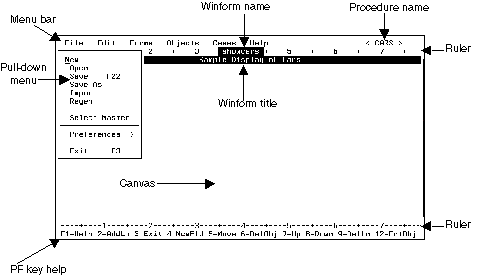
The following is a description of different elements that may be displayed on the screen when you are painting a Winform.

Most of the Winform Painter's features are available from its menu bar. To select a menu option:
Alternatively, you can use the arrow keys to move the cursor to the menu bar.
Once the cursor is on the desired menu, press the Enter key. Most menus open into a pull-down menu from which you can select an option. (The Cases and Help menus each display a dialog box; they do not open into a menu of options.)
If you wish to close a menu without selecting an option, press PF3 while the cursor is positioned anywhere in the menu system. (Note that if the cursor is on the Winform Painter canvas, PF3 closes the Painter.)
Some menu options are shown with a function key (for example, F3) to the right of the option. This indicates that the function key is a shortcut key that you can press to select the menu option; when you press the function key, the cursor can be anywhere on the Winform Painter canvas. Pressing a shortcut key is a quick alternative to navigating through the menu bar and menu options.
This is the name of the MAINTAIN file from which the Winform is displayed. The name is supplied by the developer from either the:
Each Maintain procedure can display many different Winforms. All of the Winforms are stored in one file. This means that there needs to be a way to identify which Winform should be displayed, modified, or created. The name displayed here is the one supplied in the Winform Name entry field of the Winform Properties dialog box.
The Winform title is for the benefit of the application user, and is optional. The title is centered in the Winform's top border; if a Winform has no border, it does not display the title.
Maintain's Winform Painter provides a ruler both at the top and the bottom of the screen in order to help the developer line up fields more easily.
Reference: |
The line below the bottom ruler is reserved for a list of common function keys. If the Painter needs to instruct the developer to do something, the list is not displayed, and a message is displayed.
The function keys are very useful in helping you to design and edit Winforms inside the Painter. When you are inside the Painter, the settings for some of the function keys appear at the bottom of your screen, as shown below:
F1=Help 2=AddLn 3=Exit 4=NewFld 5=Move 6=DelObj 7=Up 8=Down 9=DelLn
12=EdtObj
The following is a brief description of the function keys in the Painter. These function keys may operate differently in an individual pull-down menu.
|
Function Key |
Usage |
|---|---|
|
F1=Help |
Offers help while inside the Painter. |
|
F2=AddLn |
Adds a line to a Winform. |
|
F3=Exit |
Exits the current operation. |
|
F4=NewFld |
Adds a new field to a Winform. |
|
F5=Move |
Moves a control within a Winform. (The Winform Painter refers to controls as objects.) |
|
F6=DelObj |
Deletes a control from a Winform. |
|
F7=Up |
Pages up in a Winform. |
|
F8=Down |
Pages down in a Winform. |
|
F9=DelLn |
Deletes a line from a Winform. |
|
F10=Go To Main Menu |
Goes to menu bar. |
|
F11=Switch To Form |
Allows you to switch into another Winform. |
|
F12=EditObj |
Edits a control within the Winform. |
|
F13=Text |
Adds a text control to the Winform. |
|
F14=Grid |
Adds a grid to the Winform. |
|
F15=Browser |
Adds a browser to the Winform. |
|
F16=Frame |
Adds a frame to the Winform. |
|
F17=Button |
Adds a button to the Winform. |
|
F18=Check box |
Adds a check box to the Winform. |
|
F21=Triggers |
Adds a trigger to the Winform. |
|
F22=Save |
Saves current work to the WINFORMS file. |
|
F24=Resize |
Allows you to change the size of a control. |
|
Home=Go To Main Menu |
Goes to menu bar. |
|
Tab=Move Cursor |
Moves cursor across the screen, to the next control, left to right, and then down one line. |
|
Shift + Tab=Move Cursor Backwards |
Moves cursor across the screen, to the next control, right to left, and then up one line. |
| Information Builders |