Step 5: Adding Buttons and Triggers
So far you have created a Winform that displays data,
that is, the Car and Country fields and the grid displaying BodyStack
columns. However, you have not created a way to traverse the data
or to update the data source. You cannot process the data.
In this step you add triggers and command buttons to provide
a way to process the data. A trigger is a procedure that is invoked—"triggered"—by
a specified event. The procedure can be a function or a system action.
(Triggers are also known as event handlers, and functions are referred
to as cases in the Winform Painter.) The event can be something the
user does in a Winform, such as clicking a button. For example,
a user clicking a Cancel button triggers a system action that closes
the Winform.
In this section, you add buttons and triggers to the Winform
and assign the triggers to the buttons. By clicking one of these
buttons, the user triggers a function that pages through the data
and updates the data source, or invokes a system action that closes
the Winform or exits the application.
xAdding the First Button and Trigger
The first step is to add a command button to the Winform.
This button triggers a function that moves backward through the
data, displaying values for the previous car brands.
Try it now:
- Select the Button option
from the Objects menu.
- In response
to the prompt at the bottom of the screen to define the top left
corner of the button, position the cursor at row 20, column 5 (using
the terminal emulator's coordinates) and press Enter.
- In response
to the next prompt, to define the button's bottom right corner,
position the cursor at row 20, column 20, and press Enter.
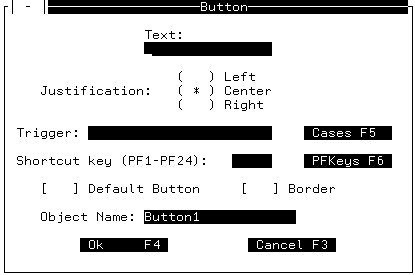
The Button dialog box opens.

x
You can type descriptive text to be displayed on the
face of the button in the Text entry field. This text usually describes
what the button does and includes the name of the button's shortcut
key.
Try it now: Type the following text and include two spaces
between the description and key name for reading ease: Previous
Car F1.
x
The Justification radio button group determines where
the text is aligned on the button.
Try it now: Accept the default justification so that the
text will be centered.
x
You specify a function to be performed or a built-in
Winform system action to be called when the application user clicks
the button. (Functions are referred to as cases in the Winform Painter.)
To specify a system action, you press PF5 or
click Cases to display a list of system actions
and existing functions. After you select the desired system action,
the Painter copies your choice to the Trigger field.
To specify an existing function, press
PF5 or click Cases to display a list of system
actions and existing functions. After you select the desired function,
the Painter copies your choice to the Triggers field and assigns
that function to the button.
To specify a new function, type the name
of the function into the Triggers field.
Try it now: For the tutorial, you must specify a new function,
so type PrevCar in the Trigger field.
xShortcut Key Field; PFKeys
The Shortcut entry field enables you to specify a function
key that users can press to click the button, thereby saving keystrokes.
If you wish to assign a shortcut key, first determine which keys
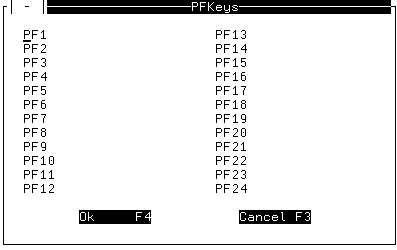
are available by clicking PFKeys. This displays
a list of the function keys (within this Winform) already assigned
to buttons and to form-level triggers.

Try it now: Select PF1 in the PF
Keys dialog box and then click OK to confirm
your choice.
The Painter copies the selected key name to the Shortcut key
field and later (upon closing the Button dialog box) assigns PrevCar
(your trigger).
You can change the values assigned to other function keys—for
example, moving a default system action to a different key—by selecting
the Actions option from the Forms menu.
x
In some Winforms, one command button is the default.
You can click the default button quickly by pressing Enter.
On terminals that support color, the default button is the color
of the terminal's unprotected high intensity field attribute. It
is helpful to make the most frequently used button—for example,
the OK button—the default.
Try it now: Leave the Default attribute
unchecked, as you do not want this button to be the default.
x
This attribute displays a border around the perimeter
of the button. This is useful if your terminal emulator does not
support highlighting.
Try it now: Accept the default value of no border, as
you do not want these buttons to have borders.
x
Try it now: Accept the default name.
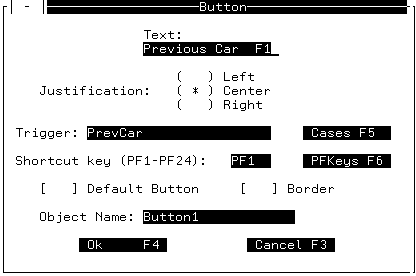
When you are finished specifying in the Button dialog box, it
should look similar to the following:

Try it now:
- Click OK to
confirm your work and close the dialog box.
The Painter displays
a message that the PrevCar function (which you had specified as
the button's trigger) does not exist and asks if you want the Painter
to create the function.
- Click the Create button.
The
Painter automatically generates an empty PrevCar function in the
Maintain procedure.
This generated function (consisting of CASE and ENDCASE commands)
serves as a temporary placeholder while you continue to develop
the application.
The Painter generates code when you save your work. To demonstrate
what the Painter produces, save your work by selecting the Save option
from the File menu.
Try it now:
- Place the cursor
on the button you just created and press PF12 to edit the button.
When the Button dialog box opens, press PF6 to display the PFKeys
list.
Notice that PF1 now displays the button's trigger. (Use
PF11 and PF10 to scroll the display to see the entire trigger).
- Click Cancel twice
to close the PFKeys and Button dialog boxes.
xAdding Additional Buttons and Triggers
Now you will add three additional command buttons to
the Winform. Select the Button option from
the Objects menu for each one, and supply the following values:
Try it now: Start the second button in row 20, column
24 and end it in row 20, column 39.
- Enter Next
Car F2 as the button's text.
- Type NextCar in
the Trigger field.
- Select PF2 for
the shortcut key.
- Accept the defaults
for Justification, Border, Default, and Object Name.
- Click OK to
close the dialog box.
- When the Painter
notifies you that the NextCar function does not exist, click Create to
generate an empty function.
Try it now: Start the third button in row 20, column 43,
and end it in row 20, column 58.
- Enter Quit
F3 as the button's text.
- Supply a value
for the Trigger field by clicking the Cases button
and selecting the exit system action. Select PF3 for
the shortcut key. Accept the defaults for Justification, Border,
Default, and Object Name. Click OK to close
the dialog box.
- You may see
the following message: This key is already assigned to a system action.
Do you want to override it? You can select OK.
Try it now: Start the fourth button in row 20, column
62, and end it in row 20, column 77.
- Enter Done
F4 as the button's text.
- Supply a value
for Trigger by clicking Cases and selecting the close system
action.
- Select PF4 for
the shortcut key.
- This will be
the default button, so select the Default check box.
- Accept the defaults
for Justification, Border, and Object Name. Click OK to
close the dialog box.
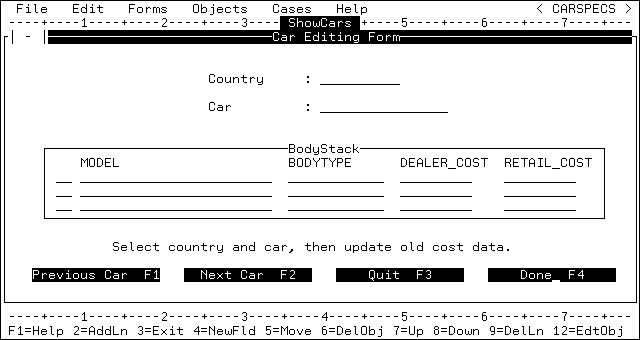
The Winform now displays four buttons:


