Step 7: Displaying and Editing an Entire Stack in a Winform
Goal
In the final stage of the application, you enable the
clerk to display and edit information about each customer's video
rentals. Adding this functionality illustrates how to use multiple
stacks and how to work with stack editors—called grids—to display
and edit all the rows of a stack at the same time within a Winform.
xMethods: Multiple Stacks and Stack Editors (Grids)
Up until now you have worked with procedures that use
only a single stack. You can develop more powerful applications
by using multiple stacks. For example, to achieve your current goal,
the application keeps your CustInfo stack—which contains each customer's
membership information, name, address, and phone number—and creates
a second stack, named TapeInfo, to hold one customer's videotape
rental information.
For each row of CustInfo (representing one customer), the application
retrieves all of the customer's tape rental data into TapeInfo.
When the clerk finishes editing the data in TapeInfo, the application
writes the new data to the data source, clears the stack, and then retrieves
into it the tape rental data for the next customer.
However, to realize fully the power of stacks and set-based processing,
you want to display and edit an entire stack at one time. You can
do this by placing a stack editor—called a grid—in a Winform. The
grid enables you to see multiple rows and columns at one time. If
there are too many rows or columns to fit within the grid box, the
Winform facility automatically provides scroll bars to scroll the
hidden elements into view.
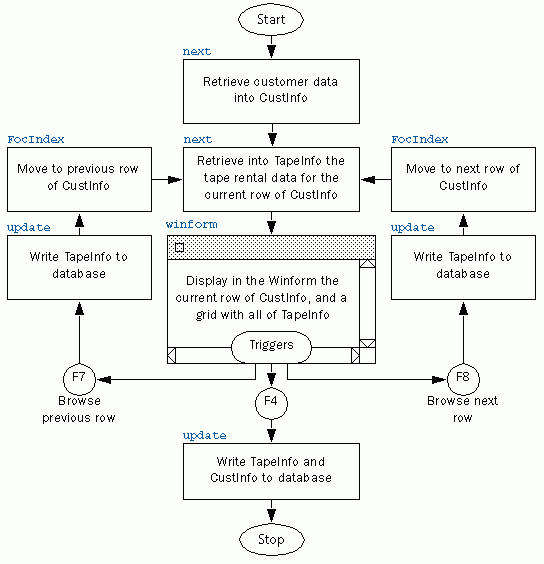
The following chart illustrates how you combine your existing
application with multiple stacks and a grid to achieve your goal.

x
You add a function called GetRental to the version of
the procedure in Step 6. For a given row of CustInfo, Get Rental
retrieves tape rental data into TapeInfo. (In the WHERE phrase in
GetRental, CustInfo().CustID refers to the value of CustID in the
current row of CustInfo.) Each time the function is invoked, it
clears the current values of TapeInfo, repositions VideoTrk to the
beginning of the data source, and retrieves the records. Note that
the default value of FocIndex is 1; the first time that GetRental
is invoked, it retrieves rental data for the first customer in CustInfo.
You also add a command that performs a new function—UpdateRental—to
the browser functions, so that when the clerk triggers them from
the Winform, the application writes the updated rental information
to the data source before advancing to the next customer in the CustInfo
stack.
Because you are no longer interested only in customers whose
membership is expiring but rather in all customers, you remove the
WHERE phrase from the first NEXT command.
The final stage of the application follows:
MAINTAIN FILE VIDEOTRK
FOR ALL NEXT CustID INTO CustInfo;
PERFORM GetRental;
WINFORM SHOW ShowCust;
FOR ALL UPDATE FirstName LastName Street City State Zip
    Phone FROM CustInfo;
PERFORM UpdateRental;
CASE GetRental
   STACK CLEAR TapeInfo;
   REPOSITION CustID;
   FOR ALL NEXT CustID TransDate MovieCode INTO TapeInfo
       WHERE VideoTrk.CustID EQ CustInfo().CustID;
ENDCASE

CASE UpdateRental
   FOR ALL UPDATE ReturnDate Fee FROM TapeInfo;
   COMMIT;
ENDCASE

CASE NextCustomer
   PERFORM UpdateRental;
   IF CustInfo.FocIndex LT CustInfo.FocCount THEN
       COMPUTE CustInfo.FocIndex = CustInfo.FocIndex + 1;
   PERFORM GetRental;
ENDCASE

CASE PreviousCustomer
   PERFORM UpdateRental;
   IF CustInfo.FocIndex GT 1 THEN
       COMPUTE CustInfo.FocIndex = CustInfo.FocIndex - 1;
   PERFORM GetRental;
ENDCASE

-* >> Generated Code Section....
.
.
.
END
Try it now: If you created your own set of application
files:
- Make a copy
of your second Maintain procedure file, rename it substituting "3"
for "2 (for example, TUTOR3 FOCEXEC), and enter these additional
commands into it.
- Enter FILE at
the TED command line to save your file and exit TED.
- Run the new
procedure (either the version supplied with FOCUS, named VIDTAPE3 or
your personal version that you named) at the FOCUS command line.
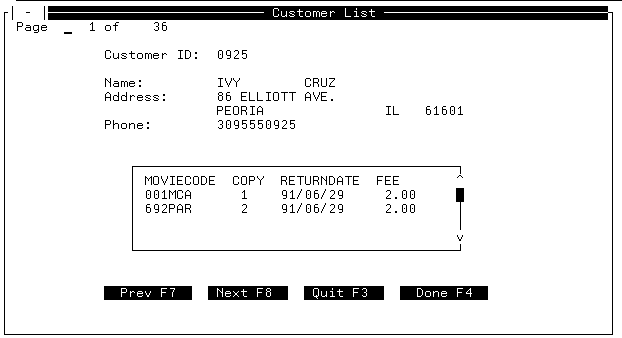
The new Winform appears. The grid is located in the center of
the form.


