In this section: |
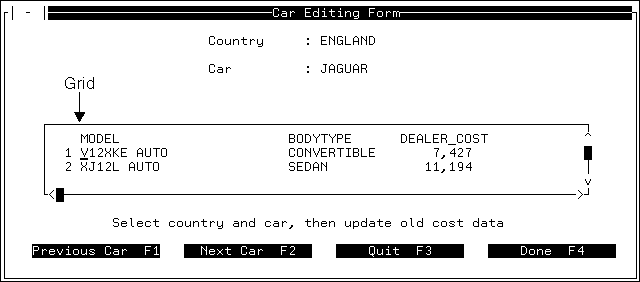
A grid is a stack editor that enables you to display and change the values in a stack. The columns are listed across the grid, and one or more rows appear at one time. In this section, you add a grid that displays BodyStack. A sample grid appears that looks similar to the following:
Try it now: To create a grid, select Grid from the Objects menu. When the Painter asks you to define the grid's upper-left and lower-right corners, position the upper-left corner of the grid in row 11, column 6 (using the terminal emulator's coordinates) and place the lower-right corner in row 16, column 76. These specifications allow sufficient space for the column headings and data.
After you specify the coordinates, the following dialog box appears:
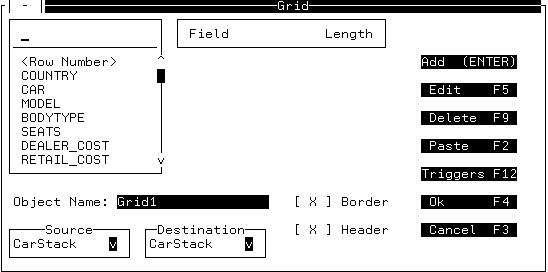
From the combo box, you can select the fields you want to include as columns in the grid. The list box displays all fields from the Master Files that you specified in the Winform Properties dialog box when you began the tutorial.
To select fields:
In either case, after pressing Enter, the field you selected and the length from the Master File appear in the Grid Field List.
Try it now: For this tutorial, select the following fields:
As you select fields, the list of selected fields grows. You can edit this list in several ways:
Below the list of available fields are two boxes indicating the grid's source and destination stacks. You specify BodyStack as both the source and the destination.
Try it now: In each box, click the down-arrow button. When the Painter displays a list of available stacks, select BodyStack.
After adding the five fields and changing the stacks, the dialog box looks similar to the following:
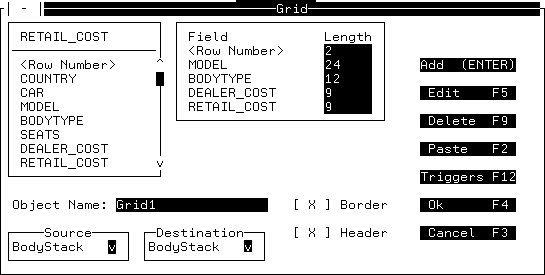
Because you previously protected the Country and Car fields from editing, the current default is Protected. Leave the Model and BodyType columns protected, because they are key fields in the Master File, but unprotect the Dealer_Cost and Retail_Cost fields.
Try it now: To protect or unprotect a column, move the cursor to the column (in this case, Dealer_Cost) and press PF5 to edit.
The Painter displays the following dialog box:
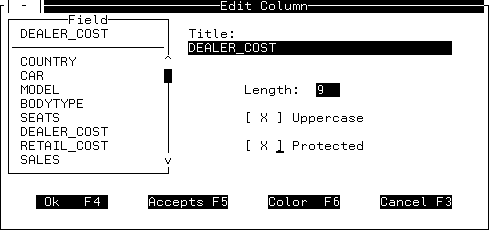
In addition to protecting and unprotecting columns, you can edit other column attributes in the Edit Column dialog box, including length, title, and case-sensitivity.
Color and data validation (Accepts) are not supported for grids in the current release.
After closing the dialog box, the screen looks similar to the following:

Note: The word BodyStack is centered at the top of the box around the grid. This name only appears during the painting process so that the developer can quickly identify which stack is used in that grid. It does not appear when the application is executed.
| Information Builders |