Report Display Options
Procedure: How to Display a Report
To display a report, perform the following steps:
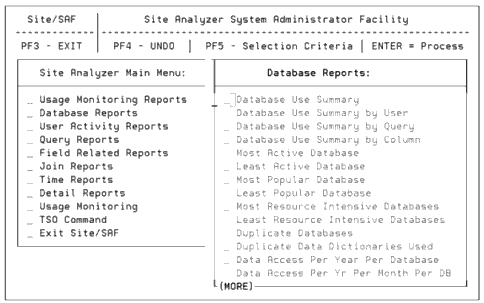
- In the Site/SAF main menu, place the cursor at the desired report group and press the Enter key. A list of the specific reports in the selected category appears. The following screen illustrates what you would see if you selected the Database Reports option.

Note: The TSO Command option that is listed under the Site Analyzer Main Menu is available for MVS only.
- Choose the specific report you wish to view by moving the cursor to the report title and pressing Enter.
If you have not specified any selection criteria during this session, SiteAnalyzer by default
runs the report for all monitored requests and displays it on the screen.
Procedure: How to Specify Report Selection Criteria
To customize the content and destination of your reports, use SiteAnalyzer's Selection
Criteria option. You access this option with the PF5 key. Follow these steps to enter report
selection criteria:
- Access Site Analyzer's main menu by entering EX SITESAF. Press the PF5 key to access Selection criteria. The following screen displays:

Note: The TSO Command option that is listed under the Site Analyzer Main Menu is available for MVS only.
The Selection Criteria menu includes a number of fields, for which you may enter criteria. The report will include only those requests that match all the criteria you specify.
- Specify your selection criteria, according to the following guidelines:
- To the right of each field is a description of the type of information you may enter; the options listed in uppercase are ones you may type.
- If you leave any of the fields blank, they default to the ALL option, running the report for all items in that field. You may also type ALL over a previously specified option.
- In the Report Dates field, you may enter Y to specify a specific date range or N to include all dates. If you enter Y you must also enter a range of dates in YYYYMMDD format.
- At the bottom of the screen you can enter ONLINE to view the report on the screen or OFFLINE to send the report directly to a printer. If you do not enter a preference, ONLINE is the default. If you view the report online, you can page through it with the PF7 and PF8 keys.
- Press Enter to run the report with your criteria, or press the PF3 key to exit the Selection Criteria menu without any changes.
Important: Once you have specified selection criteria for a report, SiteAnalyzer saves those
criteria for all reports for the remainder of the session. If you want different criteria for a
report, you must re-enter the Selection Criteria menu and revise the options.


