The Terminal Operator Environment consists of seven
types of windows. Each window performs a function or accepts certain
activities:
|
Window
|
Function
|
|---|
|
Command
|
Accepts user input: all FOCUS commands and
requests, operating commands, and WINDOW commands (see Command Window).
|
|
Output
|
Displays Command Window input and resulting
output; accesses Hot Screen facility (see Output Window).
|
|
History
|
Lists commands and requests entered in the
Command Window (see History Window).
|
|
Help
|
Displays function key settings. You may
redefine settings for the current session (see Help Window: Revising PF Key Settings).
|
|
Table
|
Displays the most recent TABLE request (see Table Window).
|
|
Error
|
Displays FOCUS error messages (see Error Window).
|
|
Fields
|
Displays a list of available fields for
a specified data source (see Fields Window).
|
x
All commands and requests are entered in the Command
Window. You can enter a FOCUS command exactly as you would at the
FOCUS command level. The Command Window accepts up to four lines
of text. You can enter any combination of commands and requests.
Type the command in the Command Window, then press Enter.
The command is copied to the Output Window and to the History Window
and is submitted for execution.
Requests are handled in a similar manner. Type your FOCUS TABLE,
GRAPH, or MODIFY request. Then, press Enter.
The request is copied to the Output Window and to the History Window
and is submitted for execution.
If your request is longer than four lines, press PF2 to
enlarge the window. Finish entering the rest of the request; do
not press PF2 again. Press Enter. The complete
request is copied to the Output Window and to the History Window
and is submitted for execution.
If you pressed PF2 and the Command Window returned to its original
size, press PF8 and scroll to the end of your request. Now, press Enter.
This ensures that the entire request, instead of a partial request,
is submitted.
Note: If you type over an existing command or request,
be sure to delete leftover characters.
If you enter four FOCUS commands (each on a separate line) or
a command and request (totaling four lines), the first item (command
or request) is copied to the appropriate windows, submitted, and
processed and followed by the next item. The Output and History Windows
display each item in succession.
In the sample screen below, the Command Window contains a combination
report request and a query command.
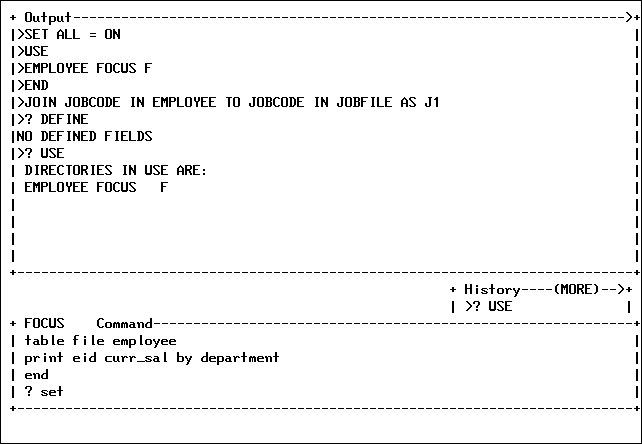
After the Enter key is pressed, the first
item (a request) is copied to the Output and History Windows. The
Output Window becomes active and the Hot Screen facility displays
the report. When you press Enter and return from
Hot Screen to the Output Window, the Output Window displays the
query command as input and its output (in this case, parameter settings).
The following sample screen illustrates the Output Window after
Hot Screen displays the report.

The Command Window also displays the current command mode in
a title area. The title area is on the left side of the window's
top border. It functions like the prompt does in the default FOCUS
environment. In the previous screen sample, for example, the title
area displays
FOCUS Command
because the ? SET query command is a general FOCUS command. If,
for example, the last request was a TABLE request or an incomplete
request and FOCUS expects another subcommand, the title area displays:
TABLE Command
In this sample screen, part of the TABLE request has been submitted.
The title area indicates a current command mode of TABLE.
Note: To return to the Command Window from another active
window, press the Enter key.
x
The Output Window functions as a session log. It displays
every line of input entered at the Command Window and every resulting
line of output. Each line is displayed in the sequence in which
it was submitted or generated. Each line of input from the Command
Window begins with a caret (>).
Note: The Output Window also accesses the Hot Screen facility.
After executing a TABLE request, the Output Window becomes active;
FOCUS pauses and displays the number of records and lines retrieved.
Press Enter to display the TABLE report in
Hot Screen. Press Enter again to exit Hot
Screen and return to the Terminal Operator Environment.
The Output Window does not log the report as displayed in the
Hot Screen facility; it records only the report request. The Table
Window contains the most recent report (see Table Window).
Within a TABLE or GRAPH request, you can use the Output Window
to display field names, aliases, and formats for the specified data
source (see Fields Window).
x
The History Window provides a history of your FOCUS
session. It records commands entered from the Command Window. You
can review up to 40 previously typed command lines. For example,
you could refer to it to see how you specified an earlier TABLE request.
In the History Window, an asterisk (*) indicates an incorrect
command or a mistake in syntax. A caret (>) indicates a command.
A request with subcommands is treated as one command and begins
with one caret.
You can also recall an old command from the History Window into
the Command Window, edit it, and resubmit it. To do so, position
your cursor at the command in the History Window and press PF6 or
use the WINDOW RECALL command described in Recalling Commands.
xHelp Window: Revising PF Key Settings
The Help Window displays the program function settings
and enables you to change those settings.
To activate the Help Window, press PF1 or enter the WINDOW HELP
command from the Command Window. The Help Window overlays existing
windows. To deactivate the Help Window and remove it from the screen,
press PF1 again.
The default key settings are:
|
Key
|
Value
|
|---|
|
PF1, PF13
|
Help
|
|
PF2, PF14
|
Zoom
|
|
PF3, PF15
|
|
|
PF4, PF16
|
Scroll Top
|
|
PF5, PF17
|
Scroll Bottom
|
|
PF6, PF18
|
Recall
|
|
PF7, PF19
|
Scroll Backward
|
|
PF8, PF20
|
Scroll Forward
|
|
PF9, PF21
|
Move Cursor
|
|
PF10, PF22
|
Scroll Left
|
|
PF11, PF23
|
Scroll Right
|
|
PF12, PF24
|
Next
|
Note: PF3 and PF15 are undefined. You may type a command
in the blank next to either key.
To change a key setting for the current session, type a new command
over the old command and press Enter. For
more space to specify a long command, enlarge the Help Window with
the PF2 key. Be sure to erase leftover characters.
Example: Erasing the Window Contents
To
erase the window contents, specify a Clear key for the Output Window
by defining the PF3 key (which happens to be undefined):
PF3 CLEAR OUTPUT
Example: Assigning WINDOW Commands as Key Settings
When
you assign WINDOW commands as key settings, the WINDOW keyword is
not required. If you assign FOCUS commands as key settings, the
FOCUS keyword is required. For example, to define the ? SET query
command as the PF3 key, type:
PF3 FOCUS ? SET
Note:
- You may also
specify the WINDOW SET command from the Command Window to change
a key setting for the session.
- PF key assignments
revert back to the default settings when you end a FOCUS session.
To retain customized key settings for each session, define them
with the WINDOW SET command in your PROFILE FOCEXEC.
- If you exit
the Terminal Operator Environment to return to the FOCUS command level,
PF key assignments are retained in the Help Window when you reenter
the optional environment.
- The FOCUS
HELP facility is available from this environment; issue the FOCUS
HELP command from the Command Window.
x
The Table Window displays the results of the most recent
TABLE request. This enables you to view the report again without
resubmitting the request. Unlike the RETYPE command, the most recent
report is available even if other commands have been issued after
the request.
The Table Window displays a TABLE report as soon as you have
terminated the report in Hot Screen. The Table Window holds up to
the first 10 pages of report data (200 lines), up to a width of
130 characters.
Note: The Table Window does not record TABLEF reports,
offline reports, or reports issued while the FOCUS SET SCREEN command
is set to OFF.
x
When a FOCUS error occurs, the Error Window appears
in the middle of the screen and displays an error message. The Error
Window always has a bright border, even when it is not the active
window. It remains on the screen until the error is corrected.
When you issue a command from the Command Window, it is copied
to the Output Window and the History Window. The command is processed
and FOCUS checks for errors. If an error is detected, the Error
Window appears and the cursor positions itself in the Command Window.
If part of the command is correct and has been accepted by FOCUS,
that part is protected.
At this point, you have two choices:
- Correct
the error identified by the cursor, add any new lines if you wish,
and press Enter to resubmit the command.
- Terminate
the command without executing it. Enter the QUIT command at the current
cursor position and delete any leftover characters.
You may also control the length of the error message that appears
in the Error Window. Use the WINDOW SET ERRORS command to specify
long form or short form.
x
The Fields Window appears when you issue the ?F query
command from within a request. The Fields Window provides a list
of fields for the specified data source.
As you enter your request from the Command Window, issue the
?F query command:
?F
The Fields Window opens, displaying the active fields. Move the
cursor next to the appropriate field. Press Enter.
The Fields Window closes and the field appears in the Command Window.
To leave the Fields Window without making a selection, press PF12.
In the sample screen, part of a TABLE request has been entered
and appears in the Output Window. The ?F query command has also
been issued. As a result, the Fields Window overlays the Output
and Command Windows. At this point, you may select a field or leave
the window by pressing the PF12 key.
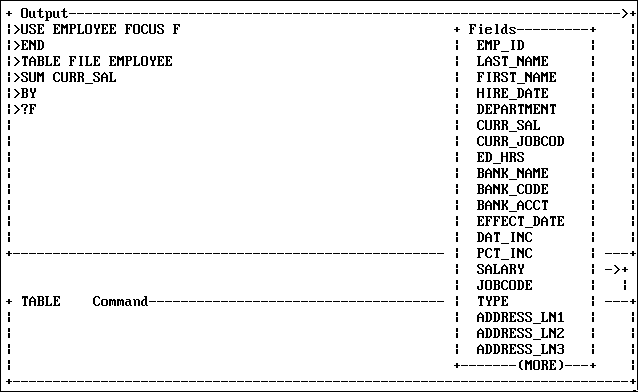
Note: If you have not issued a partial request and entered
the ?F query command, the fields appear in the Output Window and
are not available for selection.
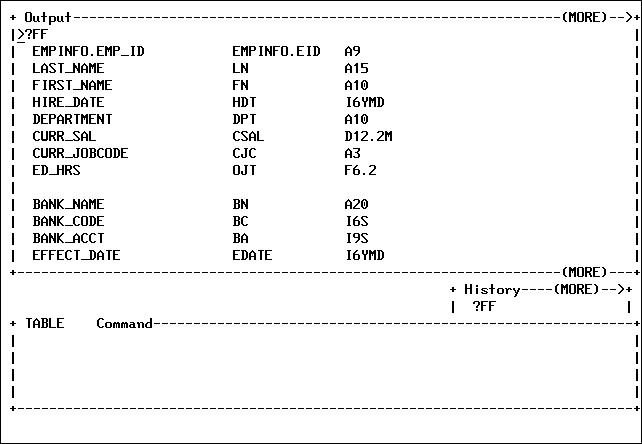
xDisplaying Fields and Field Formats
The Output Window displays a list of fields and accompanying
aliases and formats when you issue the ?FF query command from within
a request.
As you enter your request from the Command Window, issue the
?FF query command:
?FF
The Output Window displays the fields. Note the field you wish
to use in the request and then press the PF12 key
to return to the Command Window. Type the field you selected and
press Enter.
To verify that the field has been added to the request, make
the History Window the active window. Press PF2 to
zoom in; the request with the added field appears. Press PF2 to
zoom out. Then make the Command Window the active window again so
that you can continue creating your request.
In the following sample screen, part of a TABLE request has been
entered and appears in the Output Window. The ?FF query command
has been typed into the Command Window.

When the Enter key is pressed, the Output
Window displays the list of fields.