
In this section: |
You can create, calculate, and present financially oriented data such as balance sheets, consolidations, profit and loss statements, budgets, and certain government mandated reports. These reports are distinguished from other WebFOCUS reports because calculations are inter-row as well as inter-column. Each row or line represents a unique entry or series of entries that can be aggregated directly from the input data, or calculated as some function of the data. The Matrix tab is located at the top of the App Studio interface and is only accessible when a FOR field is selected on the report canvas and the Matrix tab is selected from the bottom of the Report canvas. The Matrix tab is shown in the following image.
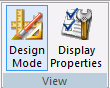
You use the View group to change the type of a field. The View group is shown in the following image.
The commands are:
Toggles the report between Design mode and Preview mode. Design mode is used to assist you in the creation of your report, and Preview mode allows you to preview what a user will see at run time.
In Preview mode, the Report canvas displays the following:
Shows the properties of the selected row in a dialog box named after the row type. For example, if your row was the DATA type, the DATA dialog box opens. You can edit the properties for that row from this dialog box.
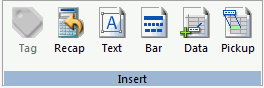
You can use the Insert group to insert or change a row in a report. The type depends on which button you click. You can choose between Tag, Recap, Text, Bar, Data, and Pickup. You can also change a row to a different type using the shortcut menu on the Report canvas. The Insert group is shown in the following image.
The commands are:
Inserts a tag row or changes a row to a tag row. Tags identify the data values of the FOR field in your report. A report row can be associated with a tag that represents:
You can also identify tag values that are organized in a parent/child hierarchy up to 99 levels deep and extending over many rows in the matrix.
The Tag command opens the TAG dialog box, from which you can define all of these variations.
Opens the RECAP dialog box, where you can create an expression that derives the value of the RECAP row and assign row properties. Recaps enable you to perform calculations on data in the rows of a report to produce new rows.
To initiate a Recap operation, you must supply the format of the value that will receive the result of the calculation, and an expression that defines the calculation you wish to perform. Initially, the default row label (R1, and so on) serves as the identifying label for the calculated value. However, it is good practice to provide a more descriptive label for reference in other calculations.
Opens the TEXT dialog box, where you can enter a row of text, or a blank row. Type up to 256 characters in the text field or leave it blank to insert a blank row to the report.
Opens the BAR dialog box, where you can add an underline character below columns of numbers. The options include a single or double underscore character.
Opens the DATA dialog box, where you can assign properties, such as title and label, to a row whose data you supply directly in the request, rather than retrieving it from a data source.
Opens the PICKUP dialog box, where you can assign row properties, such as title and label, and indicate the name of a file from which to pick up a row of previously posted data.
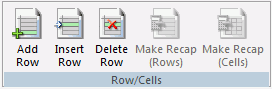
You use the Row/Cell group to create and edit rows and cells. The Row/Cell group is shown in the following image.
The commands are:
Adds a blank row at the bottom of the matrix.
Inserts a blank row between two existing rows.
Deletes the selected row.
Creates a RECAP row based on the sum of other values in the matrix.
Creates a RECAP cell based on the sum of other values in the matrix.
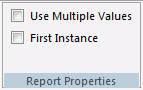
You use the Report Properties group to control report properties. The Report Properties group is shown in the following image.
The commands are:
Allows you to add the same data value to multiple rows.
When enabled, adds the .FST to all summed numeric columns, ensuring the shared value is only counted once.
You use the Row Properties group to control row properties from this group. The Row Properties group is shown in the following image.

The commands are:
When enabled, hides the selected row.
When enabled, you can hide a row, if no data exists in that row.
You can enter the name of a file you want to a row of output.
| WebFOCUS |