
In this section: |
You use the Format tab to change the output type of the report, control the navigational settings of a report, and access the special features of a report. Accordingly, this tab contains the Output Types, Navigation, and Features groups. The Format tab is located at the top of the App Studio interface and is available only when you are creating a report. The Format tab is shown in the following image.
The Output Types group enables you to choose the type of report (for example, PDF, Excel, or active report) that you would like to produce. You can also set the output format and the destination of the report using the elements in this group. The Output types group is shown in the following image.

The report type options are:
Changes the report output type to HTML. This is the default value.
Changes the report output type to HTML active report (AHTML).
Changes the report output type to active Flex, which creates an HTML report for Adobe Flash Player.
Changes the report output type to PDF.
Changes the report output type to active PDF, which creates a PDF report for Adobe Flash Player.
Changes the report output type to Excel. You can select the following types of Excel Reports: Excel XLSX, Excel XLS, Excel XLSX Formula, Excel XLS Formula, or the Excel XLS PivotTable.
Changes the report output type to PowerPoint. You can select PowerPoint PPTX or PowerPoint PPT.
Changes the output format of a report. The options that are available to you change depending on which output format you select. Formats are grouped into the following categories: Styled report formats, Unstyled formats, and Database formats.
Opens the Output Format Options dialog box where you can set a report title, turn on line suppression, turn on Cascading StyleSheets, and set how to expand report rows.
Opens the Output Destination dialog box, where you can set the destination of your output to either Web Browser, Temporary File, or Save File. If you select Temporary File or Save File, you can set the name and location of that file using the Name text box and directory selection icon. For more information, see How to Set the Output Destination.
The Output Destination dialog box displays.
Note: If you select Temporary File or Save File, the Name field is activated.
The File name and location dialog box displays.
Note: The file name that you specified on the Output Destination dialog box is carried over to the Filename field in the File name and Location dialog box.
You can type a report title into the text box.
You can select whether or not to include Cascading StyleSheets in your report. You can select On or Off. On is selected by default.
You cans select how you would like rows to be expanded. Only show top level is the default.
Note: If you want to set your report rows to expand to a specific number, you must type an integer into the text box rather than selecting one of the options.
You can select whether to suppress blank lines or not.
Off. The suppression of blank lines will not occur.
Only within report body. The suppression of blank lines will only occur within the body of the report.
Enables the display of By fields in the left portion of each panel of a multi-panel report.
Repeats headings/footings on each panel page when the columns presented on PDF reports cannot be displayed on a single page.
Sends the page settings to a PostScript printer when printing in PS format.
Displays a grid in the report output, which enables you to evaluate the correct placement of data and objects during your report design.
Adds the highest-level sort field and its values as a TOC in the report. This option deactivates all other options on the Format tab.
You can type a report title into the text box.
This indicates where the overflow rows of data break in the Excel worksheet. The default is 65,000 rows of data before an overflow sheet is generated.
Note: When you change formats from XLSX to EXL2K and ROWLIMIT exceeds 65,000, you will receive a message asking you if you want to proceed. If you decide to continue, ROWLIMIT will be set to 65,000. If you decide not to continue, the format will revert to XSLX, with no change to ROWLIMIT.
Specifies the number of rows per sheet. This option is set to max and unable to be edited when Generate overflow sheets is turned off.
Assigns a named range to a group of cells in Excel. There is a 256 character limit for named ranges.
You can set which template to use in your Excel report.
Sets the number of items to populate.
You can set which template to use in your Excel report.
Sets the number of items to populate.
You can use the User Format Selection dialog box to choose which formats and options are available, at runtime, when you select the User output format from the Styled report formats, from the Output Formats command. You can select which formats a user can choose from, and customize the options specific to each format.
The User Format Selection dialog box is shown in the following image.
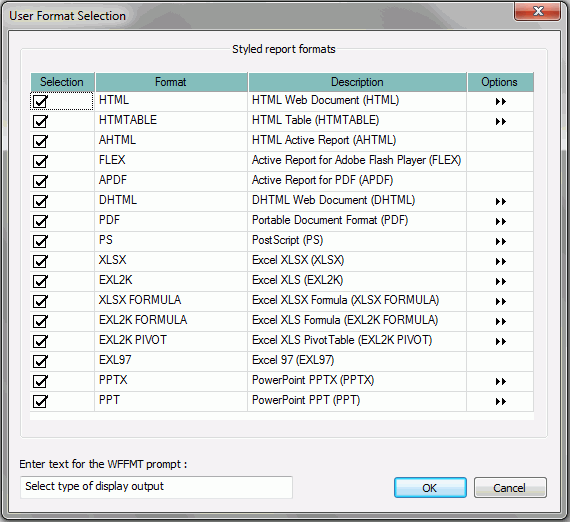
Provides a list of check boxes that indicate whether or not an output format is available to the user. All formats are selected by default. You can click the check box for a format to clear it.
Displays a list of available output formats.
Provides a brief description of the output format which is displayed to the user, at runtime. You can edit the description by double-clicking the description text box.
Indicates which output formats have options you can customize. You can click the double-arrow to open the Output Format Options dialog box, which displays the options available for that format. For example, if you click the double-arrow for the HTML output format, the Output Format Options dialog box opens, displaying the options for the HTML output format.
You can type what the user sees when prompted to choose an output format, at runtime.
Accepts the changes and closes the dialog box.
Discards the changes and closes the dialog box.
In this section: How to: |
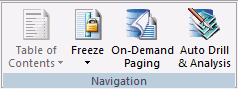
The navigation group contains the functionality for setting navigational options for your report (for example, adding a Table of Contents or freezing an area of the report). You can also page the report on-demand and control OLAP options from the Navigation group. The Navigation group is shown in the following image.
The commands are:
Displays every value of the highest-level sort field as a hyperlink, and then toggles between a display of the entire report and a designated section. It also applies a dynamic table of contents to the first By field in an HTML report. You can select Report, Heading, or None.
Note: You create a Table of Contents on a BY field.
For more information, see How to Add a TOC or Disable the TOC Feature.
Freezes the scrolling area of a report so that Headings or Footings display with the full report in a narrow browser window. You can select Off, On, Top, Bottom, or Custom. For more information, see How to Freeze the Area You Are Scrolling for HTML Report Output.
Displays one page of an HTML report, where the server sends the report to your browser one page at a time. You can use controls on your browser to display the next or previous page, all pages, or to navigate to a specific page. You can select On or Off (default).
Controls the appearance of OLAP options, the OLAP Selections pane, and automatic drilldowns. It also opens the Auto Drill & Analysis dialog box. You can select options related to OLAP, the OLAP Selections pane, and automatic drilldowns.
Note: You can use the Auto Drill & Analysis with HTML reports only.
For more information, see Auto Drill & Analysis.
Tip: Click the Properties tab in the Object Inspector to verify that the Table of Contents is turned on.
or
You can freeze page headings/footings, report headings/footings, column titles, and totals for your report output. The freeze option is available from the Navigation group of the Format tab.
The options are:
This section describes the functionality for Auto Drill & Analysis.
Automatic Drill Down controls access to automatic drill downs in a report:
In this section: |
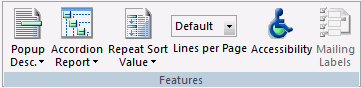
Options in the Features group enable to you control the appearance of pop-up descriptions, whether a report is an Accordion Report, whether to repeat a sorted value, whether to use special active report options, and if accessibility options are on. The Features group is shown in the following image.
The commands are:
Enables the display of pop-up field descriptions for columns in your report. You can select On or Off. The default is <not set>. For more information, see Displaying Pop-up Field Descriptions for Column Titles.
Changes a report to an Accordion Report. You can select On or Off. Accordion reports provide a way to control the amount of sorted data that appears on an HTML report page. You can produce reports with expandable views of data for each vertical sort field. When an Accordion Report first appears, only data values of the first (highest-level) vertical sort field are shown. All other data is hidden. You can manually expand your view to expose data values of lower-level sort fields. For more information, see Controlling the Display of Sorted Data With Accordion Reports.
Displays all repeated sort values instead of blanks in the output after the first instance of a new sort value, which is the default behavior. You can select On or Off. The default is <not set>.
Determines how many lines are displayed on each report page. Options are 10, 20, 30, 40, 50, and Show All. The default is 20.
Offers options that help users with disabilities to interact with the report.
Opens the Mailing Labels Options dialog box, which allows you customize the layout, dimensions, spacing, and print order of your mailing label. This option is only available for PDF and PostScript reports.
For more information, see Mailing Labels Options Dialog Box.
You can have pop-up field descriptions display in an HTML report when the mouse pointer is positioned over column titles. Field description text displays in a pop-up box near the column title using the default font for the report.
Note: Pop-up Field Descriptions are available for HTML Web Document (HTML), HTML Table (HTMTABLE), Default, and User styled report formats.
The pop-up text displayed for a column title is defined by the Description attribute in the Master File for the corresponding field. If a column title has no Description entry in the Master File, then no pop-up box is generated when your mouse is positioned over the title.
The following procedure provides information on displaying pop-up descriptions in an HTML report.
The selection menu displays.
Accordion Reports provide a way to control the amount of sorted data that appears on an HTML report page. You can produce reports with expandable views of data for each vertical sort field. When an Accordion Report first appears, only data values of the first (highest-level) vertical sort field are shown. All other data is hidden. You can manually expand your view to expose data values of lower-level sort fields.
When you create an Accordion Report, a plus sign (+) appears to the left of each data value in the column under the highest-level sort heading. For data associated with lower-level sort fields, a plus sign (+) is placed to the left of each data value, but the data does not appear unless manually expanded. Data values of the lowest-level sort field are not expandable.
To expand your view of data for any expandable sort field, click a plus sign (+) and all data associated with the next lower-level sort field appears. When you expand a data value under the next to lowest sort heading, all of the remaining associated data values in the report appear.
Note: Two vertical (BY) sort fields are required. If your report does not contain two vertical sort fields, then the Accordion Reports option is ignored and a standard HTML report is created.
The use of horizontal (ACROSS) sort fields is supported with Accordion Reports. The horizontal sort headings that appear above vertical sort headings in a standard HTML report are not displayed in an Accordion Report until at least one sorted data value has been manually expanded in each expandable sort column.
PDF and Excel formats are not supported with Accordion Reports.
The following requirements must be taken into consideration when creating Accordion Reports:
UNITS, ST, DOLLARS, CITY, REGION, CATEGORY
Note: Accordion Reports are available for HTML Web Document (HTML), HTML Table (HTMTABLE), Default, and User styled report formats.
Note: The default value is <not set>.
You can use the Mailing Labels Options dialog box to customize the settings for your mailing label. You can customize the layout, dimensions, spacing, and print order of your label.
Sets the number of rows and columns for the labels.
Determines the height and width of each label.
Determines the amount of horizontal and vertical spacing between each label (in the current units of measure).
Determines whether the data output flows down a column or across a row.
| WebFOCUS |