In this section: How to: |
You can set up access to your data using the Data command in App Studio or the Server Console. Both approaches edit the same underlying server files. This topic explains how to create a synonym from the Data command in App Studio.
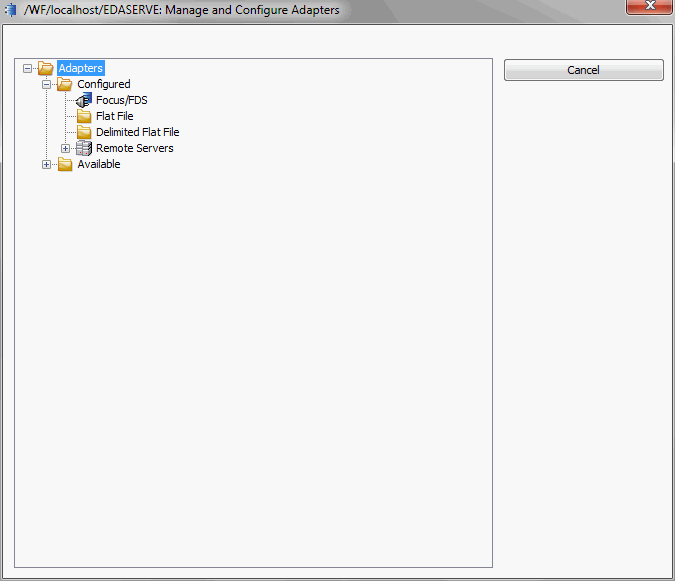
The Create Synonym feature provides the options you need to create synonyms for existing adapters, configure a new adapter, or add a remote server. To launch the Create Synonym feature, go to the Home tab, and in the Content group, click Data, and then click Synonym. When the Select Server Node dialog box opens, navigate to the application folder that contains the data you want, and click Select.
The Select adapter to configure or Select connection to create synonym dialog box opens, as shown in the following image.

In this window, the Adapters folder expands to display two subfolders.
-
Configured. Expand this folder to view a list of the configured data adapters or remote servers. From this folder, you can edit or add new connections for existing data adapters or servers, or create synonyms.
Note: If adapters have already been configured for the server, you can immediately begin to create synonyms.
- Available. Expand this folder to view a list of the data adapters that you can configure on the Reporting Server platform. As you configure additional data adapters or remote servers, they appear under the Configured folder.
-
On the Home tab, in the Content group, click Data, and then click Manage Adapters.
The Select Server Node dialog box opens, as shown in the following image.

-
Select the server that contains the data that you want, and then click Select.
The Manage and Configure Adapters dialog box opens, as shown in the following image.
- Expand the Available folder icons, and select the adapter to configure.
-
Click Configure to add the selected adapter.
The Add dialog box for the selected adapter opens.
- Type adapter configuration information in the appropriate fields.
-
Click Configure.
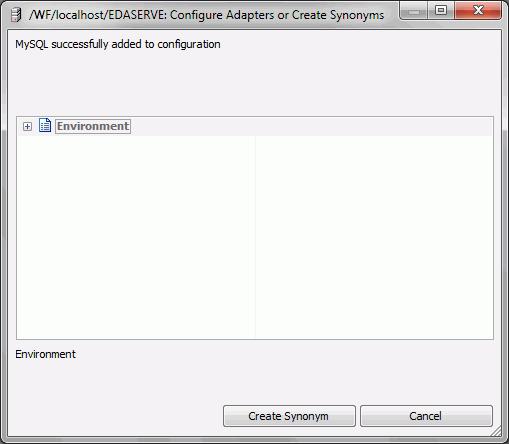
A confirmation message opens. After you close the confirmation message, you can proceed to create a synonym.
The Configure Adapters or Create Synonyms dialog box opens, as shown in the following image.
-
Click Create Synonym.
The Select Synonym Candidates dialog box opens.
For information on how to create a synonym, see How to Create a Synonym in App Studio.
To run this procedure, you must first launch the Create Synonym feature and select your project so that you see the Select adapter to configure or Select connection to create synonym dialog box.
- Expand the Available folder.
-
Right-click Remote Servers and select Configure, or select Remove Server and then click the Configure button.
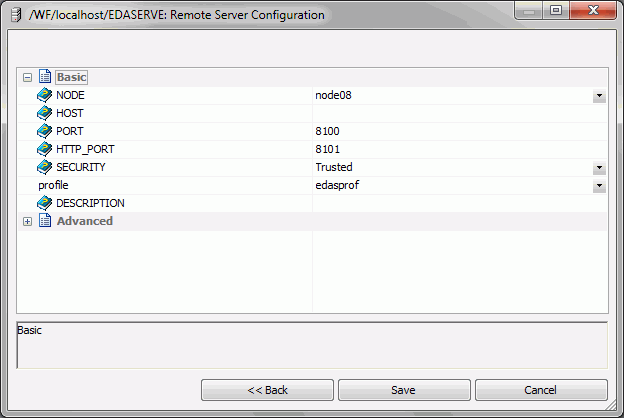
The Remote Server Configuration dialog box opens, as shown in the following image.
-
Complete the fields as follows.
Basic Parameters
Description
NODE
Type a name for the server. The name is your choice, but cannot be the same name as any other server. It must begin with a letter and cannot exceed eight characters.
HOST
Specify the host name or IP address for the server.
PORT
Specify the base TCP port for the server. The default is typically 8120, not 8100.
HTTP_PORT
Specify the HTTP port for the server. This is typically one more than the base TCP port. The default is typically 8121, not 8101.
SECURITY
Specify how a user should log on to the remote server:
- Explicit. Passes the user ID and password that you provide.
- Password Passthru. The user ID and password received from the client application are passed to your data source at connection time. This option requires that the server be started with security off.
- Trusted. For a trusted connection, where the current logged on user ID is passed to the server.
Note: If the server is not on Windows and runs with security ON, an explicit user ID and password are required to create synonyms.
user
If security is set to Explicit, enter a specific user ID.
password
If you entered a user ID, provide a password.
domain
For a server on Windows, you can specify the domain where the user ID is defined.
DESCRIPTION
Optionally, type a description for the node. This description appears in the WebFOCUS front-end tools.
-
When connecting to a Unified Server, expand the Advanced node, and complete the fields as follows.
Advanced Parameters
Description
SERVICE NAME
CLIENT [servicename]
Defines how to send outbound communications to a remote server.
servicename is optional. If servicename is provided, it must match the value of SERVICE in the service block of the server.
COMPRESSION
Activates data compression in a data transfer between client and server. Enter:
- 0 for no compression.
- 1 for compression on.
ENCRYPTION
Defines the encryption. Enter:
- 0 for no encryption.
- DES for 56-bit fixed-key Data Encryption Standard.
- Advanced to select and combine ciphers, modes, and RSA key lengths. This option provides the 3DES, AES 128, AES192, AES 256 ciphers, and the ECB and CBC modes.
- IBCRYPT for a user-defined algorithm. Key is 512-bit RSA-encrypted.
Note: Encryption is not supported for a PIPE protocol. Only 0 and DES are supported for an HTTP protocol.
CONNECT_LIMIT
Defines the maximum time, in seconds, that the client waits for a TCP connection response from the server. Enter:
- -1 for indefinite wait.
- 0 for no wait.
MAXWAIT
Defines the time, in seconds, that the client waits for a response from the server:
-1 indicates indefinite timeout.
-
Click Save when you have provided the server parameter values.
A confirmation message opens indicating that the new server has been added.
-
Click Create Synonym to proceed and create synonyms for the configured remote server.
If you select Create Synonym, the Select Synonym Candidates dialog box opens, as shown in the following image.
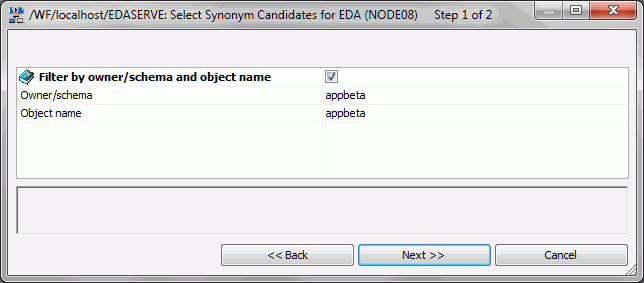
- Select the Filter by owner/schema and object name check box.
-
Type values in the Owner/schema and the Object name fields, and click Next.
The Select adapter to configure or Select connection to create synonym dialog box opens.
- Expand the Configured folder, and then expand the Remote Servers folder to see the new server.
If it is not already open, launch the Create Synonym feature from the Data button.
-
In the Select adapter to configure or Select connection to create synonym dialog box, you can select any configured Data Adapter or any Remote Server that has been added to the default Reporting Server.
Note: When you are creating a synonym through a Remote Server, the remote server should already contain the required synonyms and the corresponding adapters.
-
Select the server or adapter that you configured and click OK.
The Select Synonym Candidates dialog box opens, where you can enter additional information about the data source you want to access.
Note: The options in this dialog box vary depending on the type of adapter or server you are using. To access the pertinent information for your adapter directly from App Studio, select Reporting Server Console from the Command menu. The Server Console opens. Click Help on the menu bar, select Contents and Search, expand the Adapters topic in the Table of Contents pane and look for the adapter for which you want to create the synonym. The relevant synonym creation parameters are fully defined.
The following image is an example for accessing an adapter for Microsoft SQL Server.
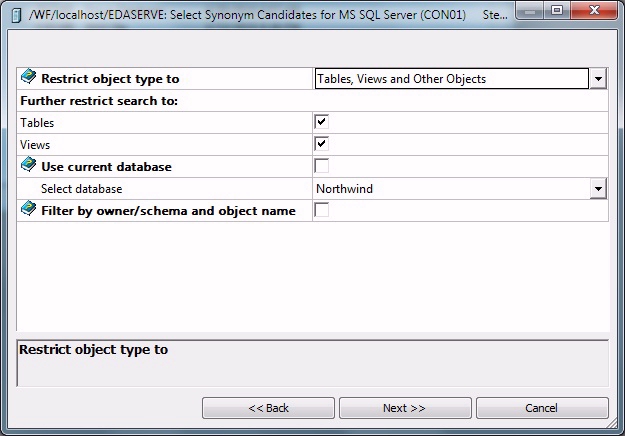
After you complete this dialog box, the data source or server is queried to determine the metadata you can use to create synonyms. For a relational database, this is usually a list of tables or views.
You can filter the results so there are fewer tables from which to choose. Optionally, choose whether both Tables and Views should be returned. By default, both check boxes are selected.
For some data sources, you can choose to generate synonyms for other object types, for example, Stored Procedures. If you do, the remaining input parameters will vary slightly.
-
For some data sources, you have the option to select a database or other parameter.
In this Microsoft SQL Server example, select the appropriate database or select Use current database. You can select from the database tables when this dialog box is complete.
- Optionally, select the Filter by owner/schema and object name check box to filter the results based on owners or table prefixes. This limits the list of tables returned from the remote data source and makes it easier to select the data for which you want to create synonyms. If you do not include selection criteria, the entire list of tables appears.
-
Click Next.
The top of the Create Synonym window now displays additional fields you can use to refine your synonym. The parameters vary depending on the type of adapter or server you are using.
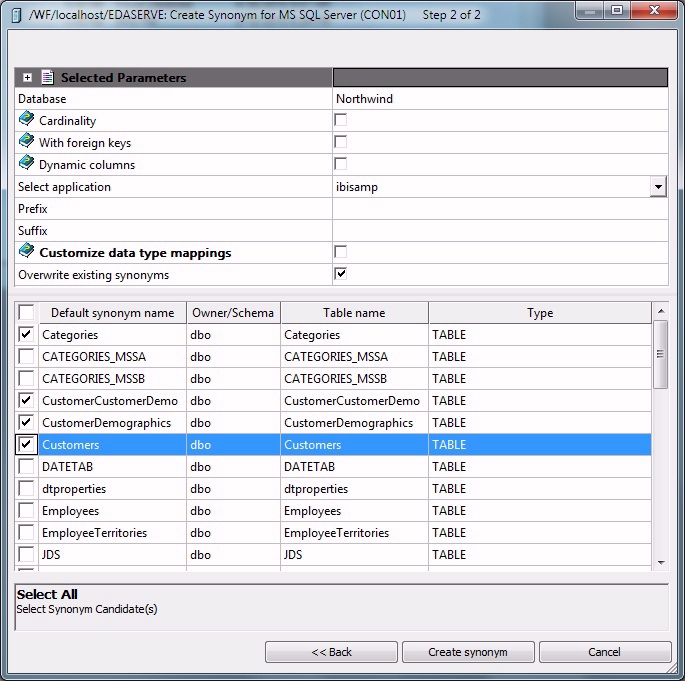
The bottom of the Create Synonym window provides a list of tables for which you can create synonyms. To select all, select the check box to the left of Default synonym name.
-
Click Create synonym.
The synonym is created and a confirmation window opens. The screen can vary depending on the type of adapter or server you are using.
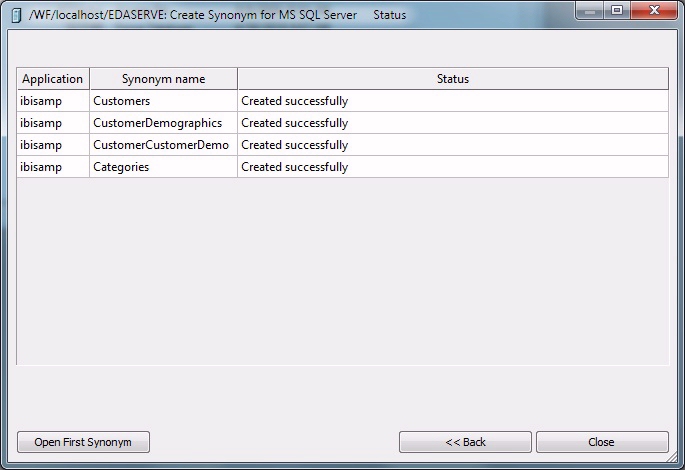
The synonyms are created in the selected application directory. In this example, the default application, baseapp, is used.
- Click Close.
The first step is to create a synonym for the stored procedure you want to report against. A synonym describes the parameters and answer set for the stored procedure.
An answer set structure can vary depending on the input parameter values that are provided when the procedure is executed. Therefore, you need to generate a separate synonym for each set of input parameter values that are provided when the procedure is executed at run time.
For example, if users can execute the stored procedure using three different sets of input parameter values, you need to generate three synonyms, one for each set of values. Unless noted otherwise, input parameters refers to IN parameters and to INOUT parameters in IN mode.
Note: If you know the internal logic of the procedure and are certain which range of input parameter values will generate each answer set structure returned by the procedure, you can create one synonym for each answer set structure. For each synonym, provide a representative set of the input parameter values necessary to return that answer set structure.
A synonym includes the following segments:
-
INPUT. Describes any IN parameters and INOUT parameters in IN mode.
If there are no IN parameters or INOUT parameters in IN mode, the segment describes a single dummy field.
-
OUTPUT. Describes any OUT parameters and INOUT parameters in OUT mode.
If there are no OUT parameters or INOUT parameters in OUT mode, the segment is omitted.
-
ANSWERSETn.
One for each answer set.
If there is no answer set, the segment is omitted.
The following table describes the synonym creation parameters for Microsoft SQL Server, based on Tables, Views, or External SQL Scripts.
|
Parameter/Task |
Description |
|---|---|
|
Restrict object type to |
Restricts candidates for synonym creation based on the selected object types: Tables, Views, External SQL Scripts, and any other supported objects. Selecting External SQL Scripts from the drop-down list enables you to represent SQL SELECT statements as synonyms for read-only reporting. A Synonym candidate can be any file that contains only one valid SQL Query and does not contain end-of-statement delimiters (";" or "/") and comments. For related information, see Location of External SQL Scripts in this table. Depending on the adapter, you can further restrict your search by selecting check boxes for listed objects. |
|
Database selection |
To specify a database from which you can select a table or other object, do one of the following:
|
|
Filter by owner/schema and object name |
Selecting this option adds the owner/schema and object name parameters to the screen.
|
|
Location of External SQL Scripts Extension |
If you specify External SQL Scripts in the Restrict object type to field, these additional fields appear. The following standard naming conventions apply for UNIX, IBM IFS, and z/OS HFS:
On IBM i, you can use alternative IFS naming conventions to access library members. The following entry illustrates this method:
During synonym generation, the adapter issues native API calls to obtain a list of elements in the select list and builds the Master File with a field for each element. The generated Access File references the location of the SQL script in the DATASET attribute, which contains the full path, including the file name and extension, to the file containing the SQL Query. For example: DATASET=/ul/home2/apps/report3.sql When a WebFOCUS report is created, the SQL Query is used to access data. |
|
Select Application |
Select an application directory. The default value is baseapp. |
|
Cardinality |
Select the Cardinality check box to reflect the current cardinality (number of rows or tuples) in the table during metadata creation. Cardinality is used for equi-joins. The order of retrieval is based on the size (cardinality) of the table. Smaller tables are read first. Note: If the cardinality of the tables to be used in the application is dynamic, it might not be beneficial to select this setting. |
|
With foreign keys |
Select the With foreign keys check box to include within this synonym every table related to the current table by a foreign key. The resulting multi-table synonym describes all of the foreign key relationships for the table. |
|
Dynamic columns |
Select the Dynamic columns check box to specify that the Master File created for the synonym should not contain column information. If this option is selected, column data is retrieved dynamically from the data source at the time of the request. |
|
Prefix/Suffix |
If you have tables with identical table names, assign a prefix or a suffix to distinguish them. For example, if you have identically named human resources and payroll tables, assign the prefix HR to distinguish the synonyms for the human resources tables. Note: The resulting synonym name cannot exceed 64 characters. If all tables and views have unique names, leave the prefix and suffix fields blank. |
|
Customize data type mappings |
Select this check box to change the data type mappings from their default settings. The customizable mappings appear. |
|
Overwrite existing synonyms |
Select the Overwrite existing synonyms check box to specify that this synonym should overwrite any earlier synonym with the same fully qualified name. |
|
Default synonym name |
This column displays the name that will be assigned to each synonym. To assign a different name, replace the value. |
|
Select tables |
Select tables for which you want to create synonyms:
|
For data sources that support stored procedures, you can use a reporting tool to execute a procedure and report against its output parameters and answer set. Among the benefits of this method of executing a stored procedure are the following options:
|
Parameter/Task |
Description |
|---|---|
|
Restrict object type to |
Select Stored Procedures. |
|
Filter by owner/schema and object name (For DB2, this applies to all platforms except IBM i) |
Selecting this option adds the owner/schema and object name parameters to the screen.
|
|
Library Object Name (IBM i only) |
To avoid the return of an extremely large and potentially unmanageable list, always supply a value for Library or Object Name:
|
|
Select |
Select a procedure. You can only select one procedure at a time because each procedure requires unique input in the Values box on the next synonym creation pane. |
|
Name |
The name of the synonym, which defaults to the stored procedure name. |
|
Select Application |
Select an application directory. The default value is baseapp. |
|
Prefix/Suffix |
If you have stored procedures with identical names, assign a prefix or a suffix to distinguish their corresponding synonyms. Note that the resulting synonym name cannot exceed 64 characters. If all procedures have unique names, leave the prefix and suffix fields blank. |
|
Overwrite Existing Synonyms |
Select the Overwrite existing synonyms check box to specify that this synonym should overwrite any earlier synonym with the same fully qualified name. |
|
Customize data type mappings |
Select the Customize data type mappings check box to change the data type mappings from their default settings. The customizable mappings appear. For more information, see Data Type Support in the chapter for your adapter in the Adapter Administration for UNIX, Windows, OpenVMS, IBM i, and z/OS manual. |
|
Values |
Select the check box for every parameter listed for the specified procedure.
If a Value is required, enter it without quotation marks ("). Any date, date-time, and timestamp parameters must have values entered in an ISO format. Specify the same input parameters that will be provided when the procedure is executed at run time if it is a procedure that requires explicit values. |
Master Files and Access Files are removed from the server when you delete a synonym.
-
In the Configured Environments tree, right-click the synonym that you want to delete, and click Delete.
A confirmation message opens prompting you to confirm the deletion.
- Click Yes to delete or No to cancel.
You can view or edit a synonym in the Projects node or Data Servers node of a WebFOCUS environment.
You can view or edit a synonym in one of the following ways:
- Right-click a synonym (Master File) in the Configured Environments tree and then click Open.
The Metadata canvas opens.
- Double-click a synonym (Master File) in the Configured Environments tree.
The Metadata canvas opens.
- On the Home tab, in the Content group, click Data, and then click Synonym via Metadata Canvas.
The Data Source Definition Wizard opens, as shown in the following image.
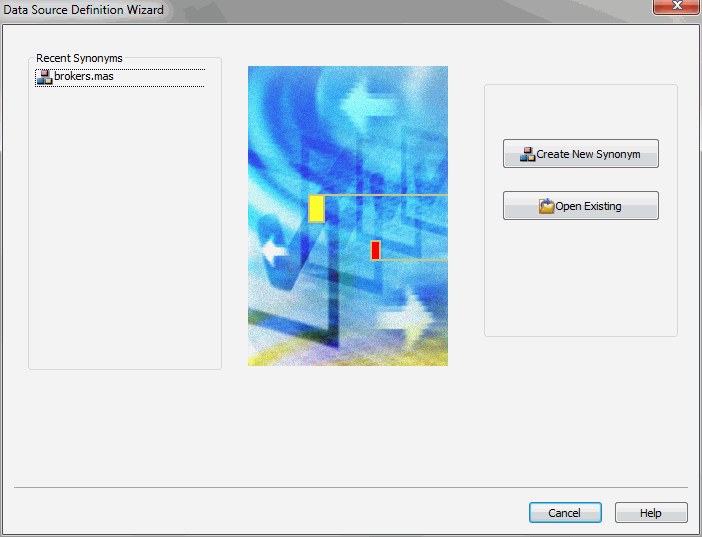
Here, you can view a recently opened synonym, create a new synonym, or open an existing synonym.
For more information about the Data Source Definition Wizard, press the F1 key.