In this section: How to: |
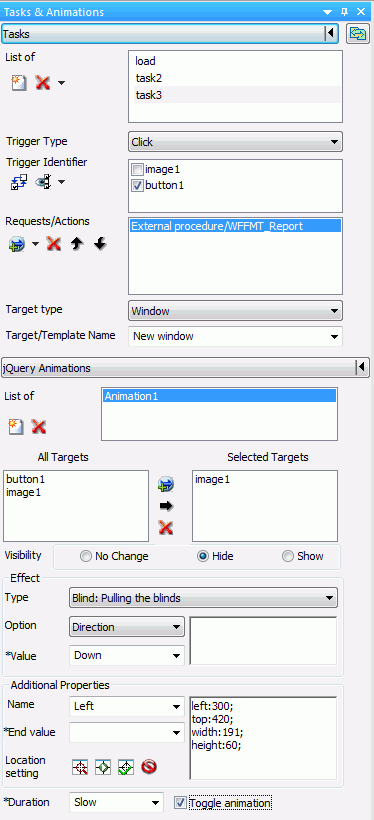
Using the Tasks & Animations panel, you can submit requests for parsing, execute tasks when specific criteria are met, and add jQuery animations to your HTML page. The Tasks & Animations panel is shown in the following image.
For more information on customizing the Tasks & Animations panel, see Using the Panel Customization Options.
The Tasks section of the Tasks & Animations panel allows you to execute a request when specific criteria are met. For example, you can create a task that runs an embedded report when a button is clicked. An example of a task created in the Tasks section is shown in the following image.
For more information, see How to Automatically Execute a Request When a Page is Loaded.
Opens the Tasks dialog box which displays the Tasks section of the Tasks & Animations panel horizontally rather than vertically. Tasks are displayed in a list. This list shows the Task Name, Trigger Type, Trigger Identified, Requests/Actions, Target Type, and Target Name, of each task, next to each other. When the Tasks dialog box is opened, the Tasks section of the Tasks & Animations panel is collapsed.
A list of tasks defined in the HTML page.
Creates a new task. A task is an actionable item.
Deletes a selected task. You can use the drop-down list to delete a selected task or to delete all untriggered tasks.
Determines when a task should start. You can choose:
Note: The Load and UnLoad trigger types are only available for load tasks. A load tasks is created for you automatically when you create a new HTML page. You can create additional load tasks by creating a new task and renaming it load.
A list of all possible triggers based on what option you have selected from the Trigger filters list.
Deselects any object you have selected in the Trigger Identifier list.
You can select whether to display buttons, images, hyperlinks, or other objects as possible Trigger Identifiers. The options are:
When All is selected, objects that are not buttons, images, or hyperlinks become available for use as Trigger Identifiers. For example, with All selected, a text object can be a Trigger Identifier.
Selected only will make objects you have selected on the canvas appear in the Trigger Identifier list.
A list that displays the order in which the requests, for the selected tasks, will execute, any Wait for completion requests, and any refresh requests. You can use Wait for completion requests to have certain requests execute before others. For example, if request1 is above the Wait for completion action and request2 is below that, then request1 will run first and when that is completed, request2 will then run.
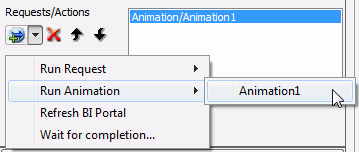
Allows you to add a request, created in the Request & Data sources panel, a refresh request, a wait for completion request, or a JavaScript call action.
When using the JavaScript call different results occur depending on what is returned. if the JavaScript call returns 0, then all actions after it run. If the JavaScript call returns 1, then one action after the call is skipped, and all actions after that are then run. If the JavaScript call returns 2, all actions after it are skipped.
Deletes a request from the Requests/Actions list.
Move an item on the Requests/Actions list up one place.
Move an item on the Requests/Actions list down one place.
The Target Type option contains a list of targets in which the request can be executed. These targets can be controls, frames, windows, or distribution methods when the Request is set to Schedule. These options can be different for specific actions.
The Window Target Type will execute the request in a window.
The InfoWindow Target Type will execute the request in the WebFOCUS generated InfoWindow.
The Ajax call Target Type will execute the request as an asynchronous call in JavaScript.
The Frame Target Type will execute the request in a selected frame.
The Deferred Target Type will run the report deferred
The Input Control Target Type is only available when you have a refresh request selected in the Requests/Actions list. This Target Type specifies that an input control will be refreshed. You specify which control should be refreshed by selecting one from the Target/Template Name list.
The active report Target Type is only available when you have a refresh request selected in the Requests/Actions list. This Target Type specifies that an active report will be refreshed. You specify the active report that will be refreshed by selecting one from the Target/Template Name list.
The Refresh BI Portal Target Type is only available when you have a refresh request selected in the Requests/Actions list. This Target Type specifies that a WebFOCUS BI Portal page will be refreshed. If you select All pages of the portal, all BI Portal pages will be refreshed. If you select Current page only, only the current BI Portal page will be refreshed.
Contains options that are associated with the Target Type option. This field is only available for Window, Frame, and Deferred.
Sets the Width and Height of an InfoWindow. Only available for the InfoWindow Target Type.
Refresh the current WebFOCUS BI Portal page. Only available when there is a request to refresh the WebFOCUS BI portal.
Refresh all WebFOCUS BI Portal pages. Only available when there is a request to refresh the WebFOCUS BI portal.
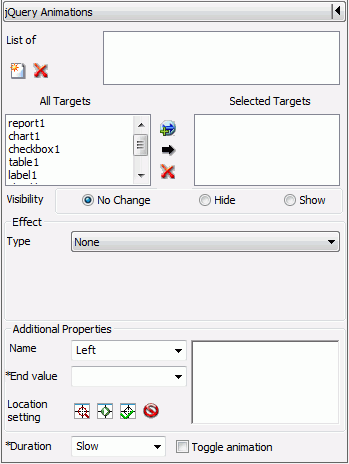
The jQuery Animations section, in the Tasks & Animations panel, allows you to execute jQuery animations on your HTML page. The animation effects in the jQuery Animations section can be used individually or in conjunction with each other to create more complex animations. The Animations section is shown in the following image.
For more information, see How to Animate an Object Using the Tasks & Animations Panel.
A list of all animations present in the HTML page. This list will change when animations are added or deleted.
Adds a new animation to the HTML page. The newly added animation appears in the List of area.
Removes an animation from the HTML page. The deleted animation is removed from the List of area.
A list of all possible targets that can be used in the current animation being defined.
A list of all targets that will be used in the current animation.
Adds the currently selected object on the canvas to the Selected Targets list. Multiple objects can be selected and added at the same time.
Adds a selected object from the All Targets list to the Selected Targets list. Multiple objects can be selected and added at the same time.
Removes an object from the Select Targets list when that object is selected. Multiple objects can be selected and removed at the same time.
You can select whether or not to animate the target so that it is hidden or displayed. You can also select not to animate the target for visibility. The options are No Change, Hide, and Show.
The Effect group contains animation effects and the options you can use to customize those animations. Animation effects can make the target bounce, shake, pulsate, and much more. You can also customize the options associated with that animation effect. The options correlate to the effect used. Such options can be how many times the target bounces after you specify that you want the bounce effect.
A drop-down list where you can select the animation effect you want to use.
You can select which option value you would like to edit, if available. For example, selecting the Bounce animation type allows you to select Distance and Times in the Option drop-down list. When you select Distance or Times, you can then edit the value of either of those options in the Value area. If you select Times and then enter 3 into the Value area, your object will bounce 3 times. The options available are different depending on the effect type you choose.
You can enter a number that pertains to the currently selected option and that affects the animation. For example, if you select the Slide type and the Distance option, the number you enter in the Value area will be the distance the object will slide when it is animated. The value options available are different depending on the effect type you choose.
As the options for the effect are set, the syntax for that effect are displayed here. You can manually adjust this syntax to affect the animation.
The Additional Properties group contains animations that change the location and size of the target and the components of that target (text size, text width, border size).
A drop-down list where you can select different properties that can be animated. Such properties include height, opacity, font size, and others.
The value for the property you choose from the Name field. For example, if you chose Left and enter 10, the object you are animating would move 10 pixels to the left. The reason you do not need to specify a start value is because the currently location of the object is the start value.
You can animate the target so that the location and size of that target is changed once the animation is activated.
This will use the location of the currently selected target. Coordinates, height, and width of the object are entered automatically into the Location setting box. This is used when the developer plans to move the selected target object and the animation will move it back.
Inserts an adjustable placeholder object into the canvas, at the location of the selected target. You can move and resize this placeholder object. This object represents where the animation will move and what size it will be when the animation is complete.
Sets the adjustable object location and size. This will be where the animated object moves and what size it will be. It is the ending location of the selected target.
Cancels the setting of the location for the animation.
Once the location has been determined using the Location setting commands, the syntax for that location is displayed here. You can manually adjust this syntax to affect the animation.
How quickly the animation will execute. You can choose either Slow or Fast.
Allows you to revert to the pre-animation state. For example, if the target moves from right to left, the next invocation of the trigger will move the target back to the original position at the right.
The following are examples for how to create and animate an HTML page with jQuery animations.
Note: Any of the jQuery animations in the jQuery Animations section can be used individually or together. Using different jQuery animations together will create a more complex animation.
A new animation is added to the animation list.
The image object, image1, is added to the Selected Target area.
This animation option will cause the image to be hidden when the button is clicked.
A new task is added to the tasks list.
The button will be used to activate the animation.
When the animation is activated using the button, the image will hide.
The following is an example for how to select an effect for an animation and customize the options for the effect.
Note: Any of the jQuery animations in the jQuery Animations section can be used individually or together. Using different jQuery animations together will create a more complex animation.
A new animation is added to the animation list.
The image object, image1, is added to the Selected Target area.
This will cause the image to appear as if window blinds have been pulled over it.
Note: Each Effect has different options available to customize. Blind has the Direction option to customize where Bounce has the Distance and Times options.
This will cause the image to be animated with a horizontal blind effect.
Note: The Value field will either be a drop-down list or a text entry box depending on what you selected for the Option drop-down list. For example, Direction will use this as a drop-down list while Times will use this as a text entry box.
A new task is added to the tasks list.
The button will be used to activate the animation.
When the animation is activated using the button, the image will animate with a blind effect.
The following is an example for how to move the location of an animation.
Note: Any of the jQuery animations in the jQuery Animations section can be used individually or together. Using different jQuery animations together will create a more complex animation.
A new animation is added to the animation list.
The image object, image1, is added to the Selected Target area.
A placeholder object is shown overlapping your image.
This removes the placeholder object and adds syntax to the Additional properties text area. When your animation is activated, it will move to a different location that you specified using the placeholder object.
This will make the animation run at a faster speed.
Checking the Toggle Animation check box will allow you to click the button after the animation has run and restore the image to its original state (in its original location and unhidden).
A new task is added to the tasks list.
The button will be used to activate the animation.
When the animation is activated using the button, the image will move to the location that you set. If you click the button a second time, it will move back to the original location.
You use the Hyperlink command and the Tasks & Animations panel to create hyperlinks. The following is an example of creating a hyperlink.
A task is added to the Tasks section of the Tasks & Animations panel with a trigger type and trigger identifier already chosen.
When the HTML page is run and you click on the hyperlink, the WebFOCUS Procedure you chose will run in the frame.
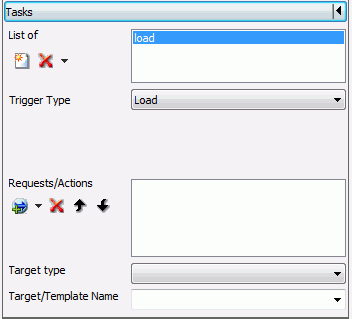
You can use the Requests and Tasks sections to create a request that executes when your HTML page is loaded. To do this, you must use the load task, in the Task Section. The load task is automatically added to every page and runs all selected requests when the page initially loads.
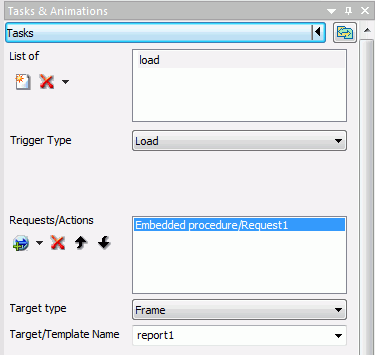
The following is an example of the Tasks section for a procedure that will execute automatically when the page is loaded.
| WebFOCUS |