In this section: |
You can use the Join tab to manipulate data sources when using a join. The Join tab is available only when you are creating a Join.
A join is a temporary connection between two or more data source files that share at least one common field. For example, a Human Resources department could have an EMPLOYEE data source that includes a job code field, and a JOBFILE data source that also includes a job code field. In this scenario, the two data sources could be joined.
When creating a join, the field format and the type must be the same for the common fields, but the field name need not be the same.
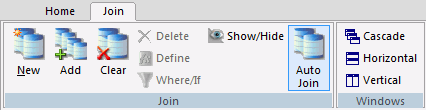
After you join two files, each time a record is retrieved from the first file (host file), the matching records from the second file (cross-referenced file) are also retrieved. The Join tab is shown in the following image.
You can choose how to display the data sources currently in the join. The Windows group is shown in the following image.

The commands are:
Arranges the windows as overlapping tiles (default).
Arranges the windows as horizontal tiles that do not overlap.
Arranges the windows as vertical tiles that do not overlap.
In this section: |
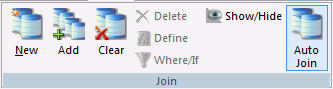
You can save, run, add, remove, and automatically join data sources when creating a Join. The Join group is shown in the following image.
The commands are:
Creates a new join.
Adds a new file to the join.
Launches the Join Clear dialog box, where you can specify the available joins to clear.
Inserts a Define field into the Join.
Joins that are based on virtual fields use DEFINE-based syntax to create a virtual field in the host file that you can then join to a real cross-referenced field. The DEFINE expression that creates the virtual host field can contain only fields in the host file, and constants. It cannot contain fields in the cross-referenced file.
You can join a virtual field to more than one real field in more than one cross-referenced file using separate Join commands, with each command referring to the same host file.
For more information, see Define-Based Joins.
Creates a conditional Join.
Conditional joins use WHERE-based syntax to specify joins based on conditional criteria, not just on equality between fields. Additionally, the host and cross-referenced join fields do not have to contain matching formats.
Suppose you have a data source that lists employees by their ID number (the host file) and another data source that lists training courses and the employees who attended those courses (the cross-referenced file). Using a conditional join, you can join employee ID in the host file to employee ID in the cross-referenced file to determine which employees took training courses in a given date range (the WHERE condition).
Shows or hides the .fex source window.
Performs automatic joins within tables.
You can use the Join canvas to temporarily join two or more data sources and use data from them as if they were one data source. Joined files remain physically separate, but are treated as one data source. The Join component provides a graphical method for creating and manipulating all types of Joins. To create a Join, you must specify a host file, and then a cross-referenced file. Both host files and cross-referenced files are Master Files.
You are responsible for placing the Join object in the correct position within your procedure (that is, before a Define, Report, or Chart), and running it. The Join remains active for the entire session, unless you explicitly clear it.
The Join canvas opens and displays the fields in the Master File.
You can also right-click the Join canvas and select Add File.
The new Master File is added to the canvas. Common fields in both files are joined by a Join connector line.
A dialog box opens, displaying the component code, and either an error message or text stating that no error exists.
You can add another component to the procedure by right-clicking the Join component, pointing to New, and clicking the component. When you are prompted to select a Master File, select the same host file you used to create the Join component. This allows you to use the joined data sources.
Joins that are based on virtual fields use Define-based syntax to create a virtual field in the host file that you can then join to a real cross-referenced filed. The Define expression that creates the virtual host field may contain fields that only appear in the host file or constants. It cannot contain fields that are cross-referenced.
A virtual field is a temporary field that you describe in a Master File or procedure. The value of the virtual field is calculated and treated as part of the data source.
You can join a virtual field to more than one real field in more than one cross-referenced file using separate Join commands, each referring to the same host file.
Consider the following factors before making a virtual field the host field in a Join:
The Join canvas opens and displays the fields in the Master File.
The Join Define in File dialog box opens.
The virtual field appears in the Fields window of the host file.
You can also right-click the Join canvas and select Add File.
The new Master File is added to the canvas. Delete any existing Join connector lines.
You cannot join multiple fields with this option. The virtual field must be the only Join field.
In some cases, you might want to Join more than one host field to a single cross-referenced field. The procedure, as well as the relationship, differs for Joins between two relational data sources, Joins between two WebFOCUS data sources, and Joins between relational and WebFOCUS data sources.
There are two types of multi-field Joins:
The following table lists the types of Joins allowed between files:
|
Host |
Cross-Referenced |
Supported Multi-Field Join Constructions |
|---|---|---|
|
SQL* |
SQL |
You can Join two SQL files with a multi-field construction. You cannot directly Join two SQL files with a concatenated Join. You can, however, use a Define-based Join to achieve the same result that a concatenated Join would produce between two SQL files. |
|
WebFOCUS |
WebFOCUS |
You can use only the concatenated Join construction to Join two WebFOCUS host fields to a single WebFOCUS cross-referenced field. |
|
SQL |
WebFOCUS |
You can use only the concatenated Join construction to Join two SQL host fields to a single WebFOCUS cross-referenced field. |
|
WebFOCUS |
SQL |
You can Join a WebFOCUS file and an SQL file with multi-field Join construction. You cannot Join a WebFOCUS file and an SQL file with a concatenated Join. You can, however, use a Define-based Join to achieve the same result that a concatenated Join would produce between these files. |
* SQL represents all relational data sources.
You can use the concatenated Join construction between two WebFOCUS files and between a host relational file and a cross-referenced WebFOCUS file. This is the only type of multi-field Join construction you can use between these files.
The first two host fields are combined in a concatenated Join. The resulting field is then joined to the cross-referenced field.
Using conditional Joins, you can establish Joins based on conditions other than equality between fields. In addition, the host and cross-referenced Join fields do not have to contain matching formats and the cross-referenced field does not have to be indexed.
The conditional Join is supported for WebFOCUS and all relational data adapters. Because each data source differs in its ability to handle complex conditional criteria, the optimization of the WHERE syntax differs depending on the specific data sources involved in the Join and the complexity of the conditional criteria.
To display a list of joined data sources, select the following query subject in the Query tool, or issue the command from the Command Console:
? JOIN
This query displays every Join currently in effect and indicates any that are based on conditional criteria.
The Join canvas opens and displays the fields in the Master File.
You can also right-click the Join canvas and select Add File.
If you are developing in the Data Servers area or in the Repository, a WebFOCUS Table List dialog box opens. If you are developing in the Local Projects area, the Open dialog box opens.
The new Master File is added to the canvas. Common fields in both files are joined by a Join connector line.
If you need to change the Join type or Join name, double-click the conditional Join to launch the Join Properties window.
You can customize an existing Join by changing the files or fields involved. If no default Join was created, you can use the same technique to specify a connection explicitly.
You can also change the Join name, make the Join a single instance, use a virtual field as the Join field, and add tag names to the Join files.
If you delete the host file, all cross-referenced files are automatically deleted.
You can also select the Join connector line, and on the Join tab, in the Join group, click Clear, or press the Delete key.
The files remain on the canvas with no connector line between them.
To create your own Join (after deleting the existing Join, if necessary):
A Join connector line appears.
You can leave the Join window open and create another Join by:
You can define up to 63 concurrent Joins that will have a maximum of 64 segments in the new Join structure.
By default, each Join is a multiple instance.
To make the Join a single instance:
A default name is automatically assigned to each Join.
You can use the Join name to later clear the Join and to prevent another Join from overwriting it. If you remove the Join name completely, any subsequent unnamed Join will overwrite this Join.
You can also provide a description. This is not used in the Join command, but for reference purposes. A comment (-*) is added to the procedure. For example, -*JOINDESC J0.
Note: The following words cannot be used as a Join name: ALL, AND, AS, IN, JOIN, TAG, TO, WITH.
The Join Define in File dialog box has the following fields and options:
Identifies the virtual field that is the host field in the Join.
Associates the virtual field with a segment in the data source. Select any field from the segment in which you want to place the virtual field.
Tag names provide a way of making identical field names a single instance. They function as aliases for the file names in the Join. Tag names are useful when you join a file to itself because in such a Join all field names, segment names, and file names are the same in the host and cross-referenced files. Tag names are also useful if a file is used as a target more than once in the join structure.
A procedure can use the tag name of a file as a qualifier for field names and aliases in the file.
If you create a report using a recursive Join without tag names, the field names in the cross-referenced file are prefixes with the first four characters of the Join name.
Note:
After a Join exists, you can retrieve it, report from it, view its syntax, and clear it. Clearing a Join makes it inactive.
The Join Clear dialog box has the following fields and options:
Lists all current Joins.
Displays the Joins that will be deleted when you click OK.
Moves the selected Joins to the Joins to Clear list.
Moves the selected Joins to the Available Joins list.
To view or modify the properties of a Join, right-click the Join link and select Properties, or double-click the Join link. The Join Properties window appears, as shown in the following image.
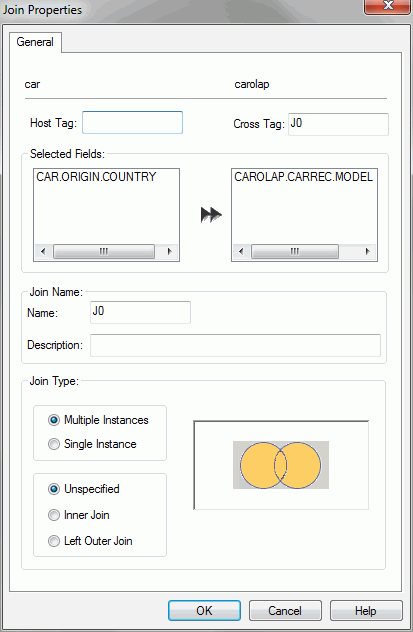
The Join Properties window has the following fields and options:
Enter a tag name for the data source.
Enter a tag name for the cross-referenced file.
Displays the field that has been joined from the host file to the cross-referenced file. A single arrow indicates a unique Join, and a double-arrow indicates a non-unique Join.
Displays the name of the Join. To change the default Join name, type a new name in this field and click OK.
Note: The Join name must be unique and cannot exceed eight characters.
Enter a description. This is not used in the Join command. It is used for reference purposes. A comment (-*) is added to the procedure.
Indicates the type of Join. Choose from the following:
Multiple Instance (Non-Unique). A one-to-many Join structure that matches one value in the host data source to multiple values in the cross-referenced field. Joining employee ID in an employee data source to employee ID in a data source that lists all the training classes offered by that company would result in a listing of all courses taken by each employee, or a joining of the one instance of each ID in the host file to the multiple instances of that ID in the cross-referenced file. This is the default selection.
Single Instance (Unique). A one-to-one Join structure that matches one value in the host data source to one value in the cross-referenced data source. Joining an employee ID in an employee data source to an employee ID in a salary data source is an example of a unique Join.
Unspecified. This option is selected in the Join properties when a Join that was created in an earlier release is opened in the Join tool. In earlier versions, the defaults for Join type and other operators were assumed and not specified in the generated code. Since the Join tool cannot determine the type of Join that was created and if there were other commands set to control the Join, select the appropriate options (Inner Join, Left Outer Join, Multiple Instances, Single Instances) from the Join tool to upgrade the generated code.
Inner Join. A Join that results when a report omits host rows that lack corresponding cross-referenced rows.
Left Outer Join. Extends the results of an Inner Join and retrieves records from both host and cross-referenced tables, including all records from the left table (host) and any records from the right table (cross-referenced) where the condition values match. If there are no matching values in the cross-referenced table, the Join still retrieves records from the host table.
| WebFOCUS |