Using Variables in Data Flows

There are times when you want to move data and vary something in the data flow each time that it runs. You might want to only pull records for a particular range of dates, for a particular department, or any criteria that changes from run to run. DataMigrator lets you use a variable in the data flow to accomplish this.

The most common use of variables is in a filter. When the data flow is executed, the variable must be set to an appropriate value.

A value could also be set by executing a pre-extract stored procedure. For example, if the value of the variable is read from a flat file or other external source.

The following data flow extracts data from the DMORD table. The filter contains a variable for date, &ODATE, so that each time the flow is run &ODATE can be passed a different value, and records with different dates can be extracted from the data source and loaded into the data target.

The process flow calls the data flow passing a value for the variable as a parameter.

Refer to the sample data flow DMVAR and the sample process flow DMVARPF for the complete example.


Top of page

Example: Using Variables in Data Flows

In the DMC:

  1. Right-click an application directory in the navigation pane and choose New, then Flow. The Data Flow tab opens in the workspace, with the SQL object displayed.
  2. Drag the data source object DMORD from the ibisamp application directory in the navigation pane into the workspace, to the left of the SQL object.
  3. Right-click the SQL object and select Column Selection.

    The Column Selection window opens.

  4. Select PLANT, PROD_NUM, and QUANTITY in the Available Columns list and click the arrow to move them into the Selected Columns list.
  5. Select T1.PLANT and T1.PRODNUM in the Selected Columns list, and select Group By from the Aggregate drop-down menu.
  6. Select T1.QUANTITY in the Selected Columns list, and select Sum from the Aggregate drop-down menu.
  7. Click OK to close the Column Selection window.
  8. Right-click the SQL object and select WHERE Filter.

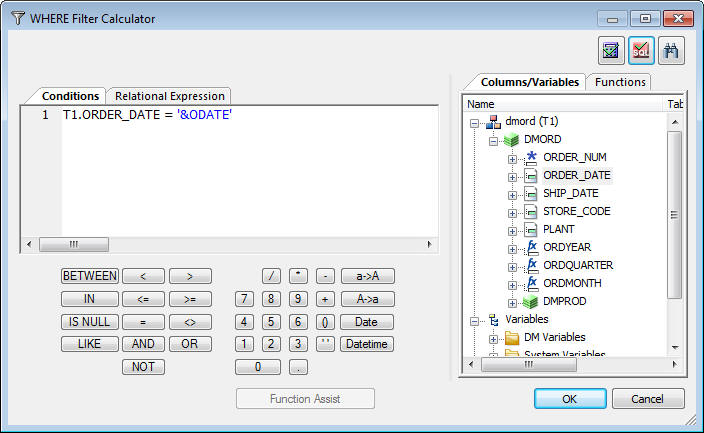
    The Filter Calculator opens.

  9. Double-click ORDER_DATE under Columns/Variables. This adds the column to the Conditions area.
  10. Complete the condition by typing the following after T1.ORDER_DATE in the Conditions field:
     = '&ODATE'

    The Filter Calculator should appear, as shown in the following image.

    WHERE filter calculator

  11. Click OK to close the Filter Calculator.
  12. Right-click the workspace to the right of the SQL object and select Add Target, then New.
  13. Right-click Target object and select Properties. Select the adapter you used for your sample procedures. Then enter the application directory you are using for your samples dmplant as the name, for example, baseapp/dmplant. Then click the small x to close the properties panel.
  14. Right-click the DMPLANT target object and select Target Transformations.

    The Transformations window opens.

  15. Check the Key column for PROD_NUM and PLANT is automatically selected in the Target Columns list to designate them as key columns in the data target. Click OK.
  16. Save the data flow as DMXVAR.

Top of page

Example: Prompting for a Variable Value

In order to test the data flow you need to supply a value for the variable. I

  1. On the Flow tab, in the Run group, click Run and select Submit.

    The prompting window opens. Enter a value to test, for example, 2006/02/14.

  2. Click Run.

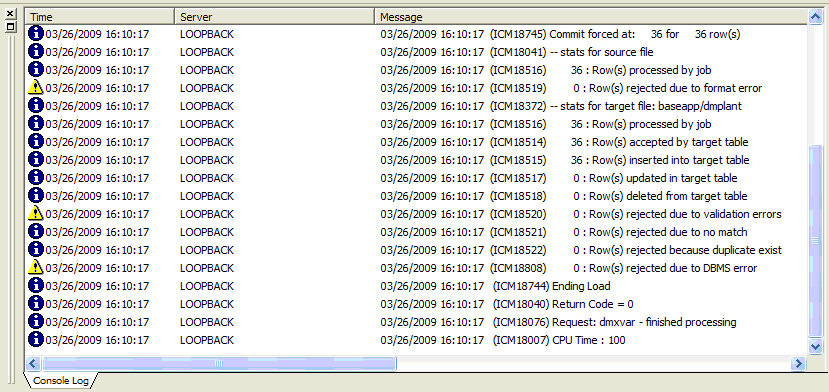
    The data flow is tested using the supplied value. As shown in the following image, the output from the flow appears in the console log window.

    Console Log


Top of page

Example: Creating a Process Flow to Pass Parameter to a Data Flow

To create the process flow that runs both the stored procedure and the data flow:

  1. Right-click an application directory in the navigation pane and choose New, then Flow.
  2. Click the Process Flow tab.
  3. Drag the data flow, DMXVAR, from the navigation pane into the process flow workspace, to the right of the Start object.
  4. Right-click the DMXVAR object and select Properties. Click the ellipsis Ellipses Button button for Parameters.

    The Parameters editor opens.

  5. Click the Add Parameter button.

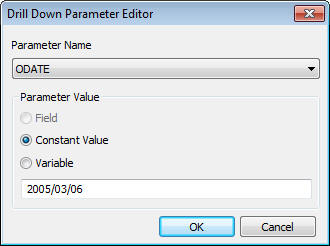
    The Drill Down Parameter editor window opens.

  6. Select ODATE from the Parameter Name drop-down menu. Enter a date value such as 2005/03/06.

    Drill Down Parameter Editor

  7. Click OK.

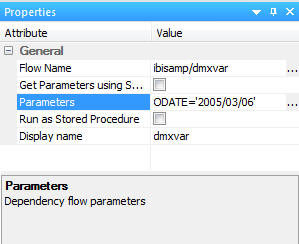
    The parameter appears in the Parameter Editor.

  8. Click OK.

    The parameter appears in the property pane, as shown in the following image.

    Properties

  9. Save the flow as DMVARPFX. You can submit the flow now.

iWay Software