Iterating Through Multiple Tables
It is often the case that an organization has multiple
tables with the same structure, that is column names and data types,
but with different names, in different databases or schemas or on
different servers.
Now a single synonym can be used to describe a collection of
tables with the same structure because the TABLENAME and CONNECTION
parameters in the access file can be specified as a variable.
Before you create and run the data flows discussed in this section,
in addition to the source data, you must also create the multiple
source tables. See How to Create Sample Procedures and Data for Iteration.
This will create five identically structured tables named dmordbos,
dmorddal, dmordla, dmordorl, and dmordstl.
Example: Create a Synonym With Parameterized Table Names
This
example has instructions for creating a synonym that can be used
to read or write multiple tables. We will create two variables,
TTABLE and TCON, that will be used for the table name and connection
name.
Refer to the sample synonym, dmortmpl, for the complete
example that also has titles and descriptions for each of the columns.
- In the DMC,
right-click an application directory in the navigation pane and choose New,
then Synonym.
The Create Synonym panel
opens.
- Open the folder for
the adapter where you created the sample procedures and select the
first connection. Click OK.
The Select
Synonym Candidates … Step 1 of 2 panel opens.
- Click Next.
The
Create Synonym … Step 2 of 2 panel opens.
- Check the
check box to the right of dmordbos and then double-click the table
name and change it to dmortmplx. Then click Create Synonym.
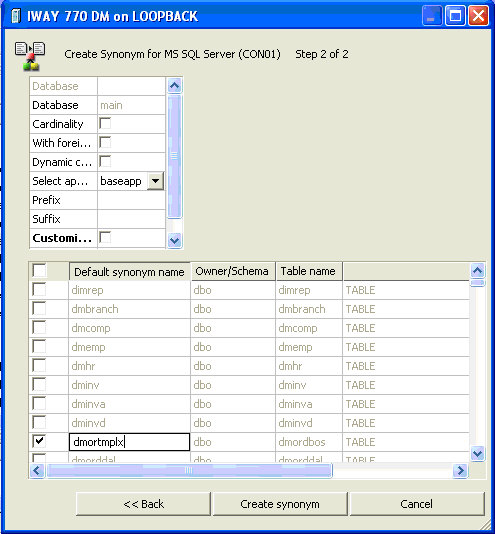
This
will create a synonym that we will use as a "template" to access
any of the six tables.
- Click the Open
First Synonym button.
The dmortmplx synonym opens.
- If there
is “Business View” window, click the small x to close
it.
- Right-click the Variables
folder, select Insert and Variable. This
adds a variable called VARIABLE1.
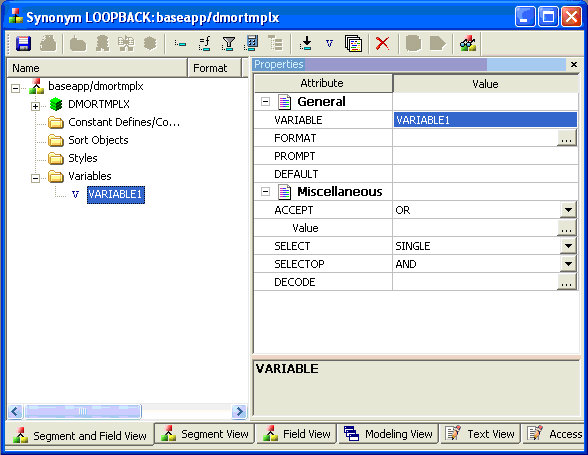
- Double-click the
name and change it to TTABLE. This creates
a global variable in the synonym.
- For DEFAULT, enter
the value dmordbos.
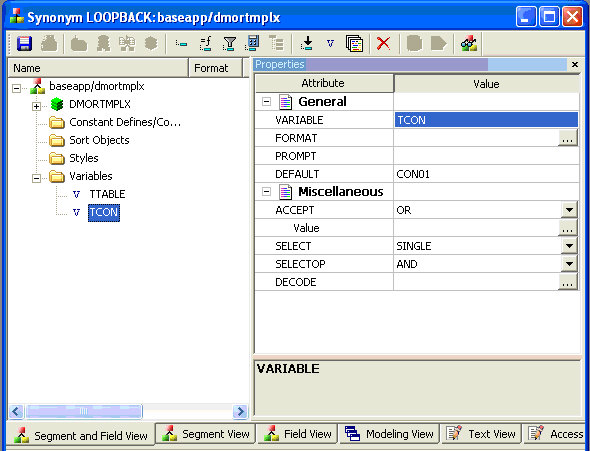
- Right-click
the Variables folder, select Insert and Variable.
- Double-click the
name and change it to TCON. For the DEFAULT, enter the name of your
first database connection, which by the server default would be
CON01.
- Click in
the left pane and the names of the two variables you created are
shown.
- Click the
segment name DMORTMPLX. For TABLENAME, enter
the value &&TTABLE and for CONNECTION,
enter the value &&TCON.
For DEFAULT,
enter the name of your connection, which by default is CON01.
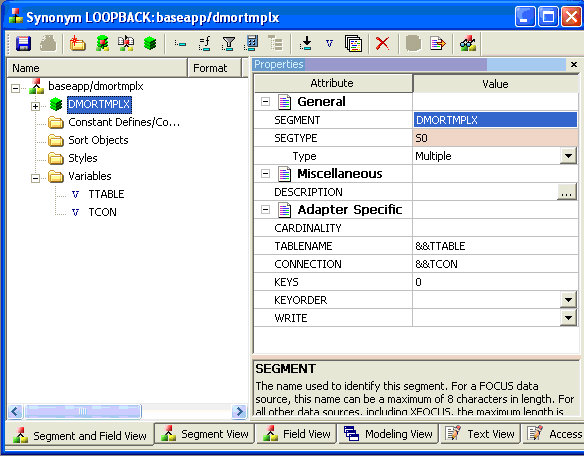
The
synonym is now set up for use with multiple tables.
- Click the Save button
(blue disk icon) to save the synonym.
Example: View Parameter Table
This
example has instructions for viewing the parameter table used in
the other examples here. The parameter table used is a delimited
flat file, but any data source that can be described by a synonym
could be used. The table has three columns, a connection name, a
table name, and a plant name.
The parameter table is automatically
created when you run Create Sample Procedures and Data for the iterator
examples. The connection name is the name of the first connection on
your server for the selected database. In this example, they are
all the same, but different connection names could also be used.
- In the DMC,
expand the ibisamp directory in the navigation
pane.
- Right-click the synonym dmplnts and
select Sample Data.
Tip: If you
do not see synonyms when you expand the ibisamp directory, select
the Synonym filter button located in the
navigation pane toolbar.
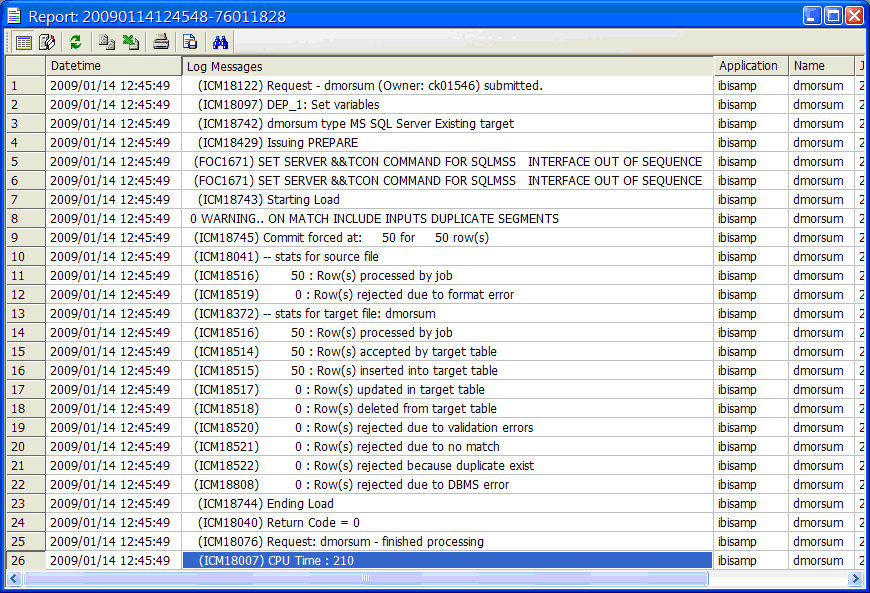
The Sample Data Report opens and
should look like the following image.

Example: Create a Data Flow Using a Parameterized Synonym
This
example has instructions for creating a data flow that uses as a
source a synonym that can be used to read multiple identically formatted
tables.
Refer to the sample flow dmorsum, for the complete
example.
- In the DMC,
right-click an application directory in the navigation pane and chooseNew,
then Flow. A new flow opens.
- Drag a data
source object into the data flow. If you created the synonym, dmortmplx,
you can use it. Otherwise, from the ibisamp application directory,
drag the synonym dmortmpl.
- Right-click
the SQL object and select Column Selection.
The
Column Selection window opens
- Select each
column in the Available Columns list and click the > arrow
to move them into the Selected Columns list. Click OK.
Tip: To
select all the columns, right-click one of them and select Select
All.
- Drag the
target object dmorsum from the ibisamp directory into
the workspace, to the right of the SQL object.
- Right-click
the dmorsum target object and select Target
Transformations.
The Transformations window opens.
- Click the Automap
 button.
- Under target
columns double-click PLANT to add it to the list
of expressions below.
- For the PLANT
expression, enter '&LPLANT' with quotes
as shown. Click OK.
- Click the Process
Flow tab.
- Right-click
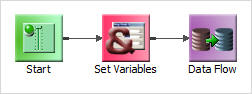
the arrow between Start and Data flow and select Delete.
- Click the Set
Variables
 button
and drag it onto the workflow between the Start and Data Flow icons.
button
and drag it onto the workflow between the Start and Data Flow icons. Then,
right-click the Start icon and drag it to
Set Variables and release.
Finally, right-click Set
Variables and drag the arrow to Data Flow and release.
The
flow will look like the following image.
- Double-click Set
Variables and then in the Value area for List, click
the ellipsis
 button.
 The
Global Parameter Editor window opens.
- Click the Add
Parameter
 button.
 The
Global Variables calculator opens.
- Type over the default
name VAR1 with TCON. In the expression entry
area, type &LCONand then click OK.
- Repeat to
set the global variable, TTABLE to value <ABLE.
When you are done, the Global Parameter Editor window should look
like the following image.
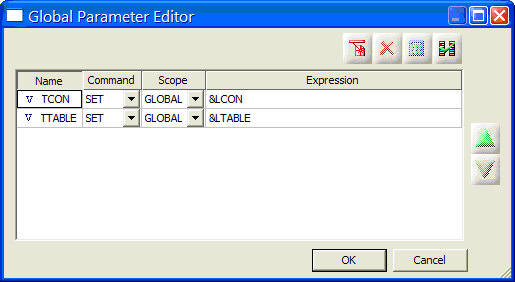
Click OK.
- Click the Save icon
to save the flow. Enter dmorsumx as the flow
name.
Example: Create a Process Flow to Use Parameterized Data Flow
This
example has instructions for creating a process flow that runs a
data flow repeatedly using a source a collection of identically
formatted tables.
Refer to the sample flow dmorsump for the
complete example.
- In the DMC,
right-click an application directory in the navigation pane and choose New,
then Flow.
A new flow opens.
- Click the Process
Flow tab.
- From the
directory where you saved dmorsumx, drag the flow into the workflow area.
- Right-click
the Start icon, drag the arrow to dmorsumx
and release.
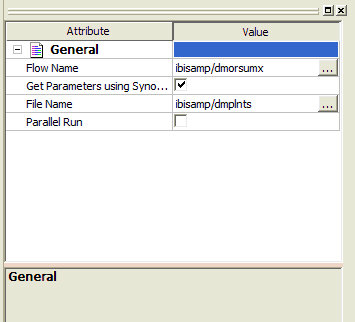
- Right-click dmorsumx and
select Properties.
- Check the
checkbox labeled Get Parameters using Synonym.
- Click the
ellipsis button
in the File Name entry area. In the ibisamp directory, select dmplnts.
The
properties for the flow should look like the following image.
- Click the Save icon
to save the flow. Enter dmorsumpfx as the
flow name.
- To create
the target table, in the ibisamp directory located in the navigation
pane, right-click the table named dmorsum,
select Data Management and then Recreate
DBMS table.
- Click the Run button
and select Submit.
When the flow completes
you should see a message in the console log:
DM: (ICM18763) Request ibisamp/dmorsumpx complete
Example: View Logs for a Parameterized Data Flow
When
a process flow calls a data flow using the iterator multiple logs
are generated. This example shows how to view the logs.
- With the
dmorsumpx process flow open, click the View Last Log
 button.
 The
process flow log opens.
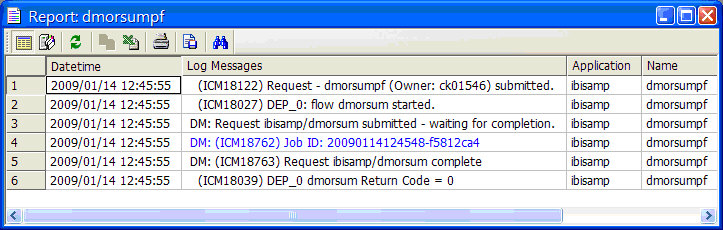
- Click the
blue line with the Job ID.
The iterator log opens. Note that
the Parameters line show the values of each parameter for each run.
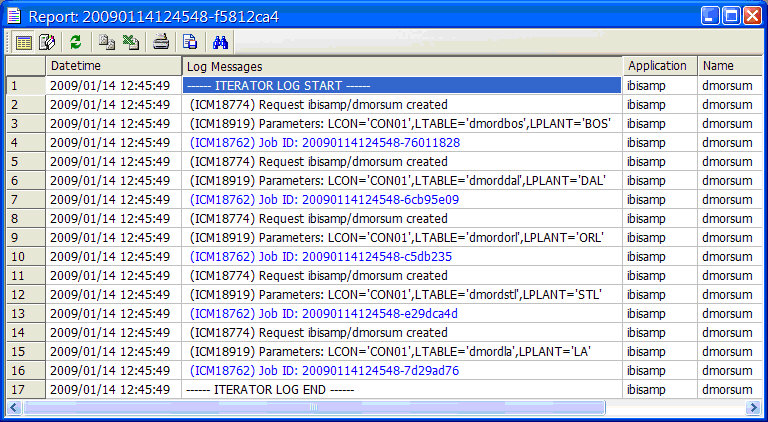
- Click one
of the blue lines with Job IDs. The log for an individual run of
the data flow opens.