Working With Integration Projects

In this section:

An Integration Project is a container of resources used to create your integration solution. The Integration Project helps you organize your resources in a logical manner and provides facilities for working with those resources.

Creating an Integration Project

To create a new Integration Project:

  1. Select File, choose New, and then Integration Project from the main menu.

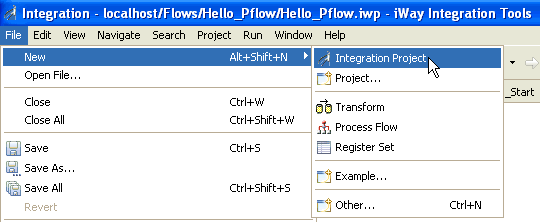
    You can also right-click anywhere within the Integration Explorer view, select New and then Integration Project from the context menu.

    The New Integration Project dialog box opens, as shown in the following image.

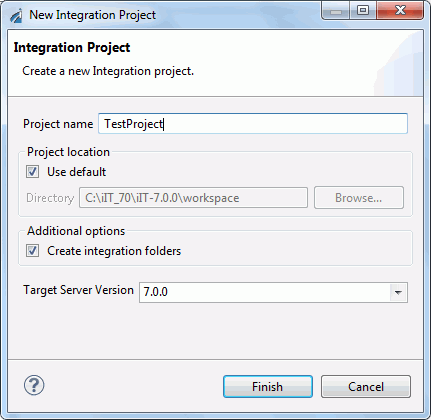
  2. Enter a name for the project in the Project name field (for example, TestProject) and click Finish.

    The new Integration Project (for example, TestProject) appears in the Integration Explorer view, as shown in the following image.

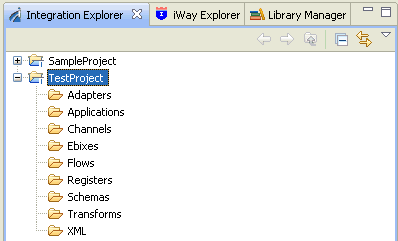
    You will also see other folders that were created to hold different types of resources. These folders are just for your convenience and it is optional to put resources in them.

Changing a Default Export Location

To change the default export location for a resource type:

  1. Select the Integration Project that you wish to change and right-click to open the context menu.
  2. Select Properties. The properties for the Integration Project opens.
  3. Expand the iWay Integration > Export Folders branch of the iWay Integration properties category.
  4. Click the folder in the Default Folder column for the type that you wish to change. An ellipsis (...) will appear that allows you to browse the project's folders and pick a new default location.
  5. Click Apply.
  6. Click OK to close the properties page.

Adding a Customization to an Integration Project

To add a customization to an Integration Project:

  1. Select the Integration Project that you wish to contain the Customization and right-click to open the context menu.
  2. Select Properties. The properties for the Integration Project opens.
  3. Expand the iWay Integration > Customization branch of the iWay Integration properties category.
  4. Add a JAR from the workspace using the Add JARs. button, link a JAR from the local file system using the Add External JARs... button, or use the Add Class Folder to link classes from another project.
  5. Click Apply. The Java content will be added to the Integration Projects customization classpath.
  6. Click OK to close the properties page.

Tip: If the customization you are working with has dependencies they can be added using the Dependencies tab in the same manner.

Searching Process Flows

How to:

Using the Search feature, you can search for specific terms within process flows in your Integration Projects. This feature is also useful when searching for items, such as Special Register (SREG) names and other parameters.

Procedure: How to Search Across Process Flows

To search across process flows:

  1. Click the Search icon in the toolbar, as shown in the following image.

    You can also click the down arrow to the right of the Search icon and select Process Flow Search, as shown in the following image.

    The Search dialog opens and displays the Process Flow Search tab, as shown in the following image.

  2. Enter your search term in the Search criteria field and select any of the following options, if you want to refine your search results:
    • Case Sensitive
    • Sub-string
    • Regular Expression
  3. Click Search.

    Search results within available process flows in your Integration Project are displayed, as shown in the following image.


iWay Software