Creating and Using a Master File Profile
|
How to: |
|
Reference: |
This release introduces a profile that you can reference in the Master File and is executed during Master File processing. The Master File profile (MFD_PROFILE) is a FOCEXEC that suspends processing of the Master File for a request, executes, and then returns to processing of the Master File. The profile can be used for many purposes but is especially useful for:
- Setting the values of global variables defined in the Master File.
- Creating a lookup file for Master File DEFINE commands or DBA attributes.
- Dynamically creating a DBA rule for the connected user by reading an external table of entitlements.
- Dynamically creating
a DBAFILE, which can be derived from an external data source and
used to restrict access during execution of any request that references
the Master File.
Note: You can also create a DBA rule dynamically in the Master File for a specific user without having to create a DBAFILE with rules for all users.
Syntax: How to Invoke a Master File Profile
Add the MFD_PROFILE attribute to the FILE declaration in the Master File:
FILE = filename, SUFFIX = suffix, MFD_PROFILE = app/fexname,$
where:
- filename
-
Is any valid file name.
- suffix
-
Is the suffix value that specifies the file type described by the Master File. MFD_PROFILE is supported for any file type.
- app
-
Is the name of the application containing the FOCEXEC to be executed. Specifying the application name ensures that the correct version of the profile is executed, in case there is another FOCEXEC with the same name higher on the application path.
- fexname
-
Is the name of the MFD_PROFILE FOCEXEC.
Reference: Usage Notes for MFD_PROFILE
- The MFD_PROFILE is
executed for every TABLE, TABLEF, MATCH, GRAPH, CREATE, DEFINE,
CHECK, ?F, and ?FF request against a Master File that contains the
MFD_PROFILE attribute.
In a MATCH request or a request using MORE, all of the MFD_PROFILE procedures specified in any of the Master Files involved in the request will be executed prior to the request. The profiles will execute in the reverse of their order in the request (the profile for the Master File mentioned last in the request executes first).
- The MFD_PROFILE is not executed as a result of the MODIFY, MAINTAIN, or -READFILE commands.
- If multiple MFD_PROFILEs set values for the same global variables, the resulting variable values will depend on the order in which the profile procedures run.
- In a join between multiple Master Files that have MFD_PROFILE attributes, the profiles will all be executed.
- The name of the calling Master File is passed as the first parameter (&1) to the MFD_PROFILE procedure.
- If the MFD_PROFILE contains sensitive information, it should be encrypted. If it creates a file (such as a DBAFILE) that contains sensitive information, that file should also be encrypted.
- If the MFD_PROFILE
is not on the application path, the following warning message will
be issued.
FOC(36373) WARNING: MFD_PROFILE DOES NOT EXIST
If you want the lack of the profile to terminate processing, turn the ERROROUT parameter to ON.
- The MFD_PROFILE procedure
should not issue a request against its calling Master File, unless
you add a counter to make sure it executes only once. Otherwise,
an infinite loop will result. If there is a reason why the MFD_PROFILE
needs to execute a request against itself, add a global Dialogue
Manager variable as a counter to make sure it is executed only once,
as shown in the following sample.
-DEFAULT &&COUNTER=1;
-IF &&COUNTER EQ 1 THEN GOTO START;
-SET &&COUNTER= 2;
-GOTO DONE
-START
MFD_PROFILE request against same Master as original request END
-SET &&COUNTER=2;
-DONE
The first time the MFD_PROFILE is invoked, &&COUNTER is set to 1, so the part of the MFD_PROFILE request that references the same Master File is executed, and &&COUNTER is set to 2. Since executing this request references the Master with the MFD_PROFILE, it is invoked again. However, since &&COUNTER will now be 2, the MFD_PROFILE request will branch around the part that once again references the same Master File, preventing the MFD_PROFILE from being invoked in an infinite loop.
- A request against a Business View will invoke the MFD_PROFILE from the original Master File.
- If the MFD_PROFILE creates a DBAFILE, an initial DBAFILE specifying authorized users and any restrictions at the SEGMENT or FIELD level must exist prior to using commands other than TABLE, TABLEF, GRAPH or MATCH. The initial DBAFILE may be created without VALUE restrictions. When the actual TABLE request runs, or you click Run from a tool, the MFD_PROFILE procedure is executed, and VALUE restrictions are applied.
- Be careful not to issue any command that affects the environment that was established prior to executing the MFD_PROFILE. For example, if the MFD_PROFILE establishes any joins that you want to clear before exiting the MFD_PROFILE, give those joins unique names and issue a JOIN CLEAR command that clears only those joins. Do not issue the JOIN CLEAR * command as that will clear any joins established prior to executing the MFD_PROFILE.
Example: Creating a Lookup File and Setting a Global Variable Using an MFD_PROFILE
The following version of the EMPDATA Master File:
- Specifies an MFD_PROFILE named DDBAEMP.
- Defines a variable to be used as the TITLE attribute for the PIN field.
- Defines the fields TYPE_EMP and EMP_TYPE to classify employees as full-time or part-time based on the values in the JOBS lookup file.
- Has DBA restrictions. For user HR3, the VALUE clause does a lookup of values in the JOBS lookup file.
The edited EMPDATA Master File is
FILENAME=EMPDATA, SUFFIX=FOC, MFD_PROFILE=baseapp/DDBAEMP,$
VARIABLE NAME = Emptitle, USAGE=A30, DEFAULT=EMPID,$
SEGMENT=EMPDATA,SEGTYPE=S0, $
 FIELDNAME=PIN   , ALIAS=ID, USAGE=A9, INDEX=I,   TITLE='&&Emptitle',$
 FIELDNAME=LASTNAME,     ALIAS=LN,       FORMAT=A15,             $
 FIELDNAME=FIRSTNAME,    ALIAS=FN,       FORMAT=A10,             $
 FIELDNAME=MIDINITIAL,   ALIAS=MI,       FORMAT=A1,              $
 FIELDNAME=DIV,          ALIAS=CDIV,     FORMAT=A4,              $
 FIELDNAME=DEPT,         ALIAS=CDEPT,    FORMAT=A20,             $
 FIELDNAME=JOBCLASS,     ALIAS=CJCLAS,   FORMAT=A8,              $
 FIELDNAME=TITLE,        ALIAS=CFUNC,    FORMAT=A20,             $
 FIELDNAME=SALARY,       ALIAS=CSAL,     FORMAT=D12.2M,          $
 FIELDNAME=HIREDATE,     ALIAS=HDAT,     FORMAT=YMD,             $
$
DEFINE AREA/A13=DECODE DIV (NE 'NORTH EASTERN' SE 'SOUTH EASTERN'
CE 'CENTRAL' WE 'WESTERN' CORP 'CORPORATE' ELSE 'INVALID AREA');$
DEFINE TYPE_EMP/I1 = DECODE JOBCLASS(JOBS ELSE 1);,$
DEFINE EMP_TYPE/A10 = IF TYPE_EMP EQ 1
          THEN 'FULL_TIME'  ELSE 'PART_TIME';
END
DBA=USERD,$
USER=USER1,ACCESS=R,RESTRICT=FIELD,NAME=SALARY,$
USER=USER2,ACCESS=R,RESTRICT=VALUE,NAME=SYSTEM,
                VALUE=DEPT EQ SALES OR MARKETING,$
USER=HR1,ACCESS=R,RESTRICT=VALUE,NAME=SYSTEM,
            VALUE=SALARY FROM 20000 TO 35000,$
USER=HR2,ACCESS=R,RESTRICT=VALUE,NAME=EMPDATA,VALUE=SALARY GT 0,$
USER=HR3,ACCESS=R,RESTRICT=VALUE,NAME=SYSTEM,VALUE=JOBCLASS EQ (JOBS),$
The DDBAEMP procedure sets a value for the global variable &&Emptitle and creates the JOBS lookup file:
DYNAM ALLOC DD JOBS DA USER1.JOBS.FTM SHR REU
-RUN
-SET &&Emptitle = 'Employee ID';
TABLE FILE JOBLIST
PRINT JOBCLASS
WHERE JOBDESC  CONTAINS '2ND' OR '3RD'
ON TABLE HOLD AS JOBS
END
The following request against the EMPDATA data source allocates the JOBS file and sets the user password to HR3. The EMP_TYPE field and the DBA VALUE restriction for user HR3 use the JOBS file created by the MFD_PROFILE as a lookup table:
DYNAM ALLOC DD JOBS DA USER1.JOBS.FTM SHR REU
-SET &PASS = 'HR3';
SET PASS = &PASS
-RUN
TABLE FILE EMPDATA
" Password used is &PASS "
" "
"USER1 -- Can't see Salary, reject request"
"USER2 -- Can see Sales and Marketing departments only"
"HR1   -- Can see salaries from 20 TO 35 K "
"HR2   -- Can see everyone "
"HR3   -- Can see Part Time only "
" "
PRINT PIN SALARY DEPT EMP_TYPE
ON TABLE HOLD FORMAT HTMLON TABLE SET PAGE NOPAGE
ON TABLE SET STYLE *
TYPE=REPORT, GRID=OFF, FONT=ARIAL,$
END
On the output, the column title for the PIN field is the value of the &&Emptitle variable set in the MFD_PROFILE procedure, and the JOBS file created by the profile was used in limiting the report output to Part Time employees, which are the only ones user HR3 is allowed to see:
Example: Creating a DBAFILE Using an MFD_PROFILE
The following version of the EMPDATA Master File specifies an MFD_PROFILE named DDEMP2 and a DBAFILE named DBAEMP2. The MFD_PROFILE will create the DBAFILE by reading security attributes from a sequential file named security.data.
The Master File is:
FILENAME=EMPDATA, SUFFIX=FOC, MFD_PROFILE=DDEMP2,$
SEGMENT=EMPDATA,SEGTYPE=S0, $
 FIELDNAME=PIN   , ALIAS=ID, USAGE=A9, INDEX=I,   TITLE='Employee Id',$
 FIELDNAME=LASTNAME,     ALIAS=LN,       FORMAT=A15,             $
 FIELDNAME=FIRSTNAME,    ALIAS=FN,       FORMAT=A10,             $
 FIELDNAME=MIDINITIAL,   ALIAS=MI,       FORMAT=A1,              $
 FIELDNAME=DIV,          ALIAS=CDIV,     FORMAT=A4,              $
 FIELDNAME=DEPT,         ALIAS=CDEPT,    FORMAT=A20,             $
 FIELDNAME=JOBCLASS,     ALIAS=CJCLAS,   FORMAT=A8,              $
 FIELDNAME=TITLE,        ALIAS=CFUNC,    FORMAT=A20,             $
 FIELDNAME=SALARY,       ALIAS=CSAL,     FORMAT=D12.2M,          $
 FIELDNAME=HIREDATE,     ALIAS=HDAT,     FORMAT=YMD,             $
$
DEFINE AREA/A13=DECODE DIV (NE 'NORTH EASTERN' SE 'SOUTH EASTERN'
CE 'CENTRAL' WE 'WESTERN' CORP 'CORPORATE' ELSE 'INVALID AREA');$
END
DBA=USERD,DBAFILE=DBAEMP2,$
The file with the security attributes (security.data) follows. The security attributes are the USER, ACCESS, RESTRICT, NAME, and VALUE attributes:
USER1       R   NOPRINT     SALARY
USER2       R   VALUE       SYSTEM  DEPT EQ SALES OR MARKETING
HR1         R   VALUE       SYSTEM  SALARY FROM 20000 TO 35000
HR1         W   SEGMENT     EMPDATA
HR2         R   VALUE       EMPDATA SALARY GT 0
According to these attributes, a user with the password:
- USER1 cannot print the values in the SALARY field.
- USER2 can only see the SALES and MARKETING departments.
- HR1 can only see salaries from 20000 to 35000. HR1 can also write to the EMPDATA segment.
- HR2 can see everything in the EMPDATA segment.
The DDEMP2 profile procedure:
- Uses the Dialogue
Manager command -WRITE to write records into the DBAEMP2 Master
File. It first writes the FILE declaration, a SEGMENT declaration,
a FIELD declaration, the END declaration that starts the DBA section
of the Master File, and the DBA password (which must be the same
as the DBA password in the EMPDATA Master File).
The rest of the DBA section will be created by reading each record from the security.data file and writing a corresponding DBA record to the DBAEMP2 Master File.
- Uses the Master File name passed as argument &1 to write a FILE declaration for the EMPDATA Master File, which will then be followed by the DBA declarations specific to that Master File.
- Loops to read each record in the security.data file using the Dialogue Manager command -READFILE. It checks if there is a RESTRICT attribute and, if so, checks if it has a VALUE attribute. Depending on which attributes are present, it writes a record to the DBAEMP2 Master File.
The DDEMP2 profile procedure follows:
-* FILEDEF the input security.data file (Windows)
FILEDEF SECURITY DISK c:\ibi\apps\baseapp\security.data (LRECL 81
-* DYNAM the output DBAEMP2 Master File and the input file (z/OS)
DYNAM OUTFI DA USER1.DBAEMP2.MASTER SHR REU
DYNAM SECURITY DA USER1.SECURITY.DATA SHR REU
-RUN
-* Write out the first part of the DBAEMP2 Master File
-WRITE OUTFI FILE=DBAEMP2,SUFFIX=FIX,$
-WRITE OUTFI SEGNAME=ONE,SEGTYPE=S0
-WRITE OUTFI FIELD=ONE,,A1,A1,$
-WRITE OUTFI END
-WRITE OUTFI DBA=USERD,$
-* Write out a FILE declaration for the calling Master File, passed as &1
-WRITE OUTFI FILE=&1,$
-* Initialize the variables to be read from the security.data file
-SET &USER=' ';
-SET &ACCESS=' ';
-SET &RESTRICT=' ';
-SET &NAME = ' ';
-SET &VALUE = ' ';
-* Establish the loop for each record of the security.data file
-SET &DONE =  N ;
-REPEAT ENDLP WHILE &DONE EQ N ;
-* Read a record from security.data
-READFILE SECURITY
-* Check if the end of the security.data file was reached and,
-*   if so, branch out of the loop
-SET &DONE =  IF &IORETURN EQ 1 THEN 'Y' ELSE 'N';
-IF &DONE EQ 'Y' GOTO ENDLP1;
-* If there is a RESTRICT attribute, go to the label -CHKSTR.
-IF &RESTRICT NE ' ' THEN GOTO CHKRSTR;
-* If there is no RESTRICT attribute,
-*  write the USER and ACCESS attributes, and loop for the next record
-WRITE OUTFI USER=&USER , ACCESS=&ACCESS ,$
-GOTO ENDLP
-CHKRSTR
-* If there is a RESTRICT attribute, check if it has a VALUE attribute
-* and, if so, go to the label -CHKVAL
-IF &VALUE NE ' ' THEN GOTO CHKVAL;
-* If there is no VALUE attribute,
-*  write USER, ACCESS, RESTRICT, and NAME, and loop for next record
-WRITE OUTFI USER=&USER, ACCESS=&ACCESS, RESTRICT=&RESTRICT, NAME=&NAME,$
-GOTO ENDLP
-CHKVAL
-* If there is a VALUE attribute, write out USER, ACCESS, RESTRICT,
-*  NAME, and VALUE, and loop for next record
-WRITE OUTFI  USER=&USER, ACCESS=&ACCESS,RESTRICT=&RESTRICT,NAME=&NAME, VALUE = &VALUE ,$
-ENDLP
-ENDLP1
When run, this procedure creates the following DBAFILE:
FILE=DBAEMP2,SUFFIX=FIX,$
SEGNAME=ONE,SEGTYPE=S0
  FIELD=ONE,,A1,A1,$
END
DBA=USERD,$
FILE=EMPDATA,$
USER=USER1,ACCESS=R,RESTRICT=NOPRINT,NAME=SALARY   ,$
USER=USER2, ACCESS=R, RESTRICT=VALUE, NAME=SYSTEM,
  VALUE=DEPT EQ SALES OR MARKETING ,$
USER=HR1,   ACCESS=R, RESTRICT=VALUE, NAME=SYSTEM,
  VALUE = SALARY FROM 20000 TO 35000,$
USER=HR1,   ACCESS=W, RESTRICT=SEGMENT, NAME=EMPDATA  ,$
USER=HR2,   ACCESS=R, RESTRICT=VALUE, NAME=EMPDATA,
  VALUE = SALARY GT 0 ,$
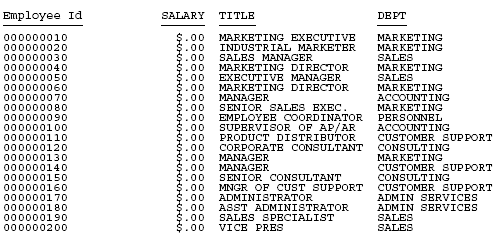
The following request prints the PIN, SALARY, TITLE, and DEPT fields from EMPDATA:
TABLE FILE EMPDATA
PRINT SALARY TITLE DEPT
BY PIN
WHERE PIN GE '000000010'  AND PIN LE  '000000200'
ON TABLE SET PAGE NOPAGE
ON TABLE HOLD FORMAT PDF
END
To run the request, you must first set a valid user password. The MFD_PROFILE procedure will be run first and will create the dbaemp2.mas DBAFILE.
Running the request by first issuing the SET PASS=USER1 command produces the following report in which the salaries display as zeros because of the RESTRICT=NOPRINT attribute for the SALARY field:
Running the request by first issuing the SET PASS=USER2 command produces the following report in which only the SALES and MARKETING departments display because of the VALUE restriction for the DEPT field:

Running the request by first issuing the SET PASS=HR1 command produces the following report in which only the salaries between 20000 and 35000 display because of the VALUE restriction for the DEPT field:

Example: Creating a Dynamic DBA Rule in a Master File
The sequential data source named VALTEST.DATA contains a list of user names and their associated value restrictions:
SALLY               CURR_SAL LT 20000
JOHN                DEPARTMENT EQ PRODUCTION
TOM                 CURR_SAL GE 20000
Before reading this file, you must FILEDEF or allocate it:
FILEDEF VALTEST DISK baseapp/valtest.data
Or, on z/OS:
DYNAM ALLOC DD VALTEST DA USER1.VALTEST.DATA SHR REU
The following Master File named EMPDBA is a view of the EMPLOYEE data source. It has a DBA section that uses the global variable &&UID for the USER attribute and the global variable &&VAL for the value test against the EMPINFO segment. It also identifies a Master File profile named DBAEMP3. This profile will obtain the user ID of the connected user and find the correct VALUE restriction by reading the VALTEST.DATA file. By setting the global variables to the correct values, it will insert the appropriate DBA rule into the Master File.
FILENAME=EMPLOYEE, SUFFIX=FOC, MFD_PROFILE=DBAEMP3,$
VARIABLE NAME=&&UID, USAGE=A8 , $
VARIABLE NAME=&&VAL, USAGE=A25, $

SEGNAME=EMPINFO,  SEGTYPE=S1
 FIELDNAME=EMP_ID,       ALIAS=EID,     FORMAT=A9,       $
 FIELDNAME=LAST_NAME,    ALIAS=LN,      FORMAT=A15,      $
 FIELDNAME=FIRST_NAME,   ALIAS=FN,      FORMAT=A10,      $
 FIELDNAME=HIRE_DATE,    ALIAS=HDT,     FORMAT=I6YMD,    $
 FIELDNAME=DEPARTMENT,   ALIAS=DPT,     FORMAT=A10,      $
 FIELDNAME=CURR_SAL,     ALIAS=CSAL,    FORMAT=D12.2M,   $
 FIELDNAME=CURR_JOBCODE, ALIAS=CJC,     FORMAT=A3,       $
 FIELDNAME=ED_HRS,       ALIAS=OJT,     FORMAT=F6.2,     $
END
DBA=DBAUSER1,$
USER=&&UID,ACCESS=R,RESTRICT=VALUE,NAME=EMPINFO,VALUE=&&VAL,$
The following is the MFD_PROFILE procedure:
SET MESSAGE = OFF
-SET &VALUETEST = 'NOTFOUND';
-* Find the user ID of the connected user
-SET &&UID = GETUSER('A20');
-SET &&UID = TRUNCATE(&&UID);
-* Create a HOLD file with the value test for the connected user
TABLE FILE VALTEST
PRINT VALUETEST
WHERE USERNAME EQ '&&UID'
ON TABLE HOLD AS USERVAL FORMAT ALPHA
END
-RUN
-READ USERVAL &VALUETEST.A30
-* If the user name was not in the file, type a message and exit
-IF &VALUETEST NE 'NOTFOUND' GOTO SETVALUE;
-TYPE USER WASN'T THERE
-EXIT
-SETVALUE
-* Set the global variable for the value test to the correct test
-SET &&VAL = ''|&VALUETEST||'';
-* Set the USER parameter to the user ID of the connected user
SET USER = &&UID
The following request displays a report against the EMPDBA view of the EMPLOYEE data source:
USE
EMPLOYEE AS EMPDBA
END
-RUN
TABLE FILE EMPDBA
PRINT LN FN CURR_SAL
BY DEPARTMENT
ON TABLE SET PAGE NOPAGE
END
Running the request when SALLY is the connected user produces a report of employees whose salaries are less than $20,000:
DEPARTMENT  LAST_NAME        FIRST_NAME         CURR_SAL
----------  ---------        ----------         --------
MIS         SMITH            MARY             $13,200.00
            JONES            DIANE            $18,480.00
            MCCOY            JOHN             $18,480.00
            GREENSPAN        MARY              $9,000.00
PRODUCTION  STEVENS          ALFRED           $11,000.00
            SMITH            RICHARD           $9,500.00
            MCKNIGHT         ROGER            $16,100.00
Running the request when TOM is the connected user produces a report of employees whose salaries are greater than or equal to $20,000:
DEPARTMENT  LAST_NAME        FIRST_NAME         CURR_SAL
----------  ---------        ----------         --------
MIS         BLACKWOOD        ROSEMARIE        $21,780.00
            CROSS            BARBARA          $27,062.00
PRODUCTION  BANNING          JOHN             $29,700.00
            IRVING           JOAN             $26,862.00
            ROMANS           ANTHONY          $21,120.00
Running the request when JOHN is the connected user produces a report that includes only the PRODUCTION department:
DEPARTMENT  LAST_NAME        FIRST_NAME         CURR_SAL
----------  ---------        ----------         --------
PRODUCTION  STEVENS          ALFRED           $11,000.00
            SMITH            RICHARD           $9,500.00
            BANNING          JOHN             $29,700.00
            IRVING           JOAN             $26,862.00
            ROMANS           ANTHONY          $21,120.00
            MCKNIGHT         ROGER            $16,100.00